How Can We Help?
UpsellMaster Setup & Documentation
This documentation covers the setup and installation of the UpsellMaster Plugin. With this WordPress Upsell Plugin, you’ll be going to enjoy automatic upselling on your website saving you more time for other important things to work on. Read the complete information of this plugin right here.
Once you acquire a copy of this plugin, just follow the steps below on how to set up and install properly for it to work on your web store. Moreover, it is very simple and fast, so you don’t have to worry!
Table of Contents
(1) Plugin Purpose
(2) How to Install?
(3) Upsells Summary
(5) Upsell Analytics
(6) Upsells Widget
(10) Preferred and Exclude Product Upsells
(11) Campaigns
(13) Hooks
(14) Displaying Upsells
(16) Settings Page
Plugin Purpose
The UpsellMaster Plugin uses a data-driven algorithm to automatically calculate suitable Upsell Candidates for each product. You can modify how your algorithm works so that you can continuously optimize your Upsell Strategy. Save hours of manual work by using this plugin which calculates the best possible Upsell Candidates for you.
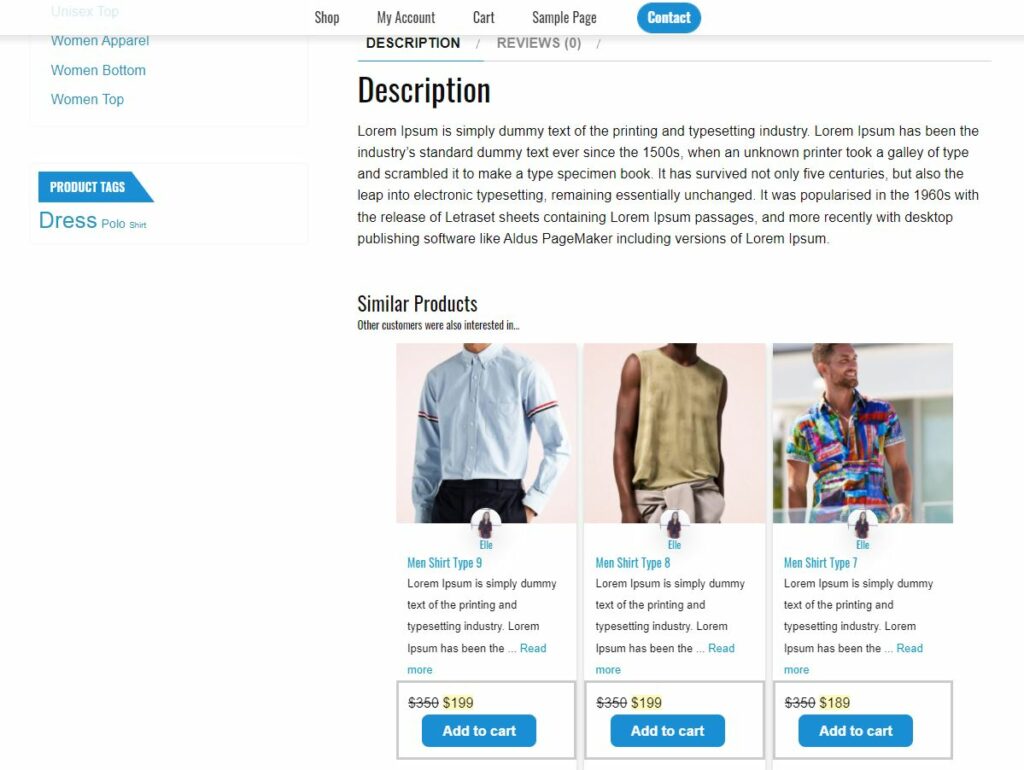
How to install UpsellMaster WordPress plugin?
1. First, install the UpsellMaster Plugin on your Easy Digital Downloads WordPress website. You can either upload the plugin via File upload or via FTP into the plugin folder. After that, don’t forget to Activate the plugin on the Plugins Page.

2. After that, the plugin will automatically calculate product Upsells for you. Just go to Upsells > Products > Recalculate All Upsells.
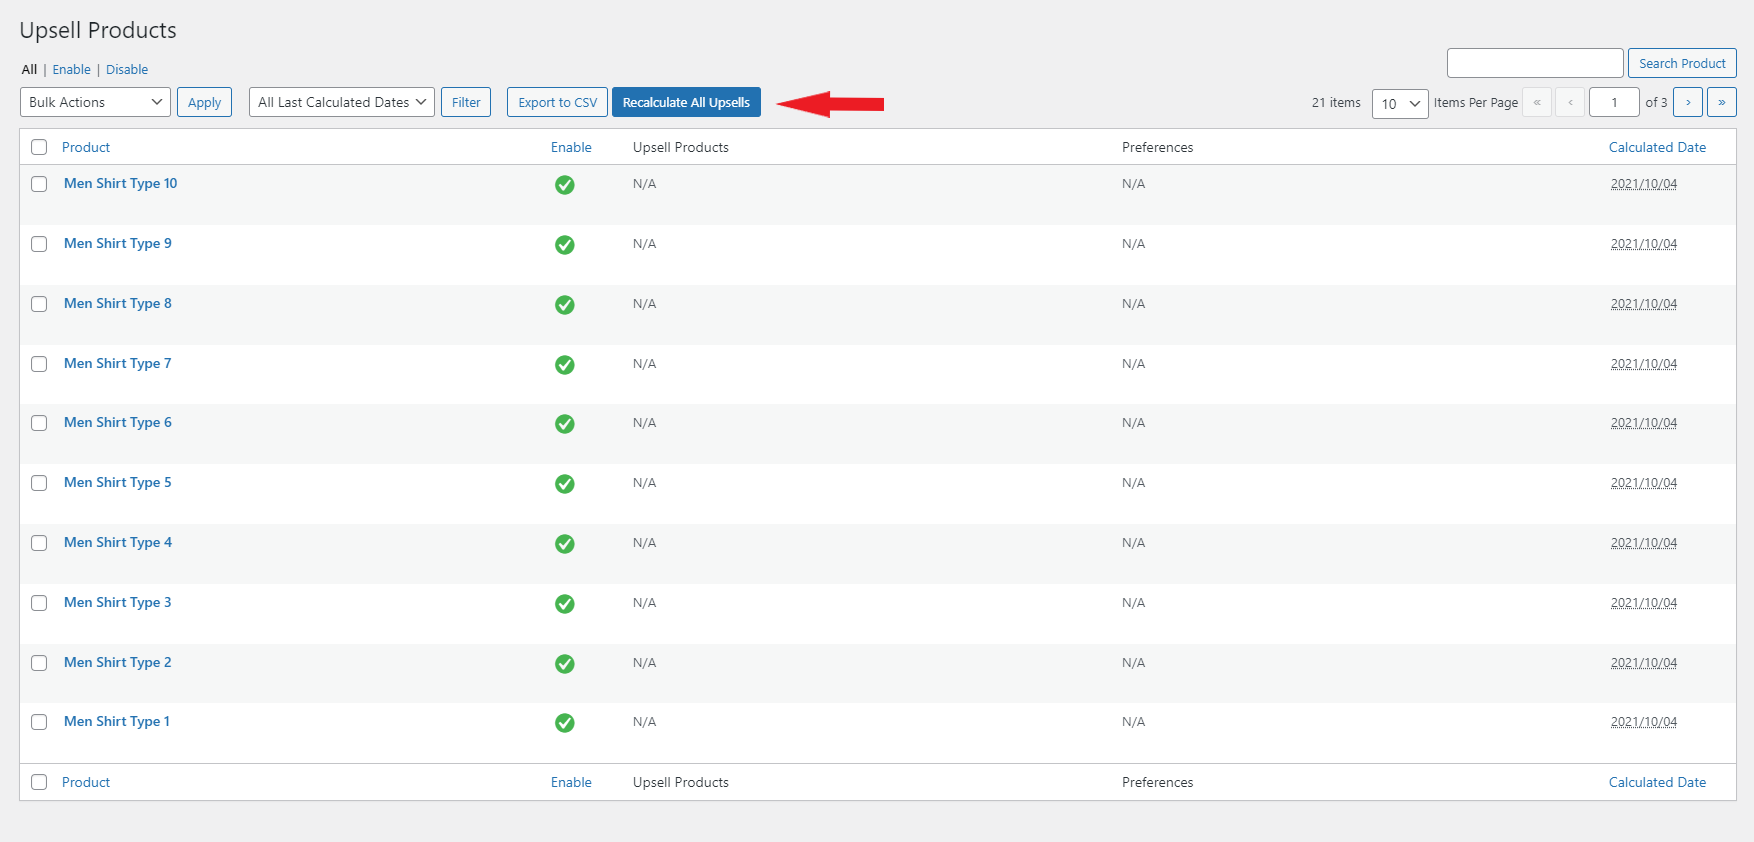
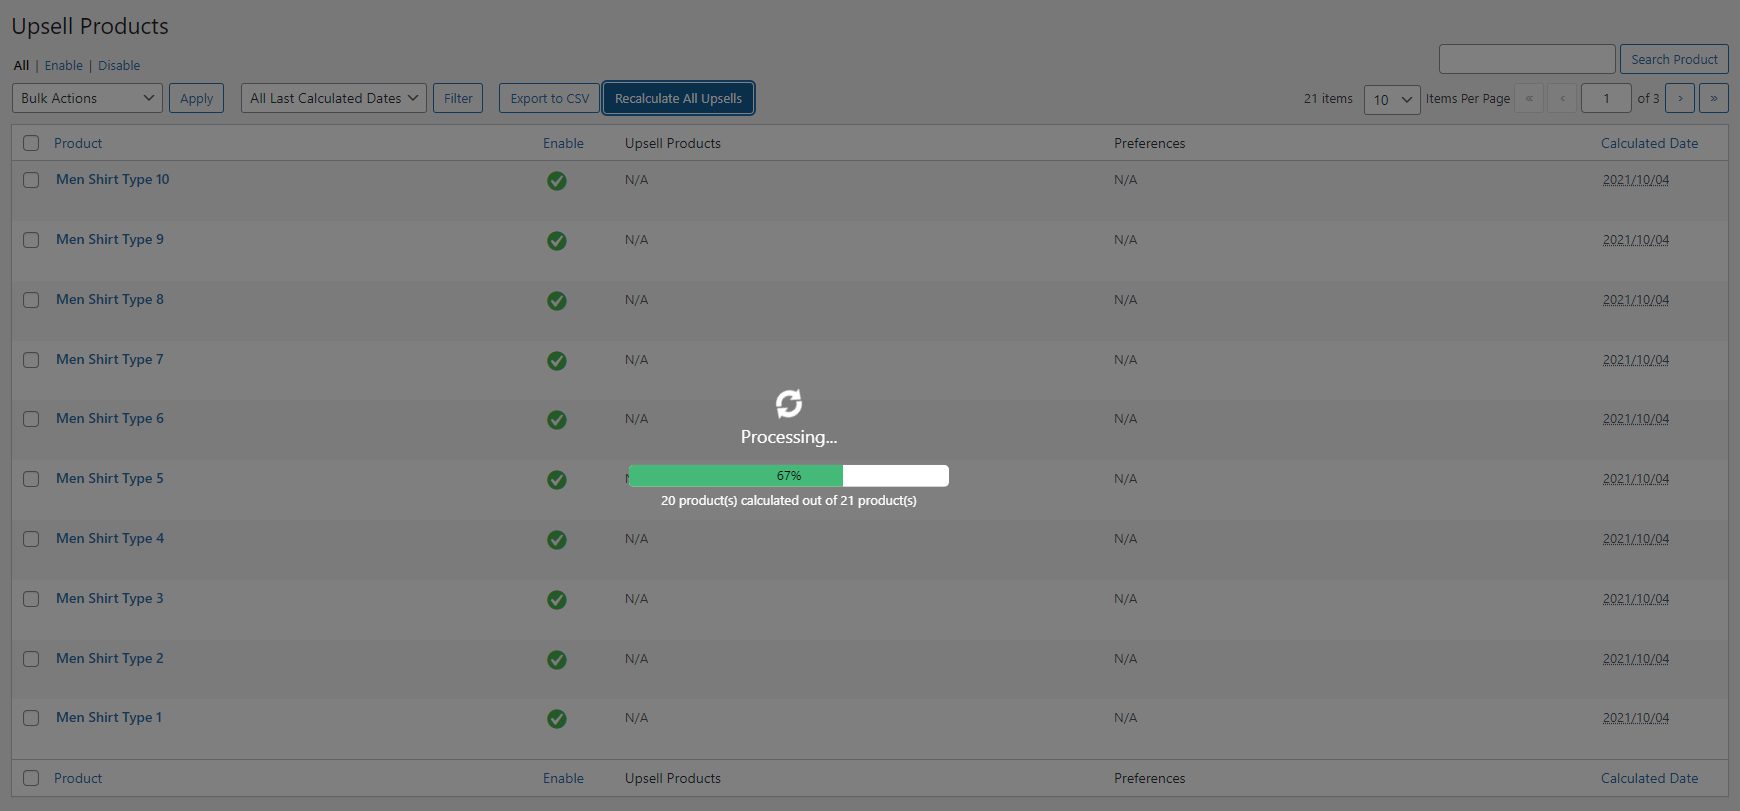
3. You can go to Upsells > Settings to fine-tune your strategy then Recalculate again if needed. Take note that for large servers, calculating upsells can consume a lot of resources, in that case, reduce the batch size to avoid time-out errors. You can do this by going to Upsells > Settings > General Settings > Batch Size.
Upsells Summary
This Upsell WordPress Plugin comes with a very informative Upsells Summary. It basically contains important values and information that will help you in strategizing and optimizing your Upsells.
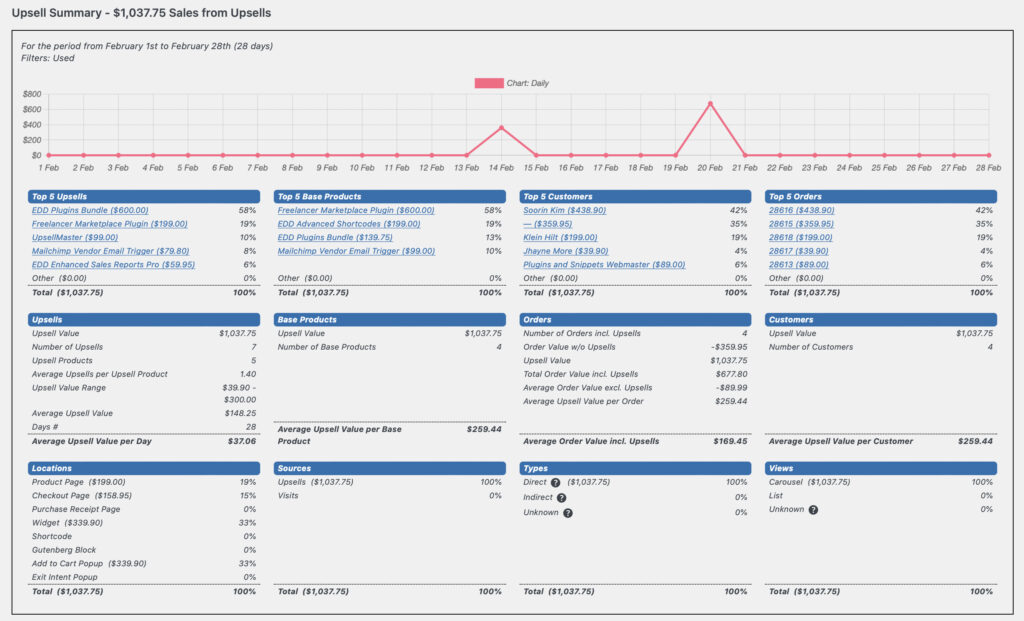
The following are the key informations you can get out of this Summary Report:
Upsells
- Total Upsell Value
- Total Number of Upsells Sold
- Upsell Value Range
- Average Upsell Value
- Average Upsell Value per Day
Products
- Total Products Sold
- Number of Base Products Sold
- Average Upsell Value per Base Product
- Average Upsell Value per Product Sold
Orders
- Number of Orders Received
- Total Order Value
- Average Order Value
Customers
- Number of Customers
- Total Customer Lifetime Sales
- Average Customer Lifetime Value
Top 5
- Upsells
- Base Products
- Customers
- Orders
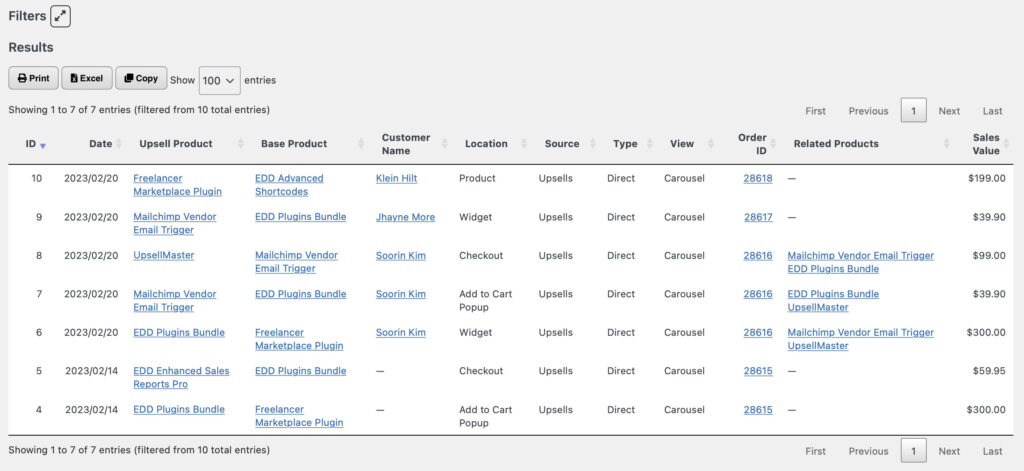
Further below on the same page, you can also see a complete list of all Upsells Sold, along with details such as the Base Product, Customer Name, Location, Payment ID, Related Products, Sales Value, and Date.
Why keeping track of the Location? An important thing to keep note of is the location where the upsell product has been purchased. This only indicates the best location the customer is willing to put another product on his/her cart for purchase.
Lastly, Site Admins can Print, Export to Excel, and Copy this Upsells Summary List by clicking on the buttons above the list, for future reference and purposes.
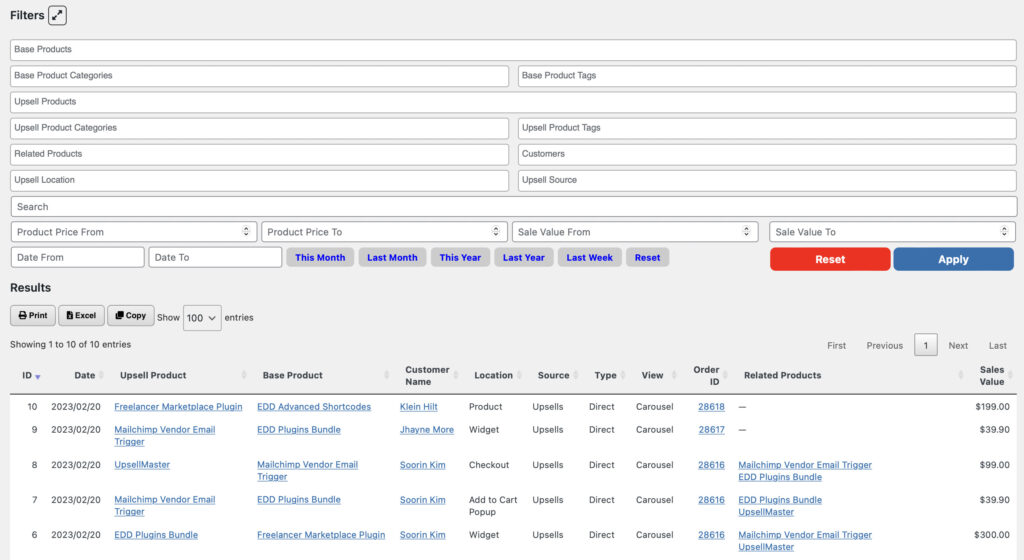
You can filter out the Upsells Summary using our extensive Filters List below. Here is the list of all filters you can apply on the Upsells Summary:
- Base Product / Product Categories & Tags
- Upsell Product / Upsell Product Categories and Tags
- Related Products
- Customers
- Upsell Location / Source
- Search
- Product Price From and To
- Sales Value From and To
- Date From and To
- Time Period: This Month, Last Month, This Year, Last Year, Last Week
Upsells Product List
This page basically shows a list of all your products alongside the Upsells automatically generated to each.
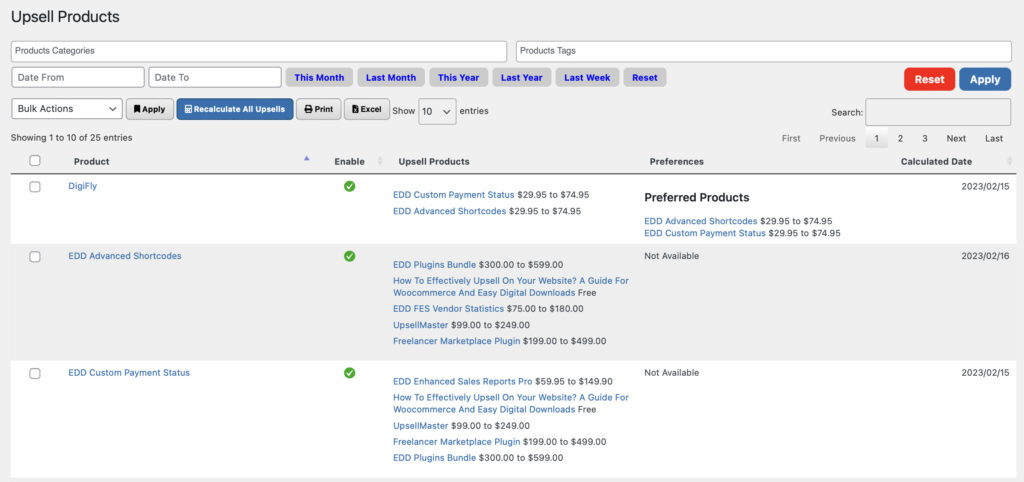
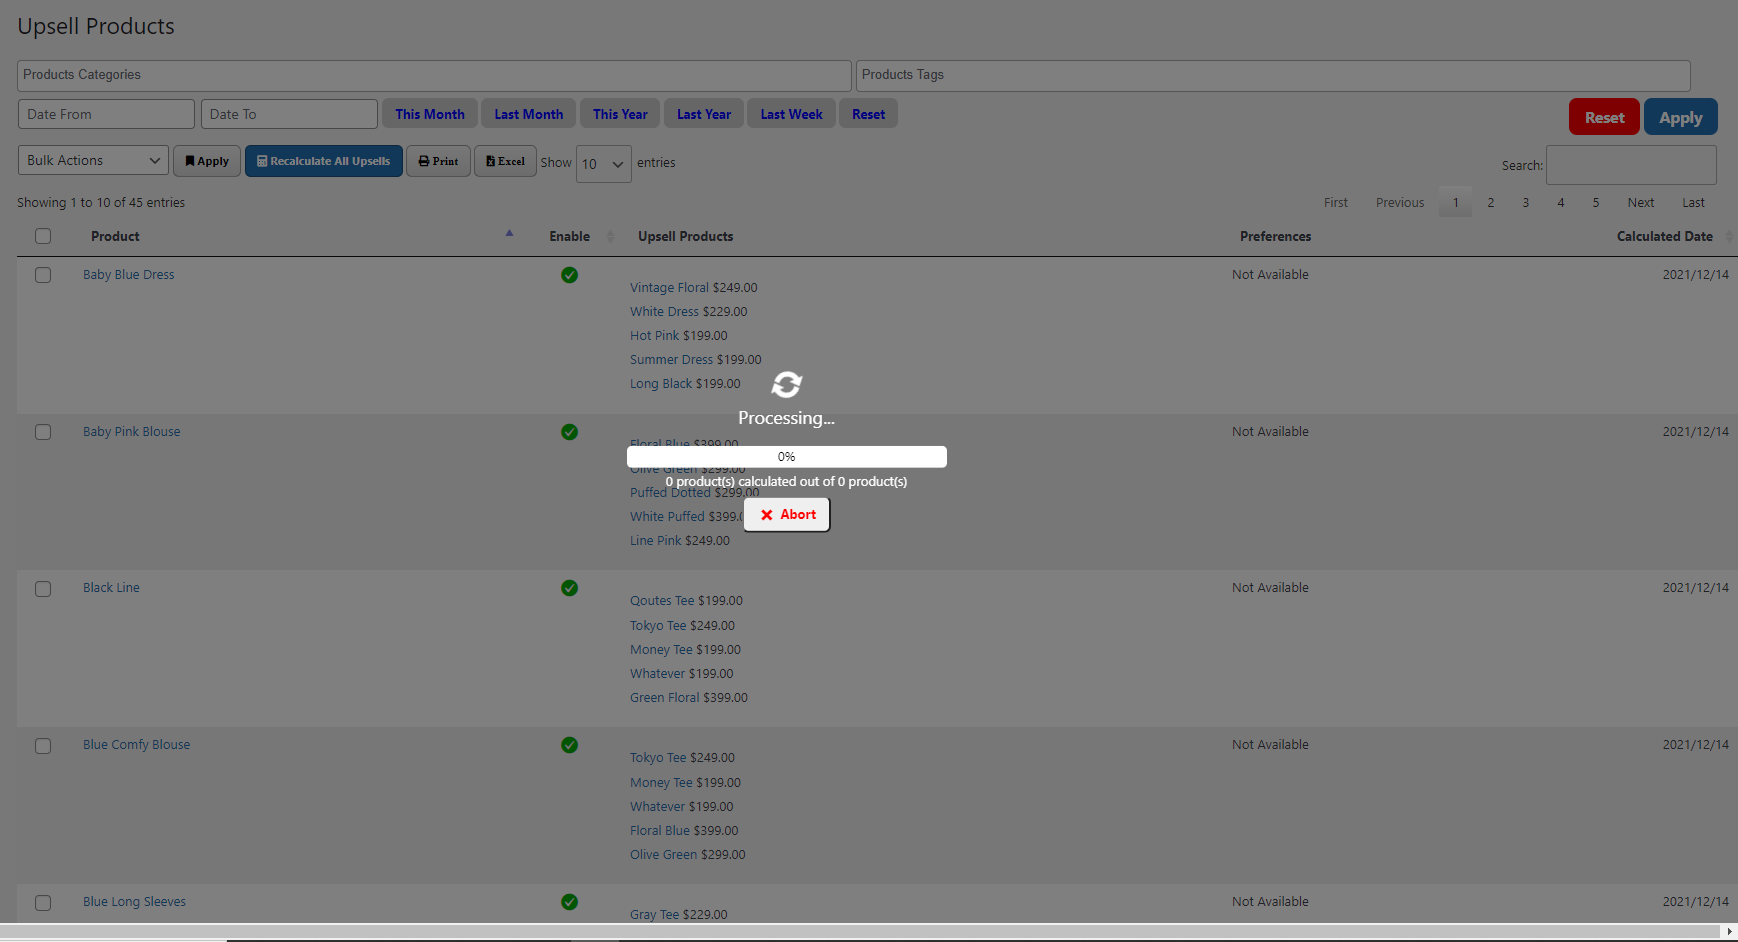
You can enable/disable Product Upsells for each product, check which upsells are generated for each product, preferences, and date calculated.
You can also filter out this list, Export to CSV, as well as to Recalculate All Upsells whenever upsell configurations were made on the Upsells Settings Page.
Upsell Analytics
The newly added feature of this plugin is the Analytics Page. Here, we can separately track Upsell Results and Order Results.
Upsell Results
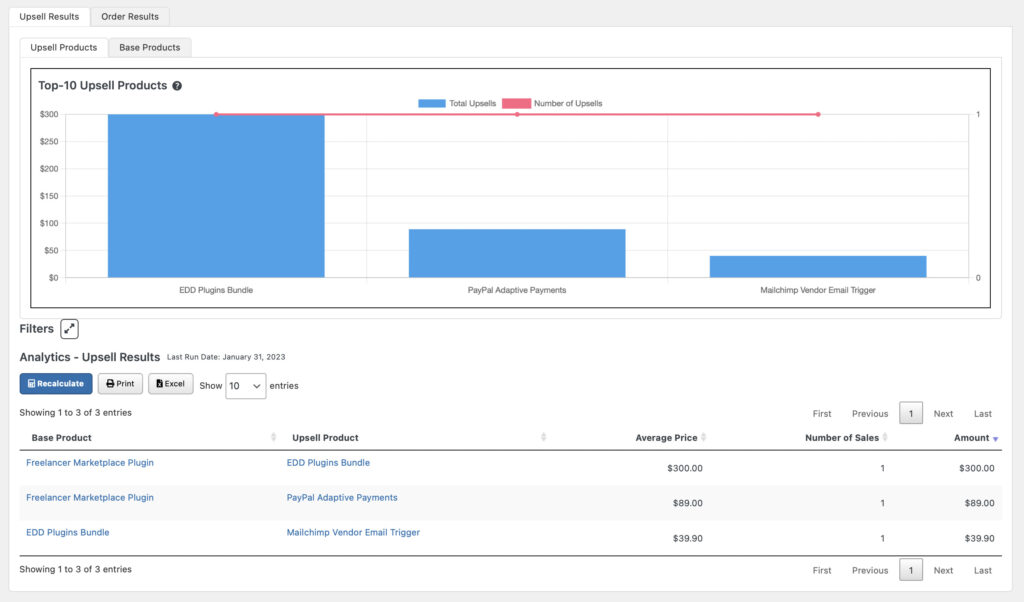
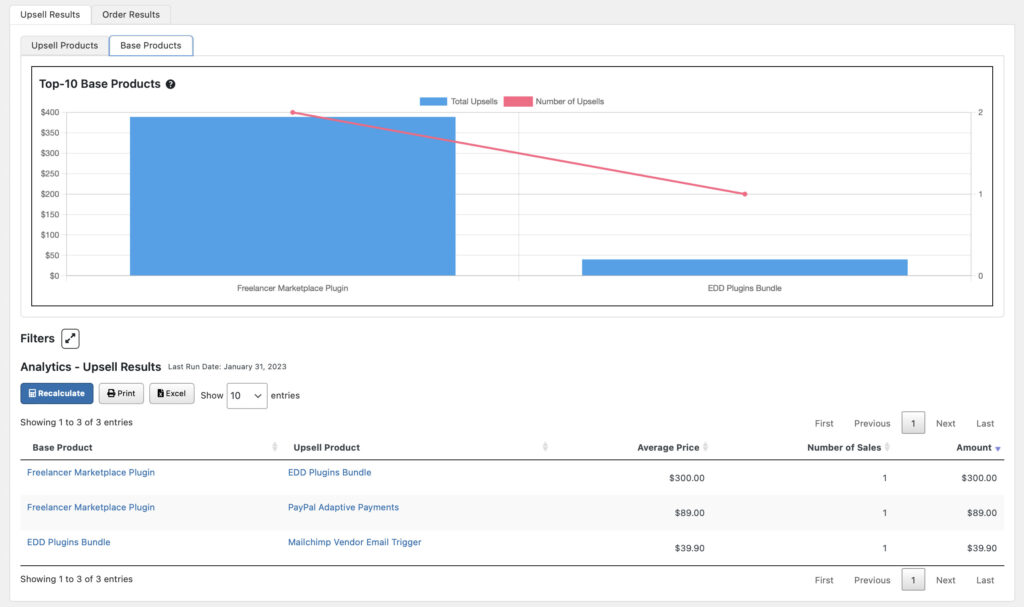
This report is separated into two:
a) Upsell Products – These resulted in the highest number and amount of sales. Basically, these are the products that you can use best as Upsells and earn revenues.
b) Base Products – These are the products that triggered the highest number of Upsells. Basically, products that offer the best changes of getting an Upsell.
These two reports can be located in different sub-tabs, each with info charts showing total amount and value of Upsells purchased. Below each reports, we can also see a list of all Upsell Results.
Order Results
This report shows us:
a) Top 10 Order Products – those that triggered the highest number and amount of sales for other products, or basically related products in the same order.
b) Top 10 Related Products – those that resulted in the highest number and amount of sales, or basically are best use as Upsells.
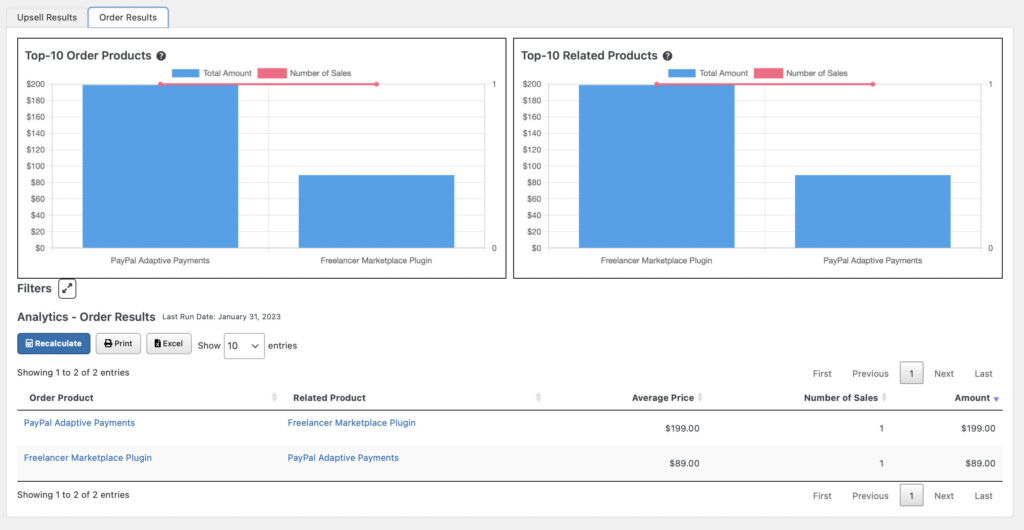
Below this report, we can also see a list of all Order Results, and the corresponding average price and total amount.
Upsells Widget
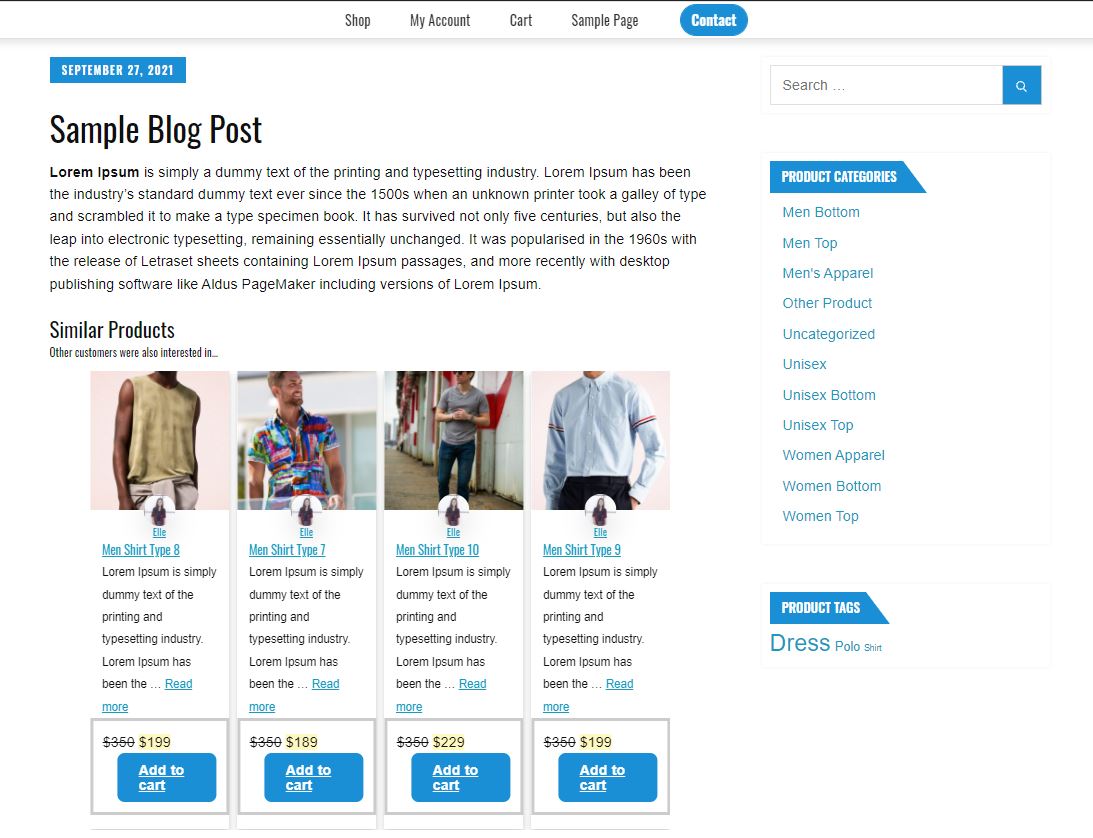
This plugin also comes with an Upsell Widget which you can insert on any Page Sidebars to display Upsells to more locations throughout your website, thus getting more chance of a conversion.

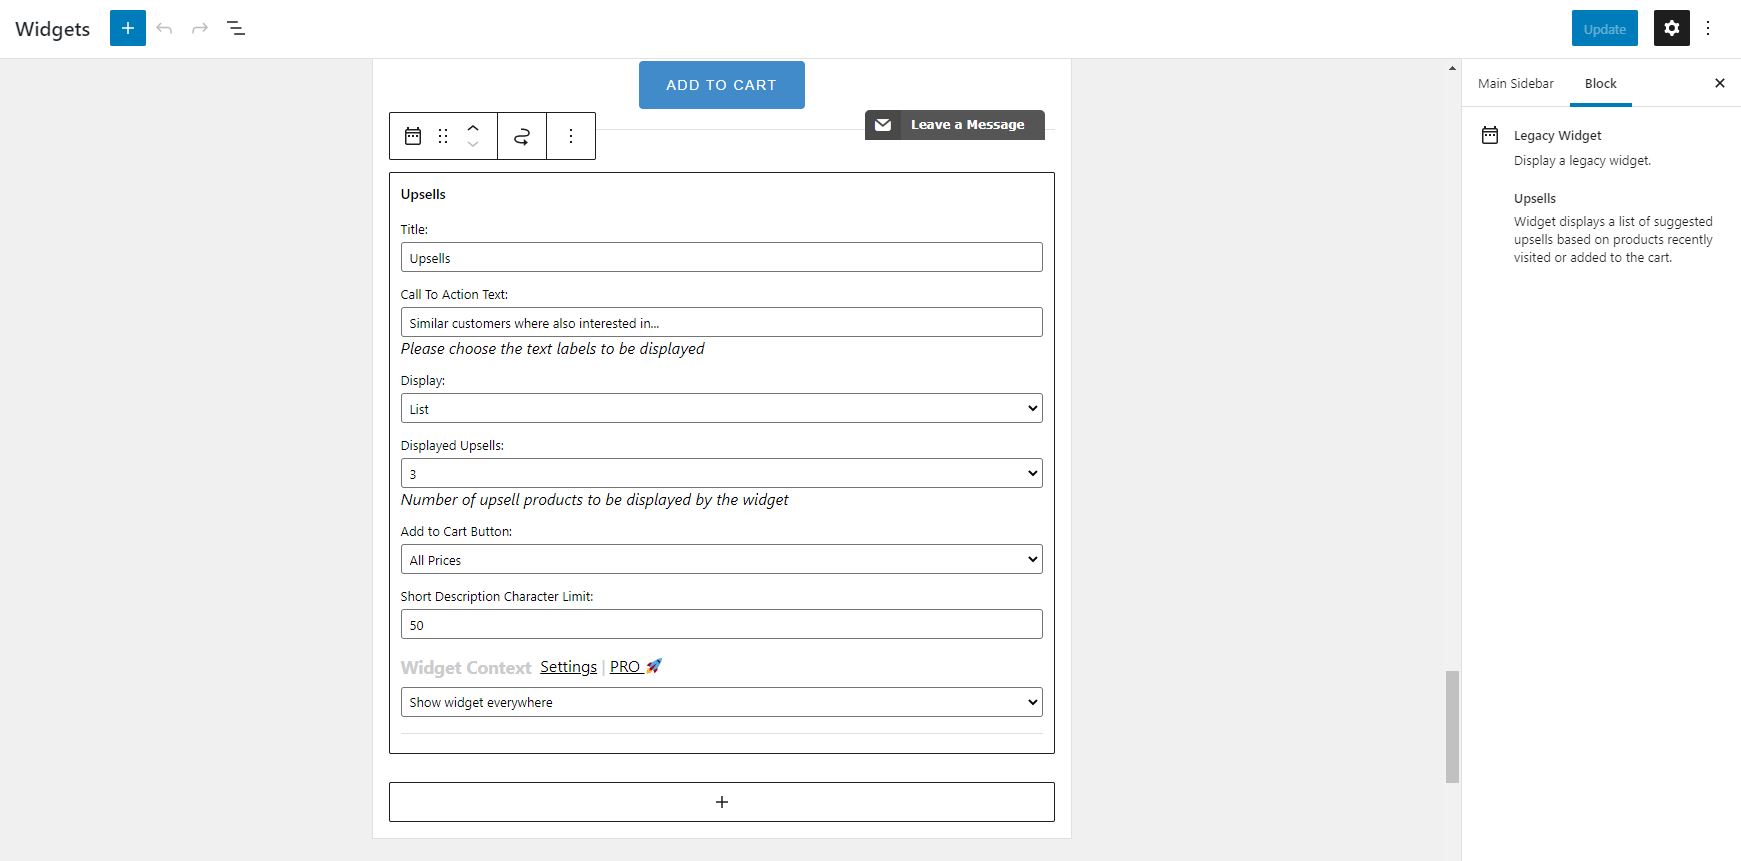
The Widget Settings includes the following:
Title – Set a title for your widget
Call To Action Text – More like a subheading and allows you to add more text
Display – Show Upsells either as a List or a Carousel
Displayed Upsells – Set the number of Upsells to display (1 t 4)
Add to Cart Button – Show either the highest price point or all prices per Upsell Product
Short Description Character Limit – Set the character limit for the product description
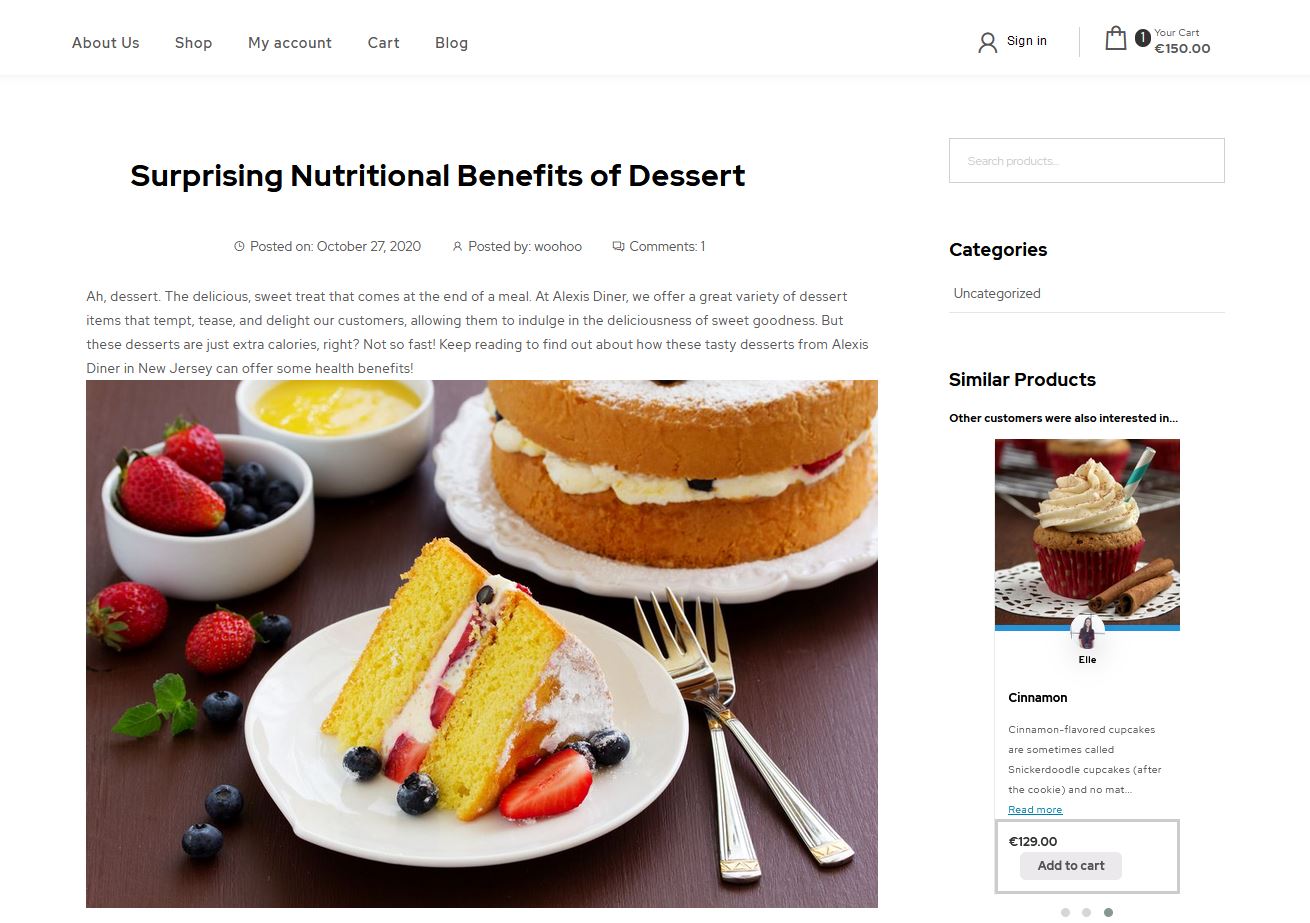
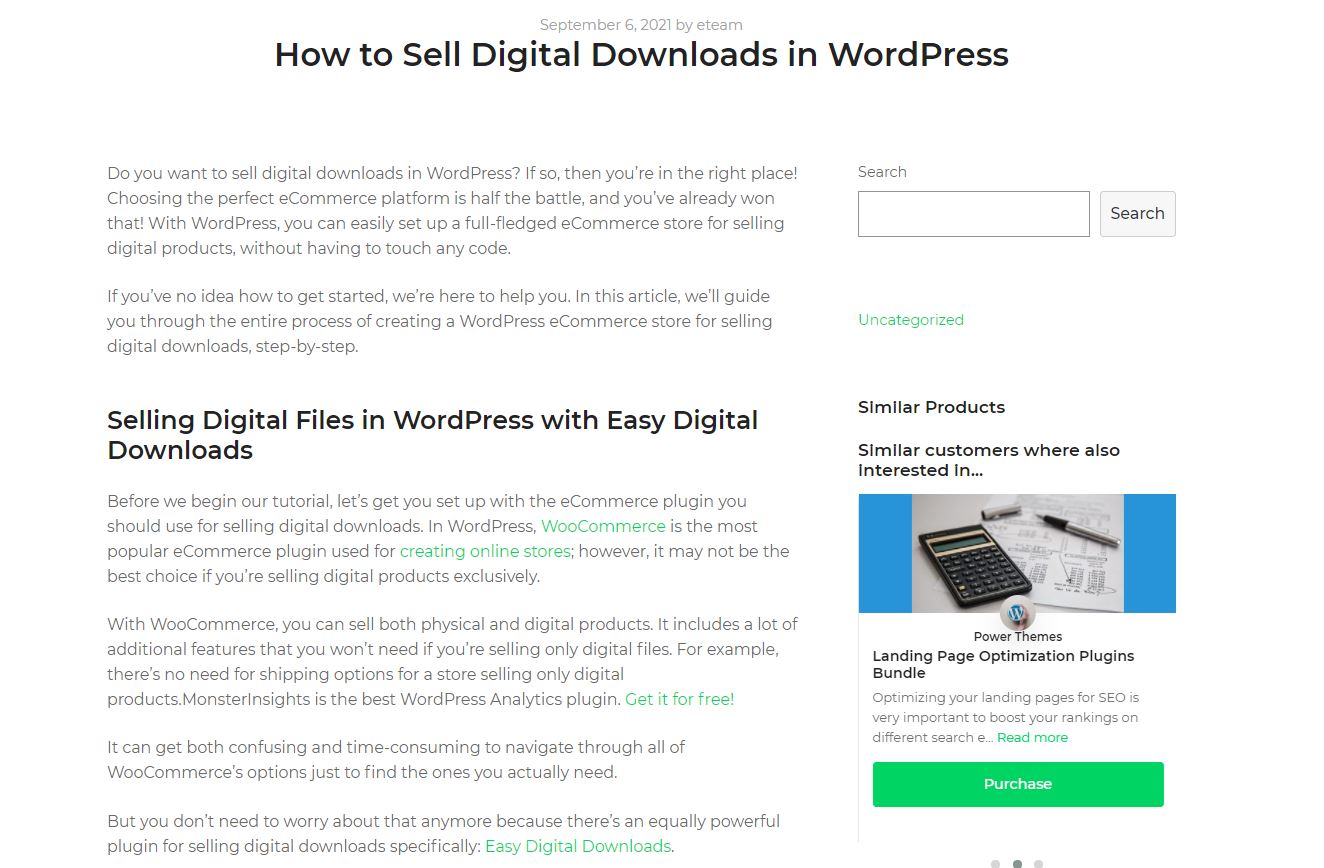
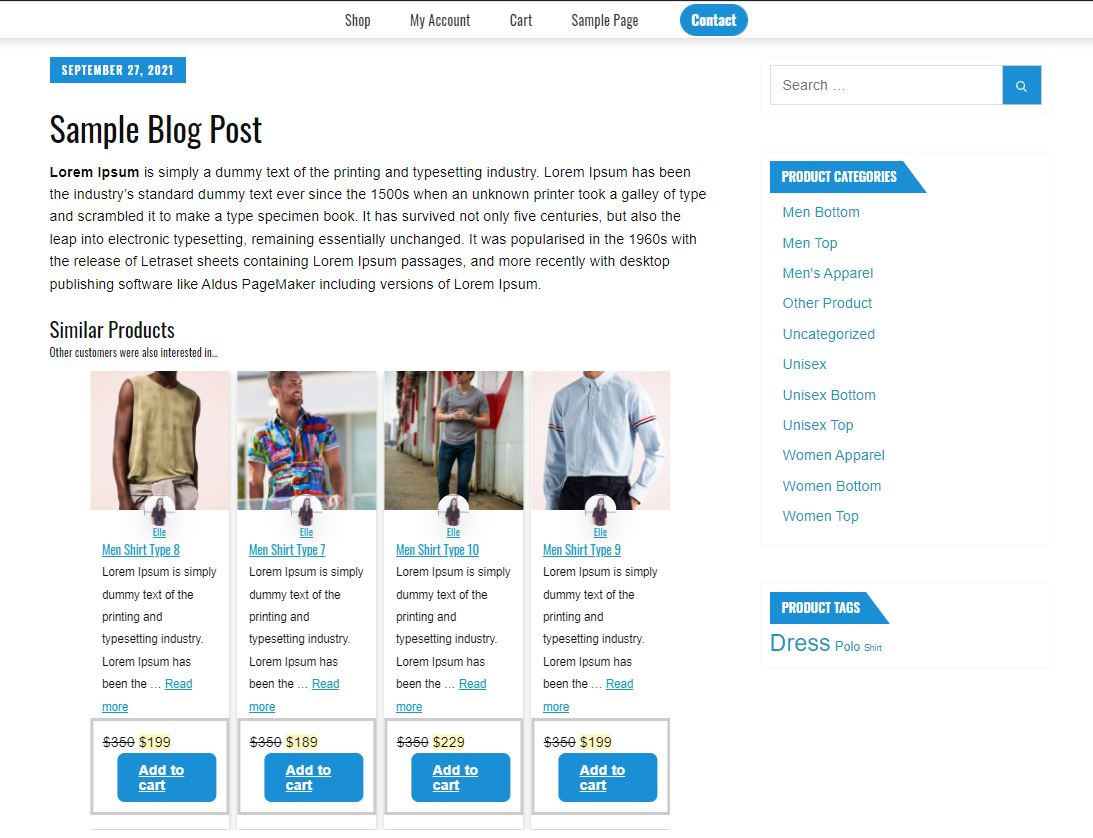
This is how the widget will look like when inserted for example, on a blog page.
Recently Viewed Products
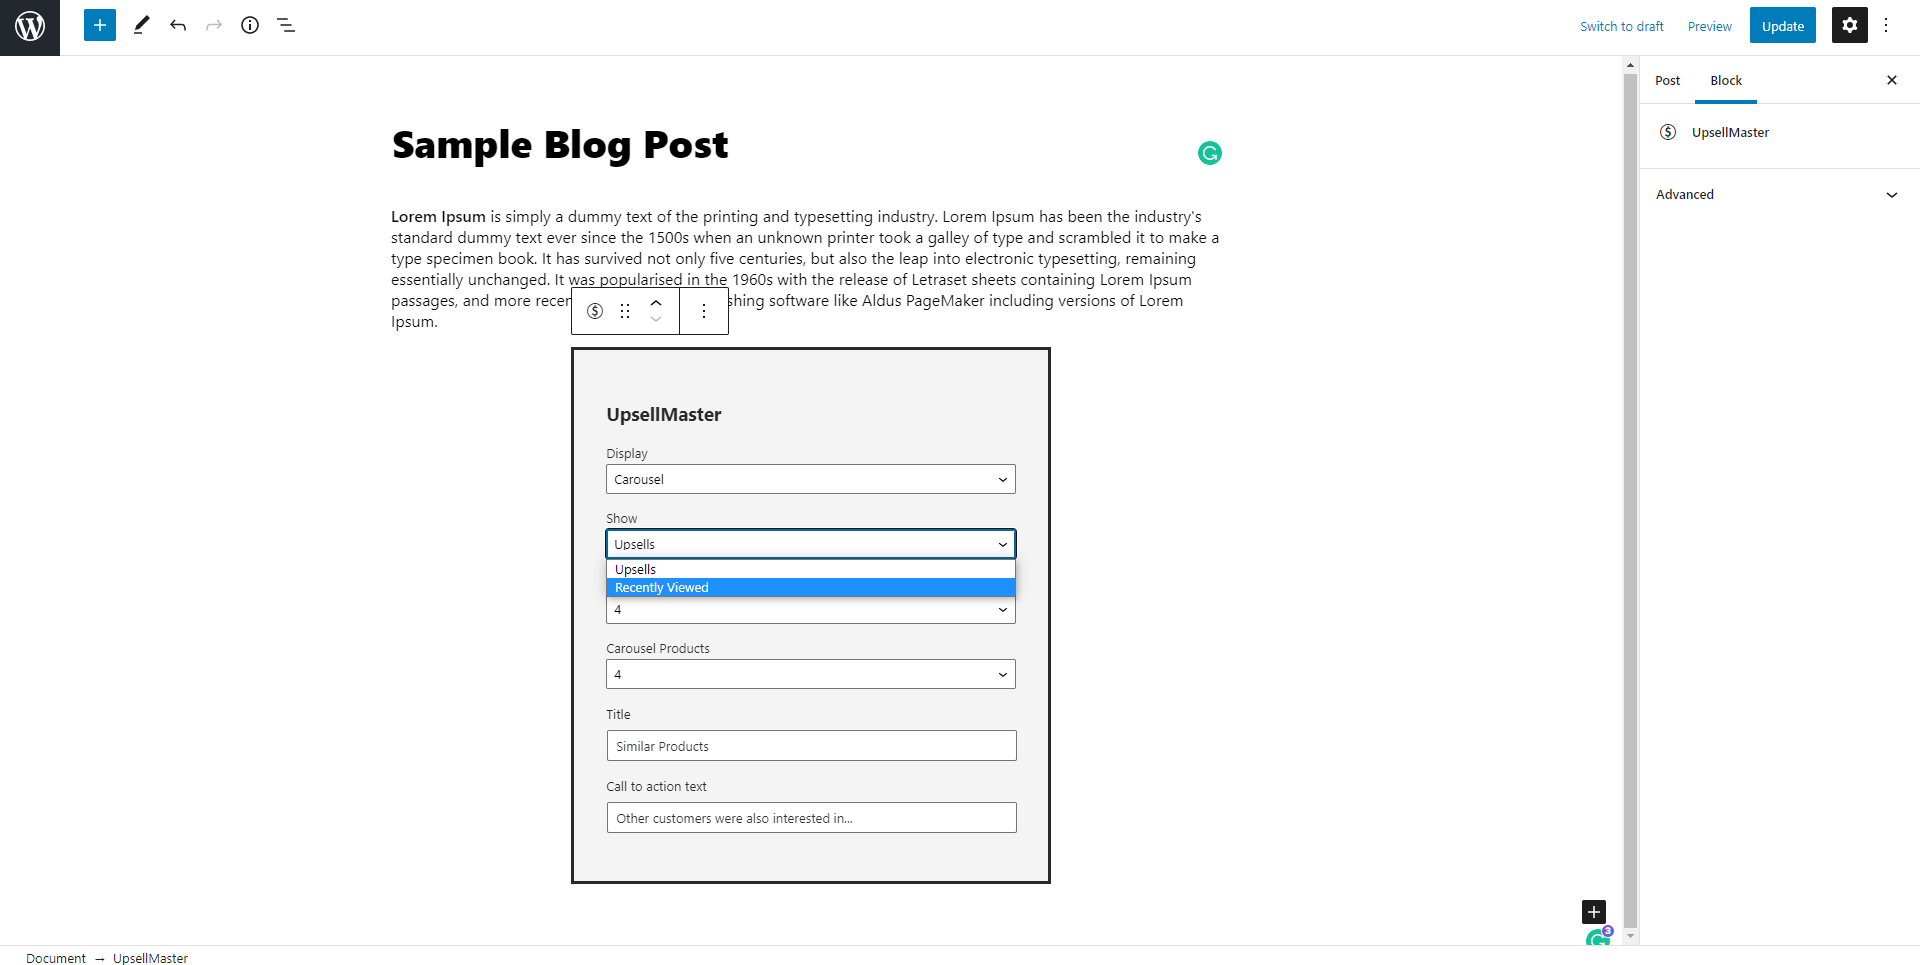
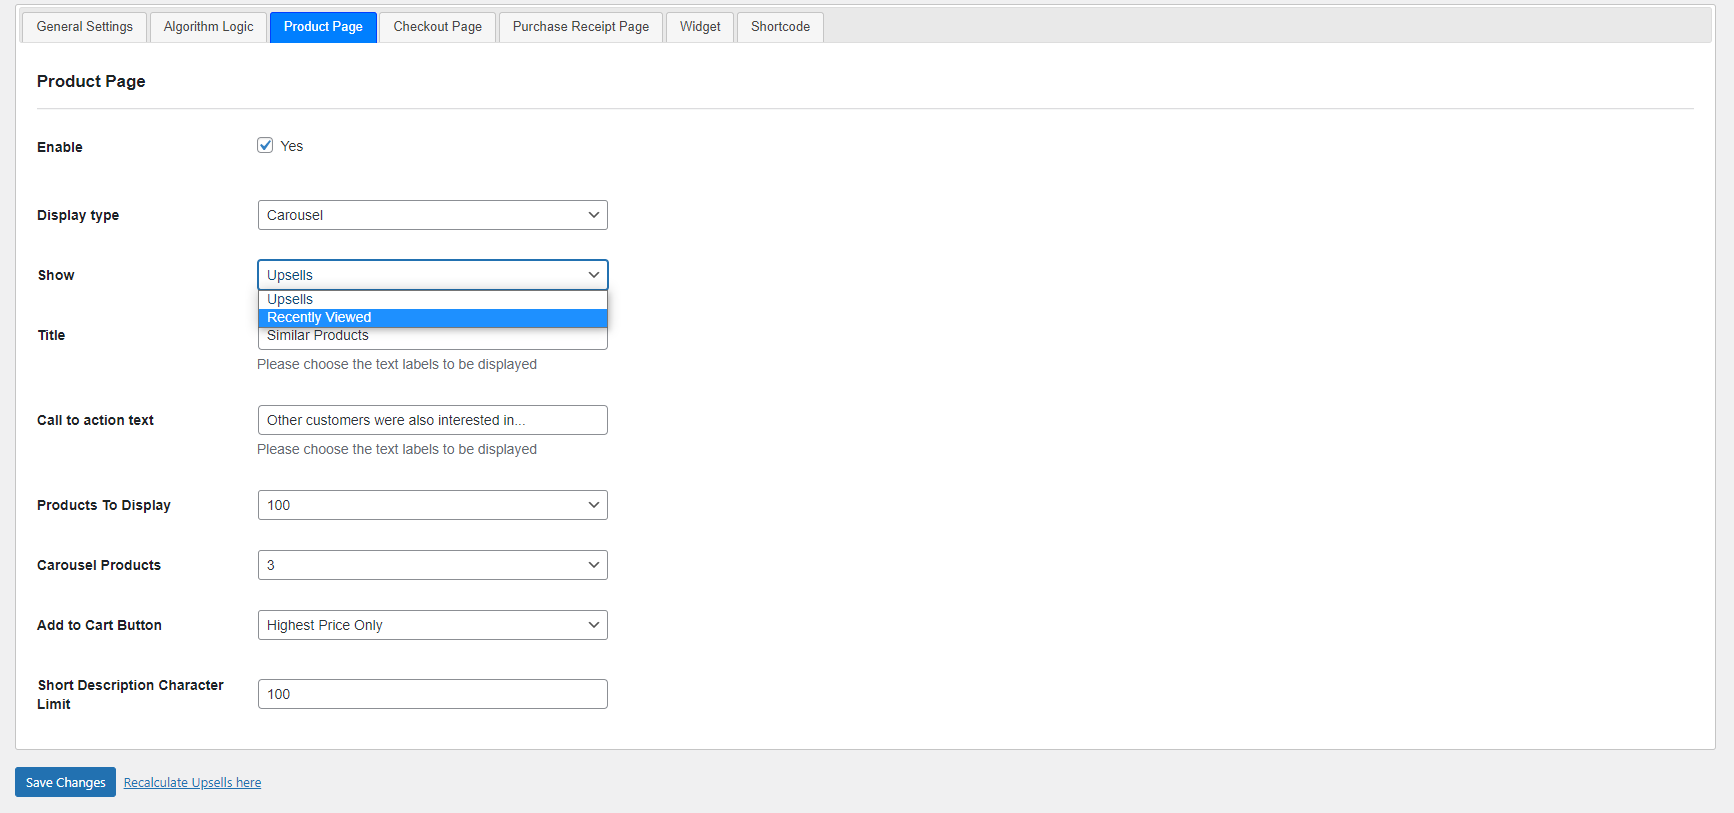
Instead of showing Product Upsells on any page, you can choose to show Recently Viewed Products or both. This allows users to employ a new strategy to convince customers to purchase a product from you, either from Upsells, or products they recently viewed.
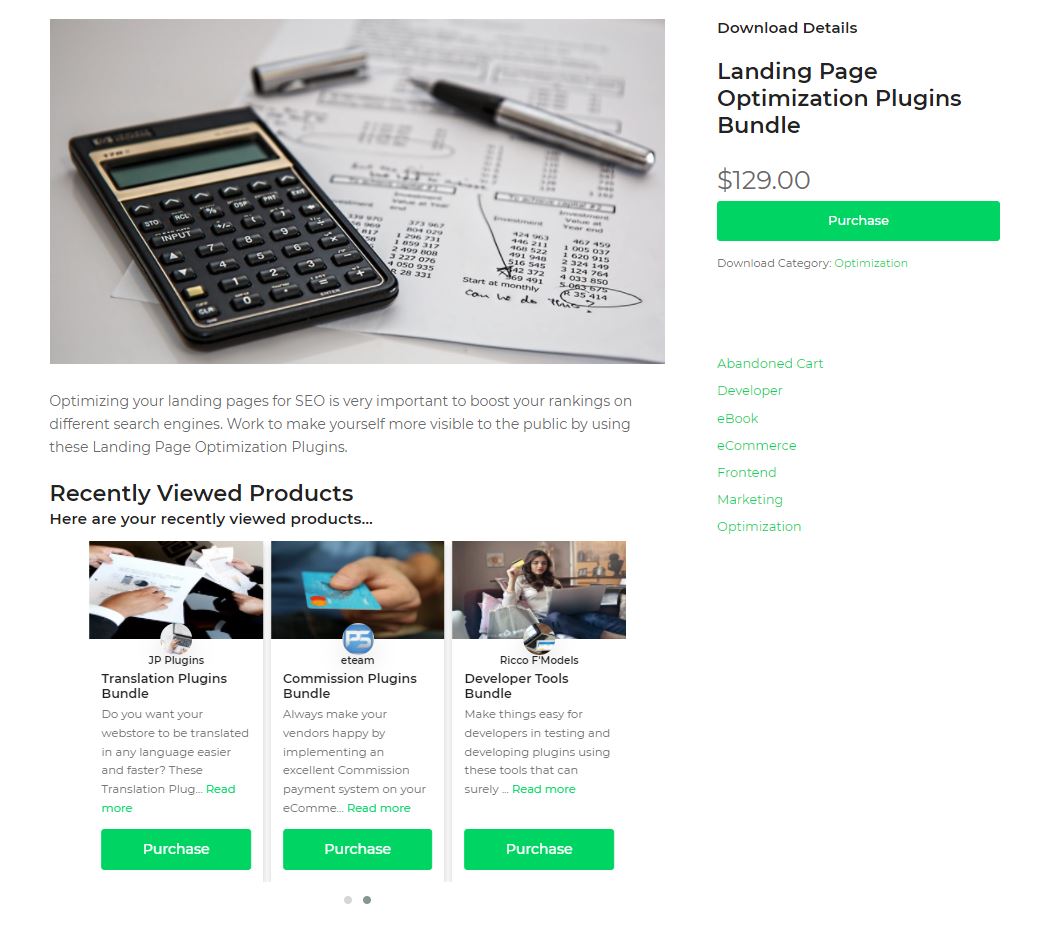
UpsellMaster Gutenberg Page Block
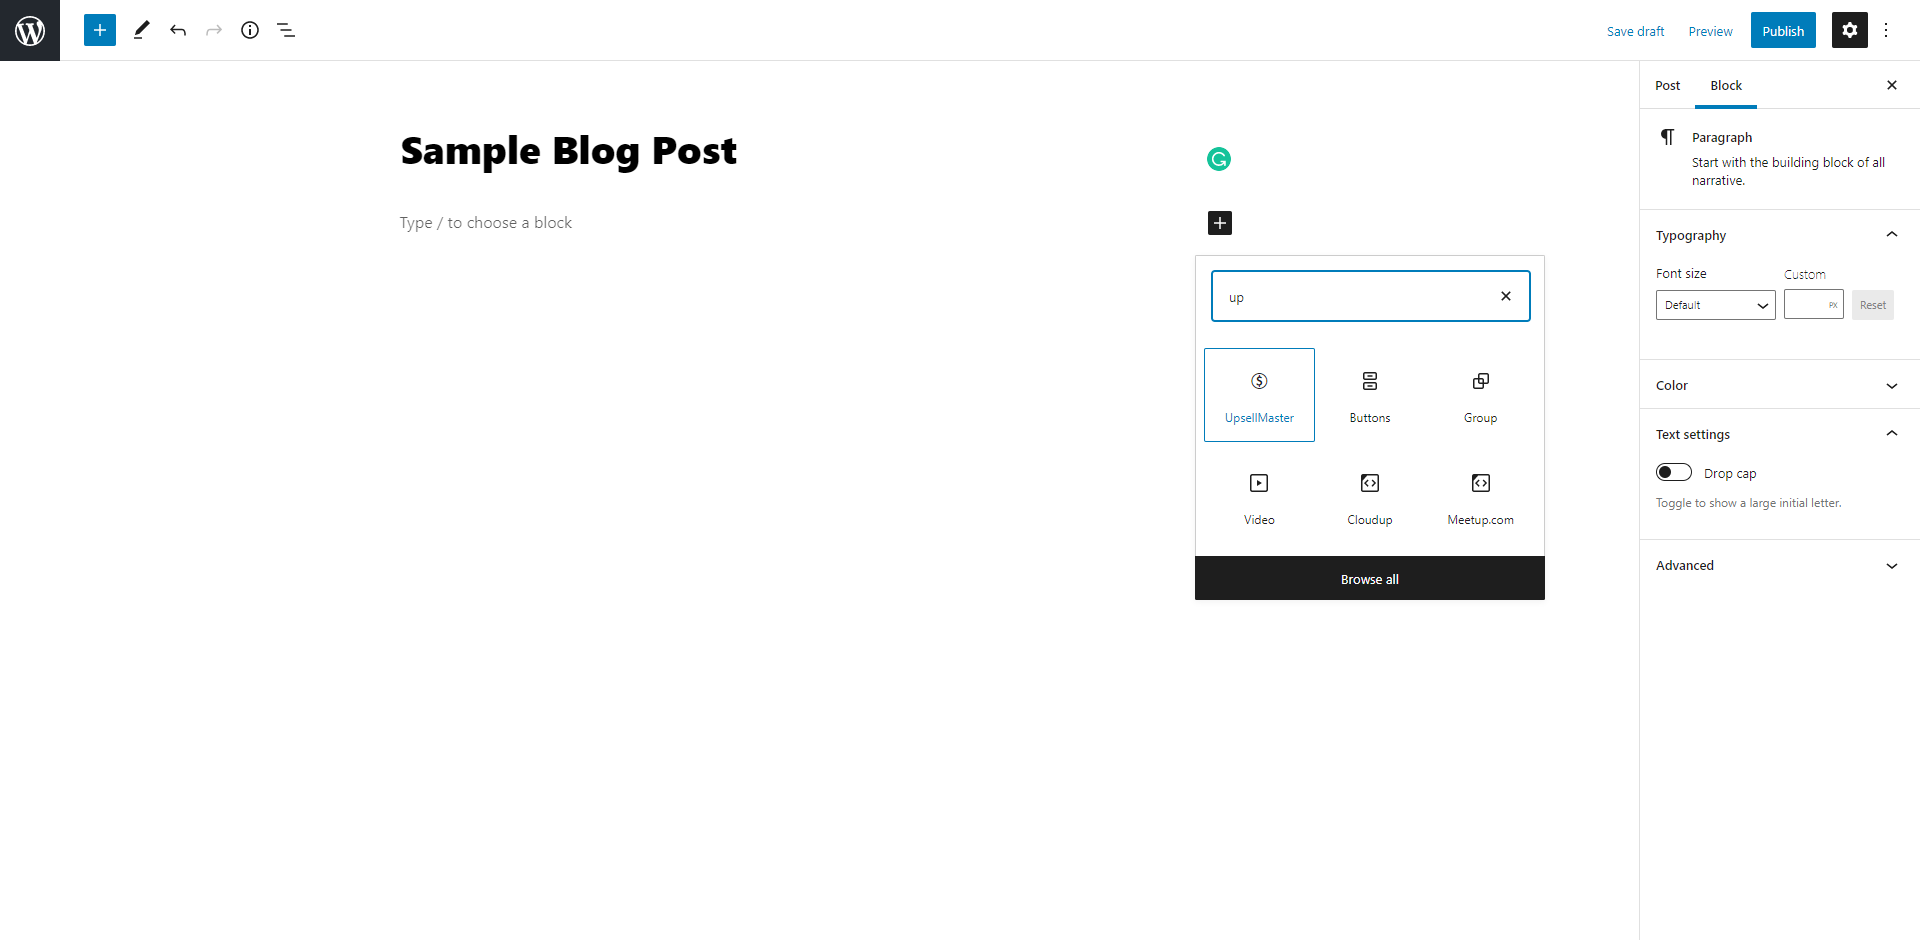
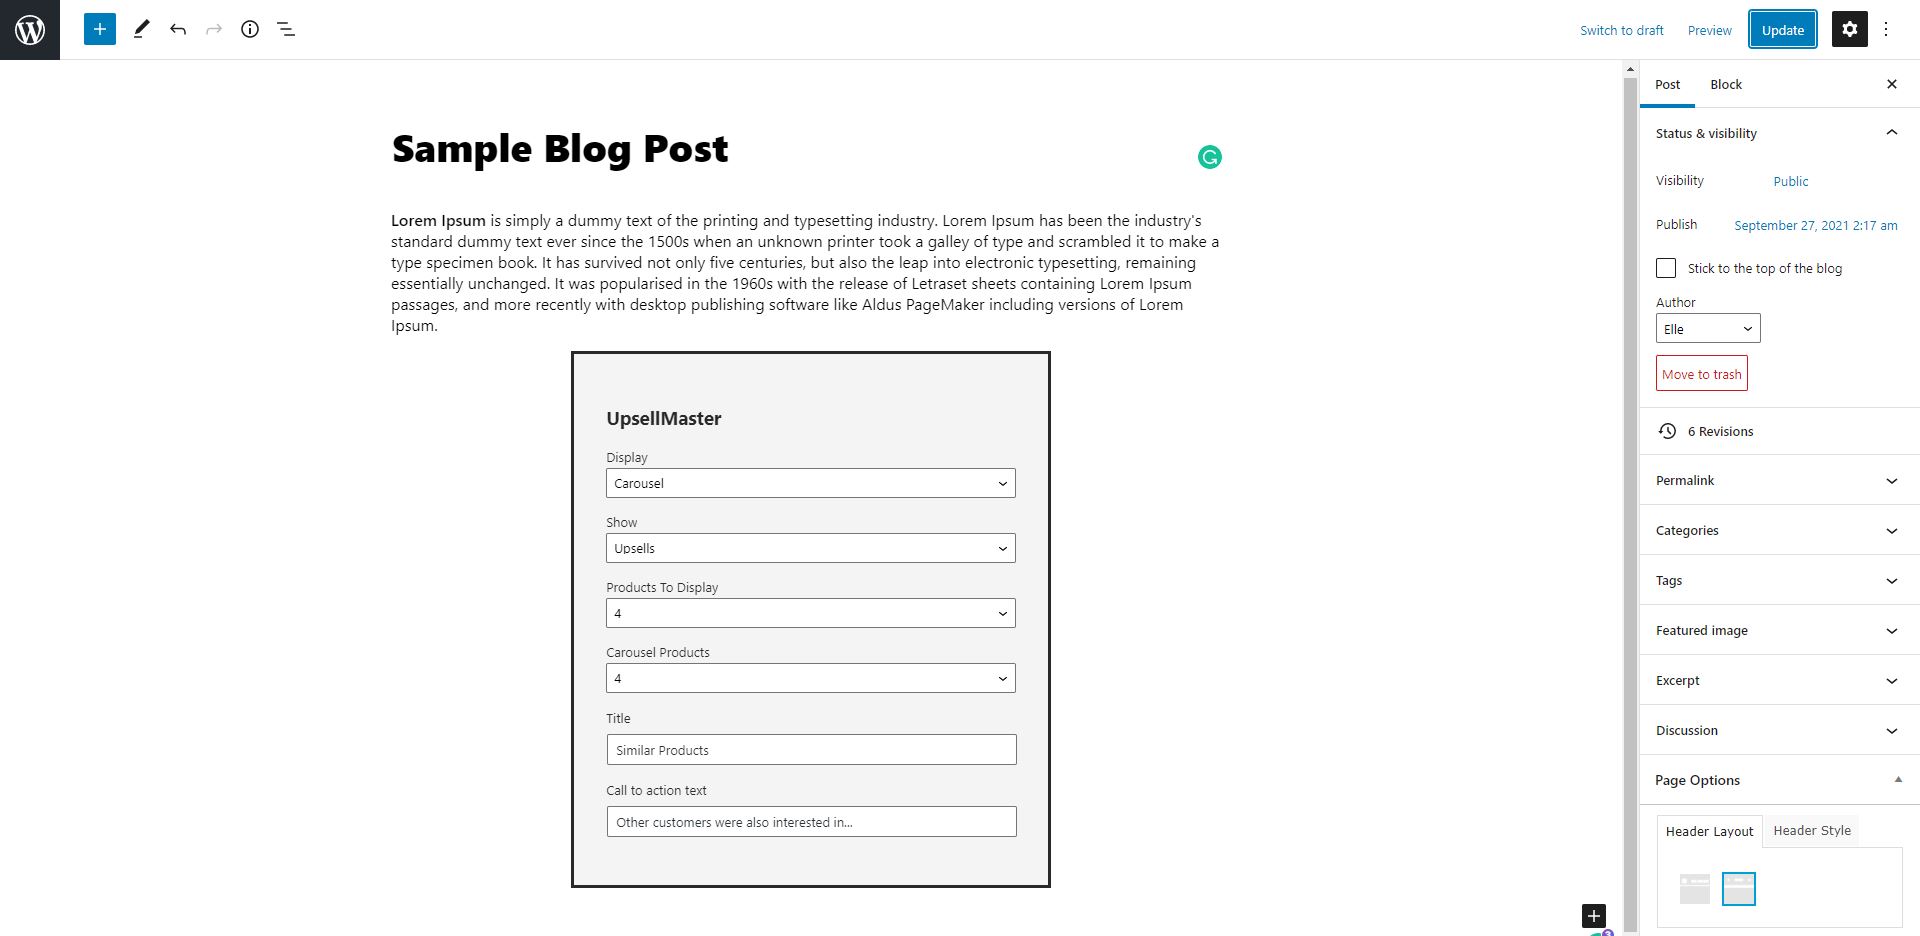
This plugin has a feature to show UpsellMaster on any page or post with Gutenberg Block Editor. This allows an easier way to display Upsells or Recently Viewed Products on any page of your choice.
UpsellMaster Shortcodes
This plugin provides a variety of Shortcodes to use if we want to also display Upsells and Recently Viewed Products on any page of our choice.
You can see the complete list of available Shortcodes by going to Upsells > Settings > Shortcode tab.
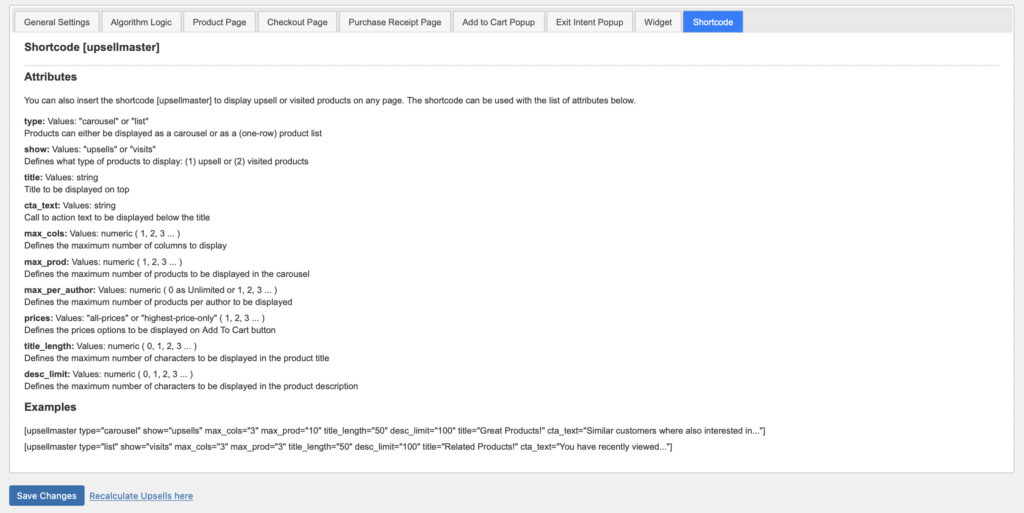
To give you an example how the shortcode looks live on a page, we will use this shortcode:
[ upsellmaster type=”carousel” show=”upsells” max_cols=”3″ max_prod=”10″ desc_limit=”100″ title=”Great Products!” cta_text=”Similar customers where also interested in…” ]
Great Products!
Similar customers where also interested in...
EDD Plugins Bundle
If you are looking for ways to enhance the conversion of your Easy Digital Downloads (EDD) WordPress... Read more
Freelancer Marketplace Plugin
A plugin that will turn your EDD WordPress website into a total Freelancer Marketplace. Be able to o... Read more
UpsellMaster PRO
The UpsellMaster Plugin uses a data-driven algorithm to automatically calculate suitable Upsells for... Read more
Preferred and Exclude Product Upsells
This plugin not only allows the automatic calculation of Product Upsells but also gives you an option to set your preferred upsell products to each of your base products. This is very helpful if you want a specific product to always show as an Upsell on a base product to allow you for a more accurate product upselling depending on your strategy.
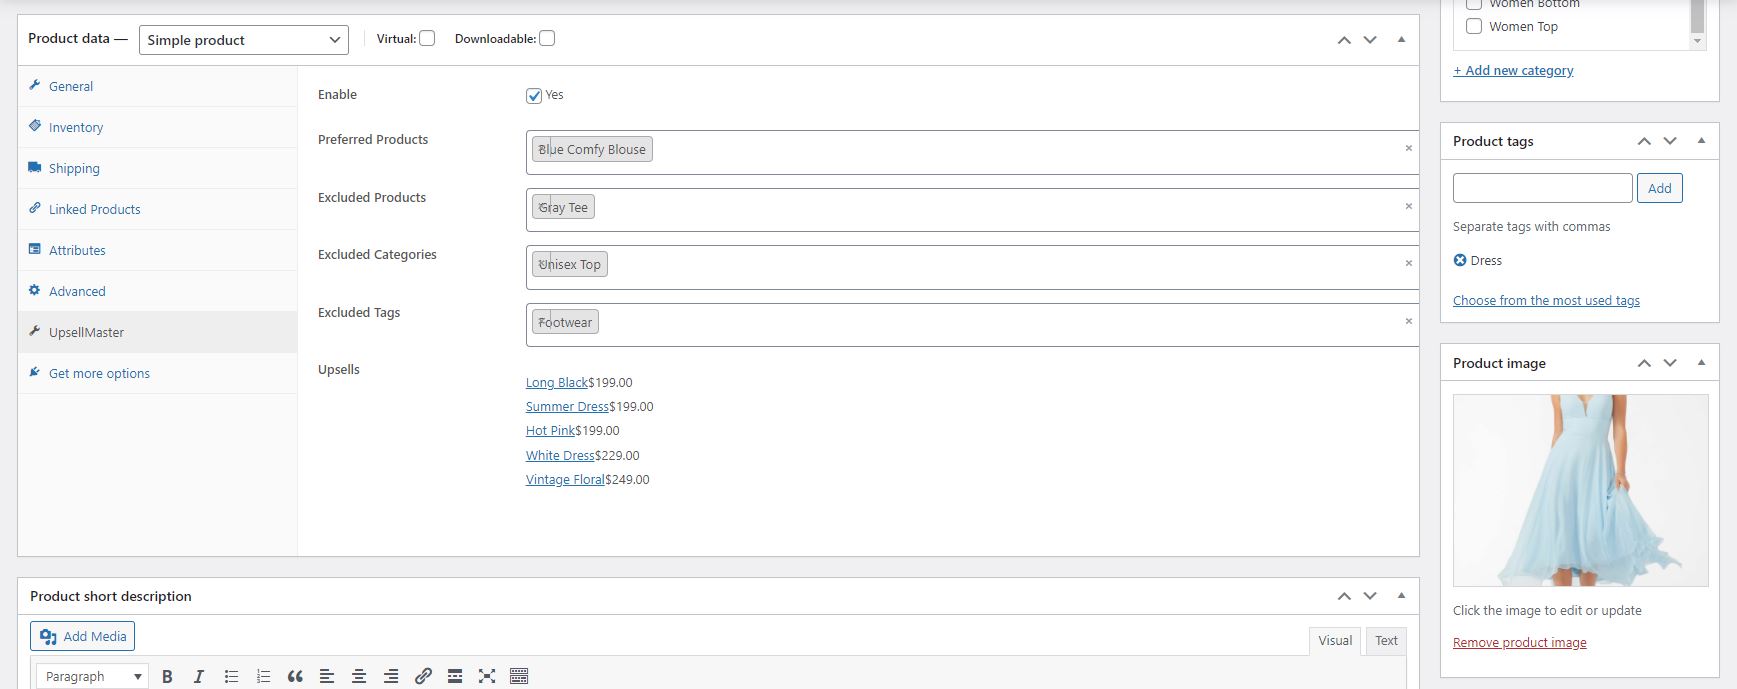
You can do this by going to the Edit Product Page, scroll down on the page and you can see the UpsellMaster Settings section. Here you can:
- Enable/Disable Preferred and Exclude Upsells for this product
- Enter Preferred Upsell Product
- Enter Exclude Product, Categories, and Tags as Upsells
- See a list of all Upsells calculated for this specific product.
Campaign Module
One notable feature it offers is the ability to generate Promotional Campaigns. With this, efficiently managing and promoting discount campaigns has reached new levels of effectiveness. The user-friendly interface enables you to launch impactful Promotion Campaigns effortlessly, enabling your business to run seamlessly on autopilot with just a few clicks.
Now let’s talk about the backend settings page to configure the campaigns.
Campaign Overview
The Campaigns page shows us the overview of all Campaigns created on the website.
In the first section, you can see the Performance Chart so you can get a visual of how the campaigns were doing in one glance. It shows the value of carts created, orders made, and the total net earnings for all purchases.
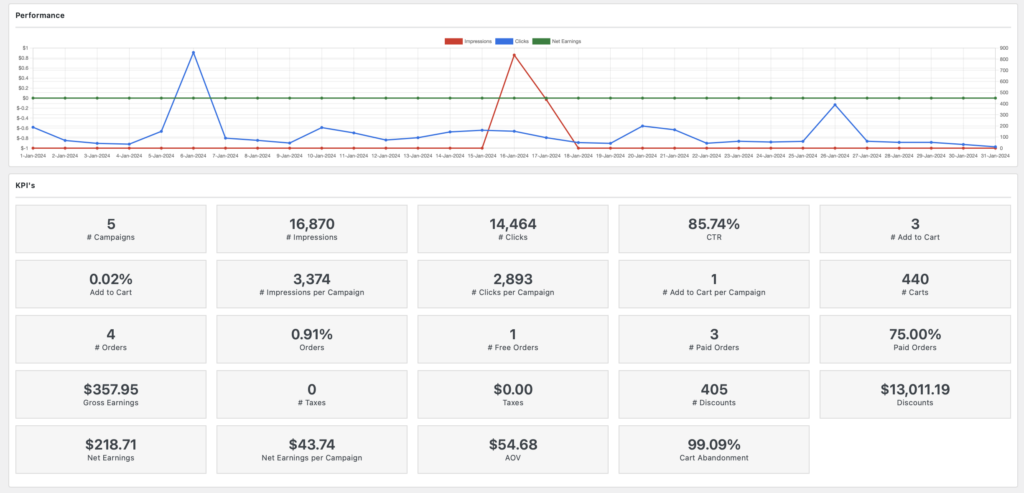
Then, followed by all the important Key Performance Indicators (KPIs) you should check and track from time to time. Here are as follows:
- # of Campaigns created
- # of Impressions from Campaigns
- # of Campaign Clicks
- CTR (%)
- # of Add to Cart Actions
- Add to Cart (%)
- # of Impressions per Campaigns
- # of Clicks per Campaign
- # of Add to Cart per Campaign
- # of Carts created
- # of Orders created
- Order (%)
- # of Free Orders
- # of Paid Orders
- Paid Orders (%)
- Gross Earnings ($)
- # of Taxes incurred
- Taxes Value ($)
- # of Discounts
- Discount Value
- Net Earnings ($)
- Net Earnings per Campaign
- AOV ($)
- Cart Abandonment (%)
On the same page, you also have tons of powerful filters if you want to manipulate the Performance Chart and Campaigns List depending on the information you want to focus on or track.
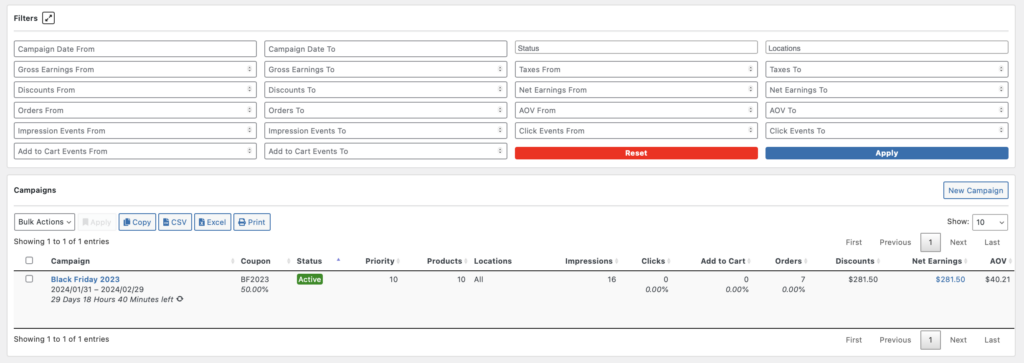
The last part of the Campaigns page shows the list of all campaigns created, either Active or Inactive, along with the important metrics to check for each. This includes:
- Campaign Name and Date Duration
- Coupon Code and Percentage
- Campaign Status
- Priority Number
- # of Products Eligible in the Campaign
- Location of the Campaign Banner
- # of Impressions
- # and % of Clicks
- # and % of Add to Carts
- # and % of Orders
- Discount Amount
- Net Earnings
- Average Order Value
Adding a New Campaign
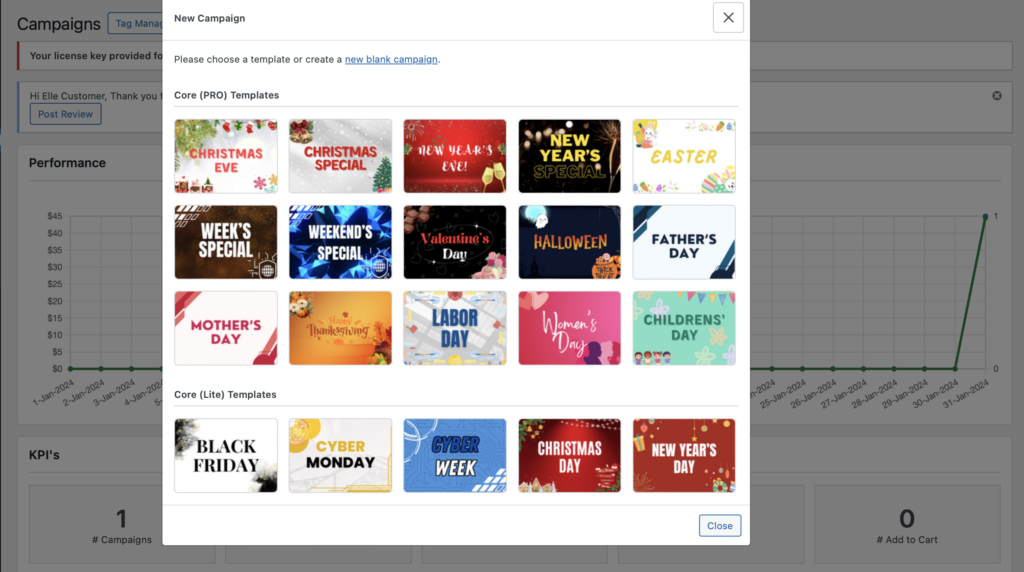
Now, how can we create campaigns? If you’re on the Campaigns Overview Page, simply click the “New Campaign” on the top, and it will show all available templates you can use to easily create your promotions in just a few clicks. But, you can also create a blank campaign from scratch.
Note: The available templates you can use vary if you’re on either Lite or Pro Plugin Versions.
This is now what the Add / Edit Campaign Page looks like. Let’s talk about each step in creating campaigns:
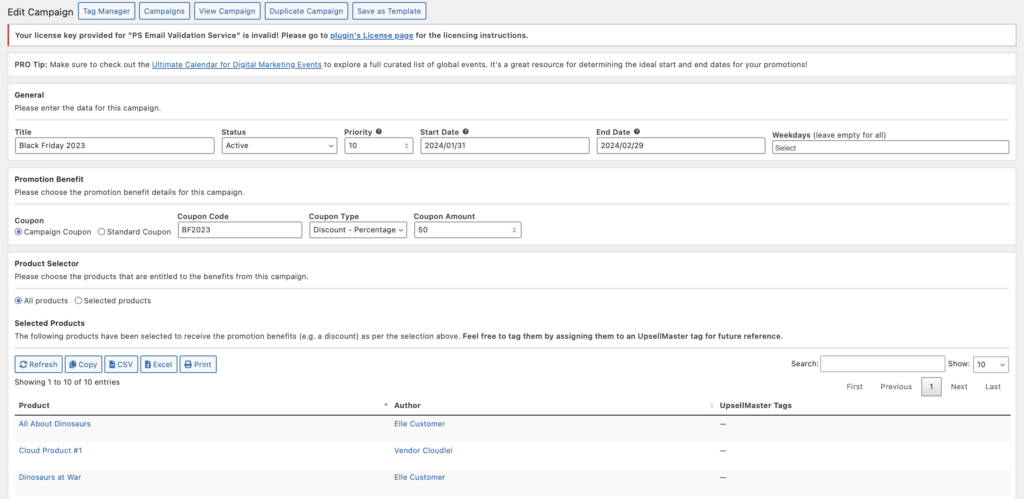
General
- Title – Add a Campaign Title
- Status – Active, Inactive, Expired and Scheduled
- Priority – Enter a number from 1 to 100. Lower value indicates higher priority.
- Determine the Start and End Dates
- Determine the days of the week when the campaign should only be applicable.
Promotion Benefit
- Campaign Coupon – This means that the discount code would be created by the campaign itself.
- Standard Coupon – You can select an already existing discount code from your website.
Please note that when the Standard Coupon is selected, the Campaign will take over the existing coupon, and all its data will be overwritten going forward. Therefore when the campaign is saved, it will become a Campaign Coupon.
- Coupon Type – Percentage or Fixed
- Indicate Coupon Amount
Product Selector
Here you choose the products to be entitled to the benefits of the campaign you’re creating.
Selected Products
Then below is a list of the products that have been selected to receive the campaign benefits, as per the selection made above. You can also tag the selected products by assigning them to an UpsellMaster tag for future reference or use.
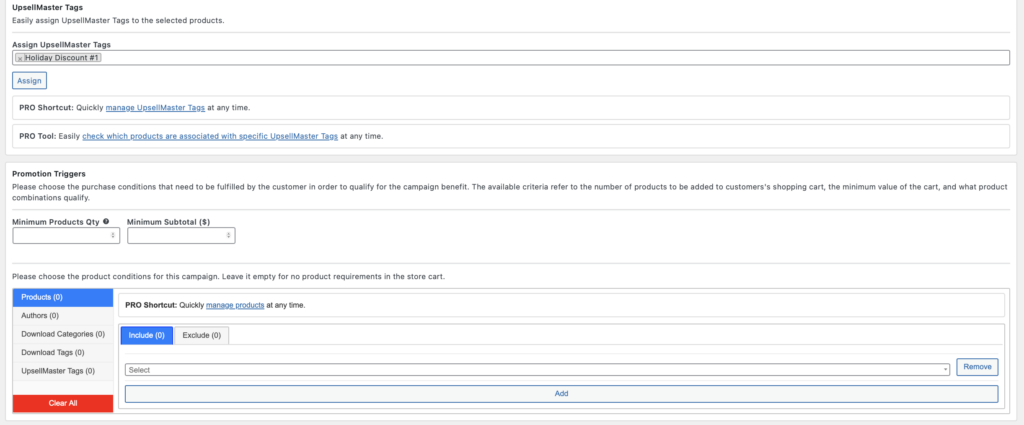
UpsellMaster Tags
You can directly create the tags in this section which will automatically tag all selected products from this campaign.
Promotion Triggers
Here you can choose the purchase conditions that need to be fulfilled by the customer in order to qualify for the campaign benefit. The available criteria refer to the number of products to be added to customers’s shopping cart, the minimum value of the cart, and what product combinations qualify.
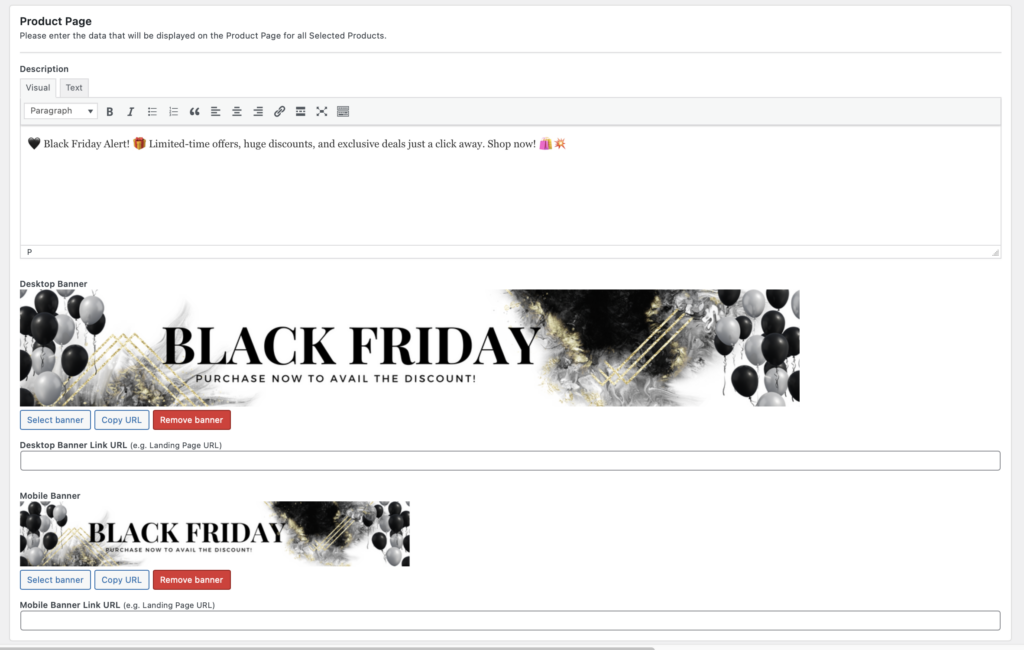
Product Page
You can also manipulate the data that will be displayed on the Product Page for all the Selected Products in the campaign. You can add here a unique text for your discount promotion and add special banners to show, if needed.
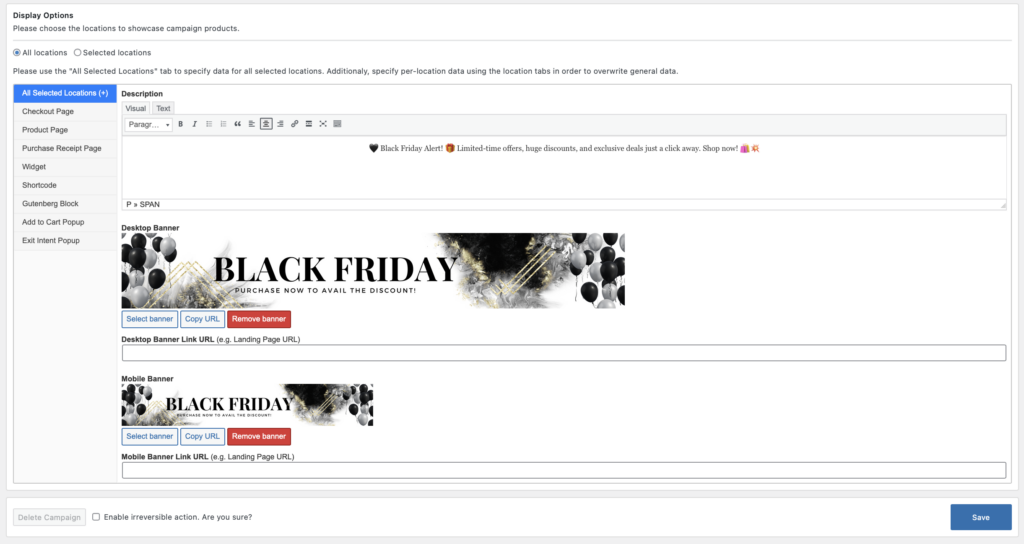
Display Options
Now, this is where you need to select at which available locations you can display your Campaign Banners and Promotions. You can just easily select All Locations, enter some text and upload banners, and you’re done.
But you can also just select few chosen locations to display your promotions, such as:
- Checkout Page
- Product Page
- Purchase Receipt Page
- Widget
- Shortcode
- Page Gutenberg Block
- Add to Cart Popup
- Exit Intent Popup
You are free to modify the campaign contents for each locations and show different text and banners, depending on your promotion strategy, or what you think best works for your campaign.
View Campaign and Analytics
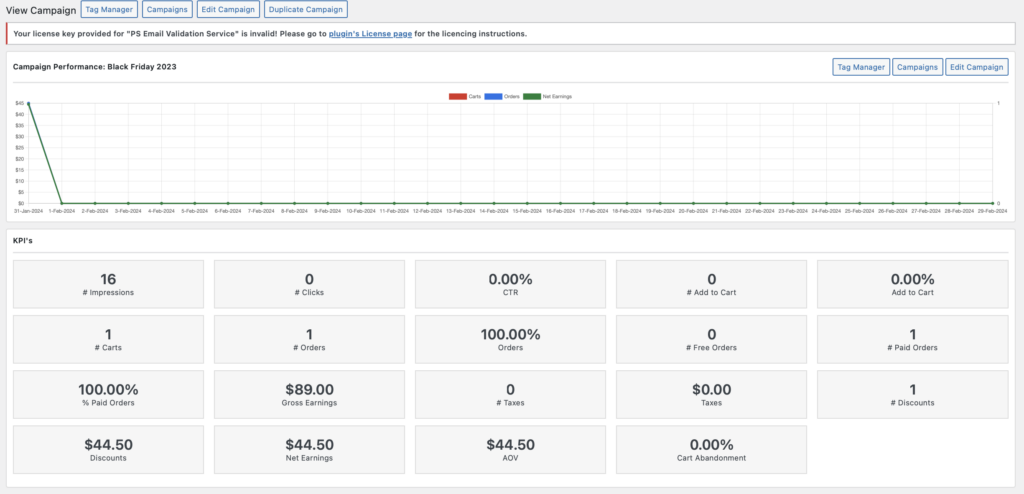
Once your campaign has been created, you can click on the View Campaign, and this page will open up, showing you all important metrics and information you need to check and monitor on your campaigns.
- Campaign Performance Chart – You can see the value performance per date, for all the carts created, orders made, and net earnings earned.
- KPI’s – Here also a selection of metrics to track that shows the results of your campaign.
- There are also many important Filters to modify the campaign information depending on your preference which to check or track.
- Campaign Carts – This shows all carts created using the selected campaign. You can also see here whether the cart is actually been purchased, or just abandoned.
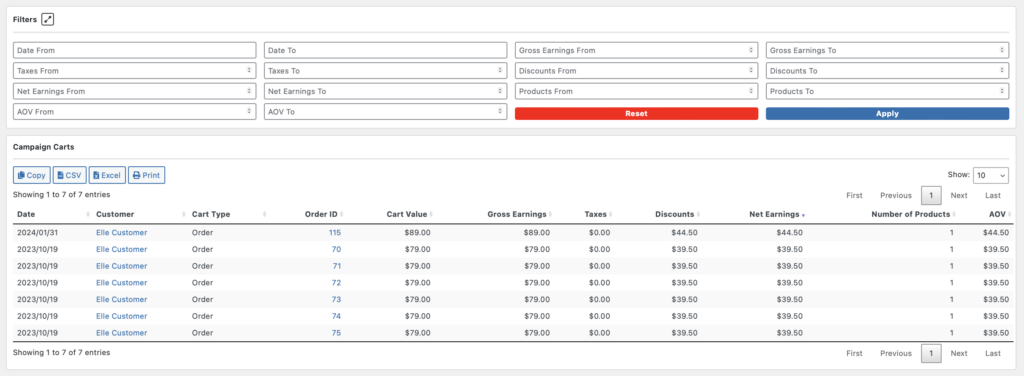
Tag Manager Page
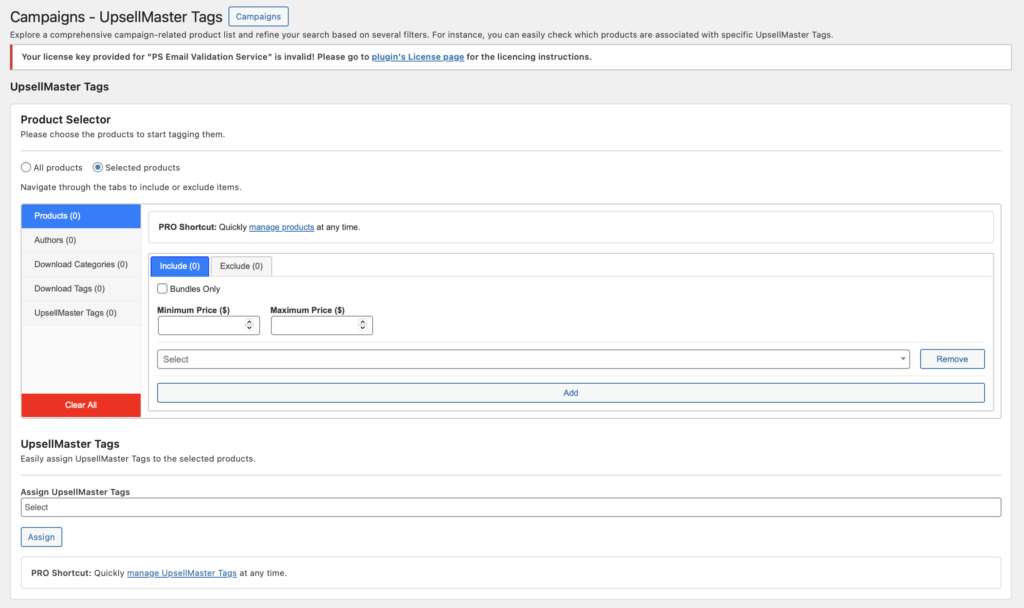
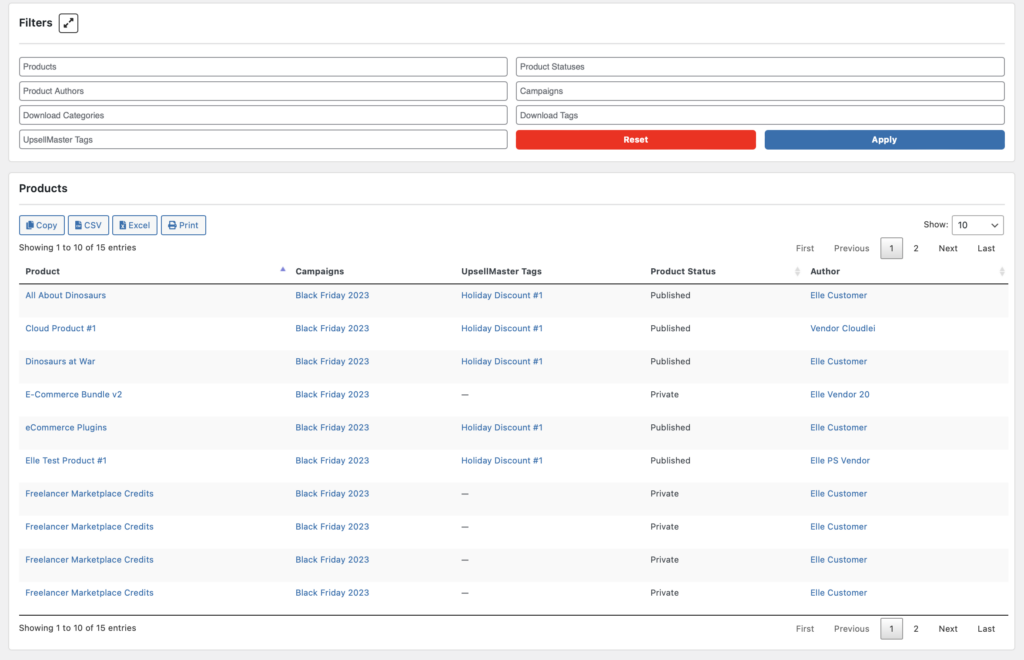
Lastly, here is the page we have prepared so you can better and easily manage the UpsellMaster Tags.
Here you can explore a comprehensive campaign-related product list and refine your search based on several filters. For instance, you can easily check which products are associated with specific UpsellMaster Tags.
Using Custom Taxonomies besides Download Category and Tag
A new feature of this plugin is now you can include Custom Taxonomies to be used on the plugin’s algorithm in generating automated tailored upsells for each of your base products. This is very helpful for WordPress webstore owners who uses custom taxonomies besides the standard Download Category and Tag.
In here example, we have used Custom Post Type UI plugin to add custom taxonomies on our webstore. Notice the feature changes occured within our plugin when custom taxonomies are included:
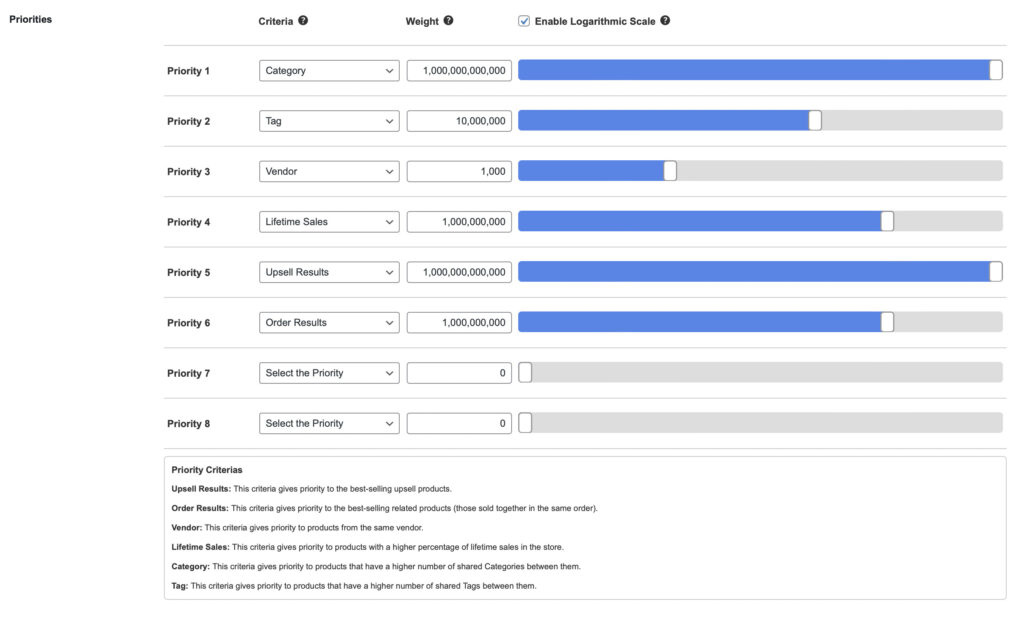
a. Algorithm Priorities
Besides the standard Download Category and Tag, here I have added new taxonomies “music”, “actor” and “movie”. Notice how I can use them as the algorithm priority in generating automated upsells, and also allows excluding for the new taxonomies.
b. New Filters on Upsell Summary Results
On the Upsell Summary Results, we also have added new filters for the custom taxonomies added, which allows you to filter the Upsell Results via the new taxonomies, and monitor how Upselling is doing.

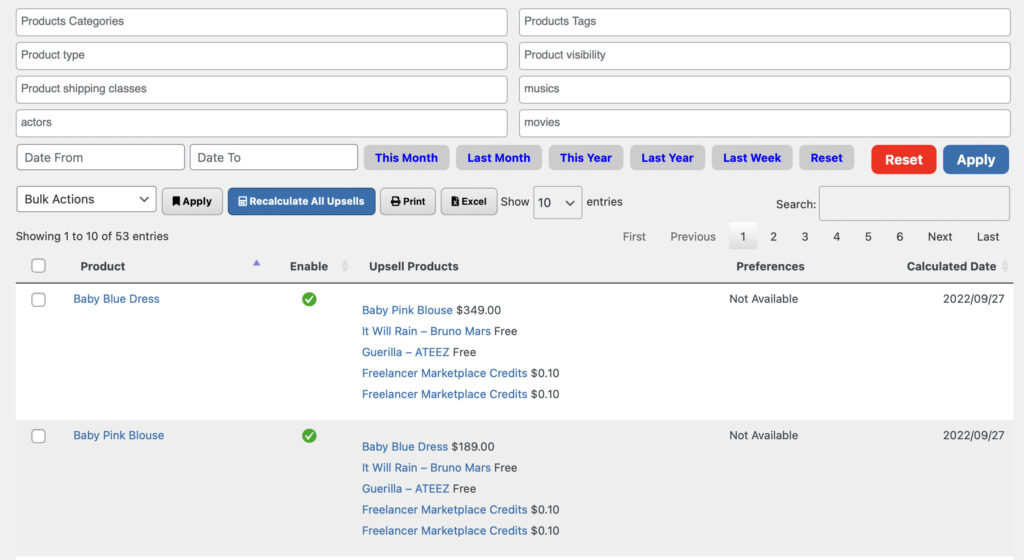
c. New Filters on Upsells Products List
In the Upsells Products List, we have applied the same by adding new filter boxes for the custom taxonomies we have just added.
Hooks
The psupsellmaster_base_products_id_list hook (filter) allows developers to set a product ID list (base products to retrieve upsells from). This hook has a higher priority when compared to other sources of base products. It is used to retrieve upsells for the shortcode, widget, block, add to cart popup, and exit intent popup.
Displaying Upsells
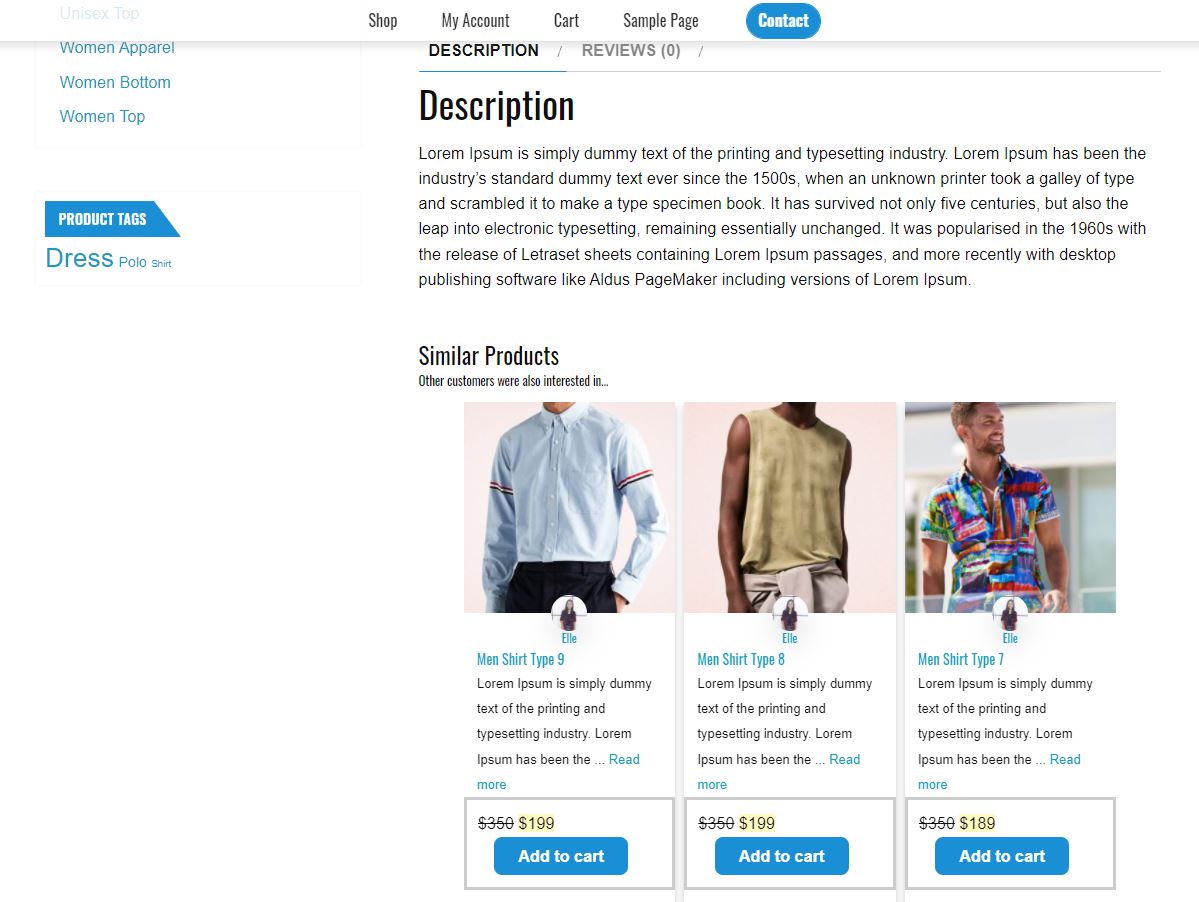
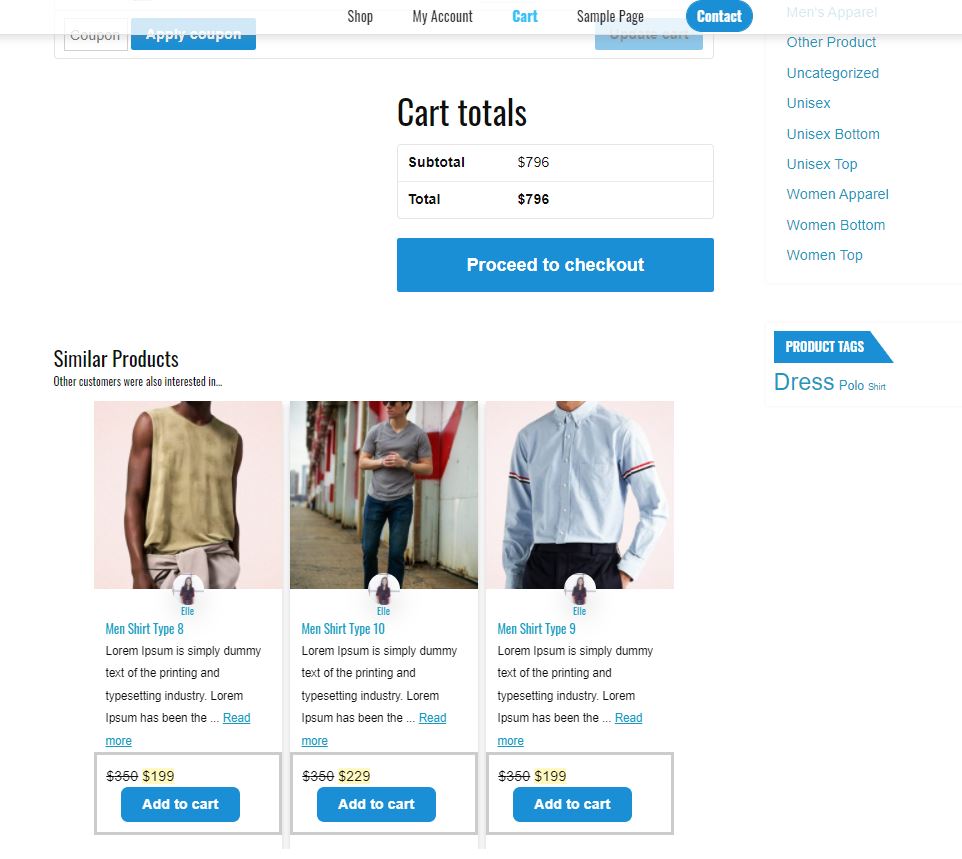
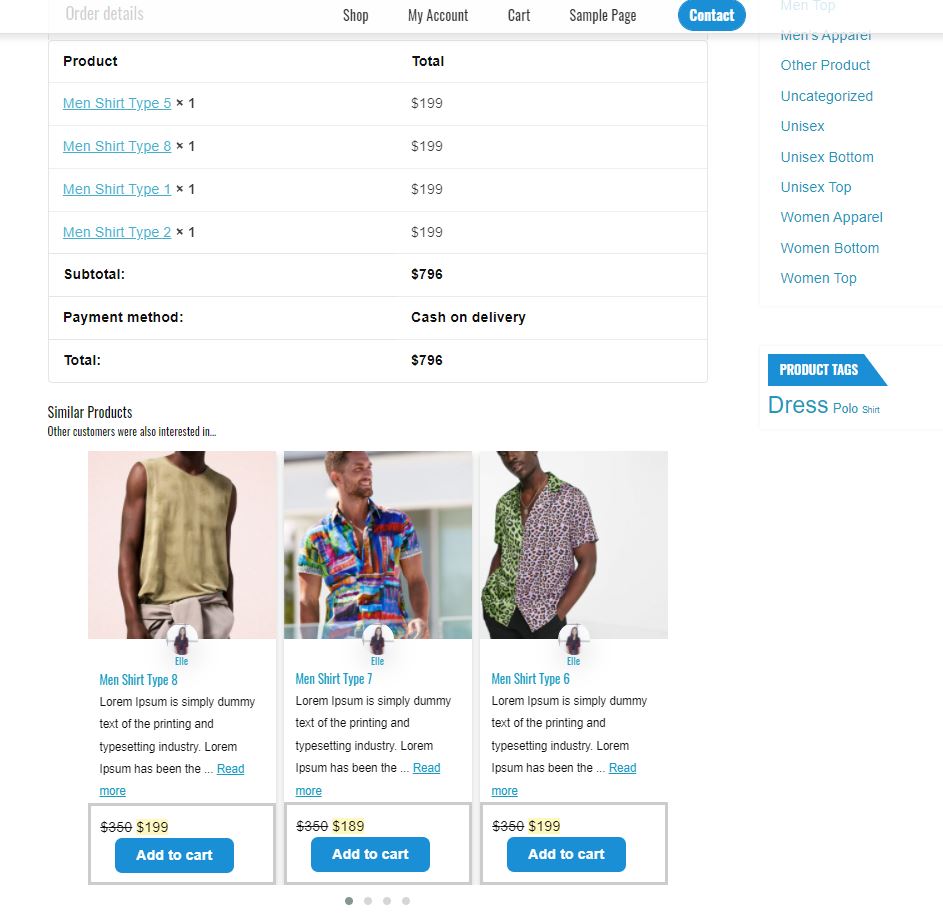
A great feature of this plugin is you can show Upsells on different pages across your website which is very helpful to gently push customers in browsing and purchasing products they might also be interested in.
You can display Product Upsells to different pages such as:
Product Page
Be able to show Upsells on Product Pages so your customers will have more options to choose from, or even purchase more products from your webstore that he/she might be interested as well.

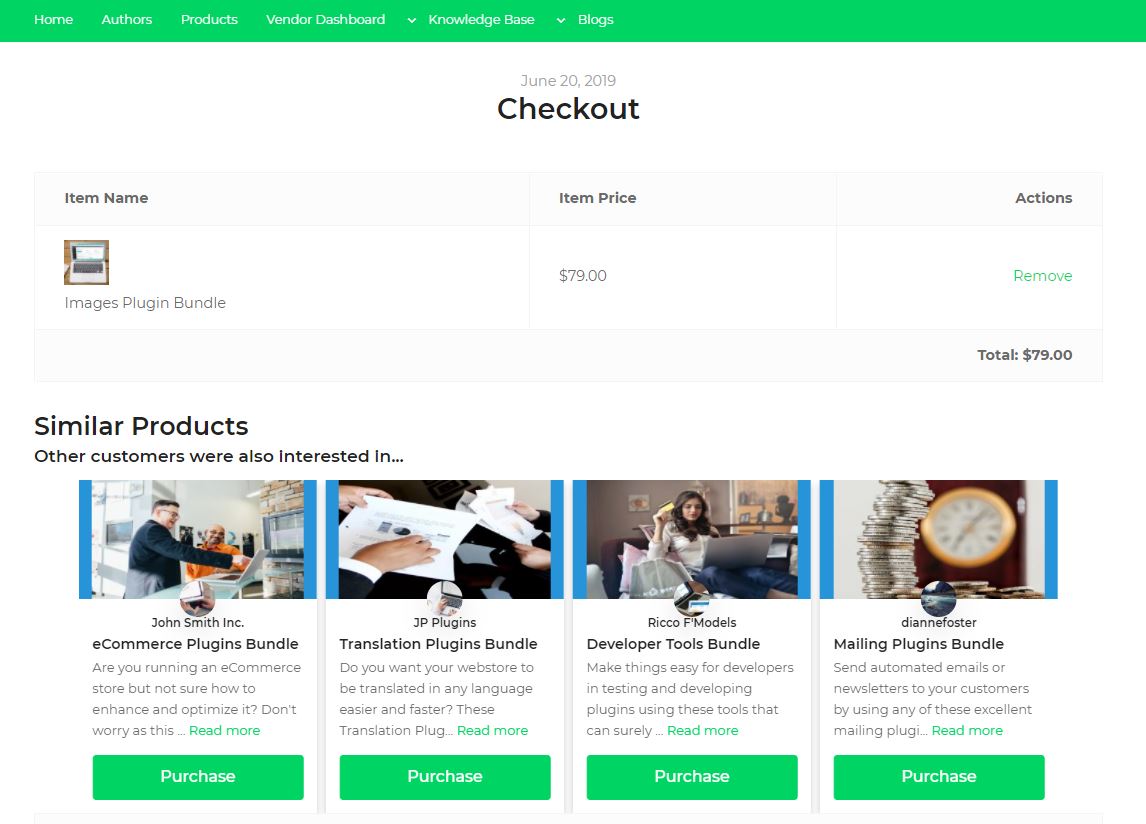
Checkout Page
Before your customers proceed in buying the products they desired, showing Upsells on the Checkout Page gives them additional product suggestions they might want to buy related to the product they are currently buying, thus increasing your Customer’s Lifetime Sales Value.
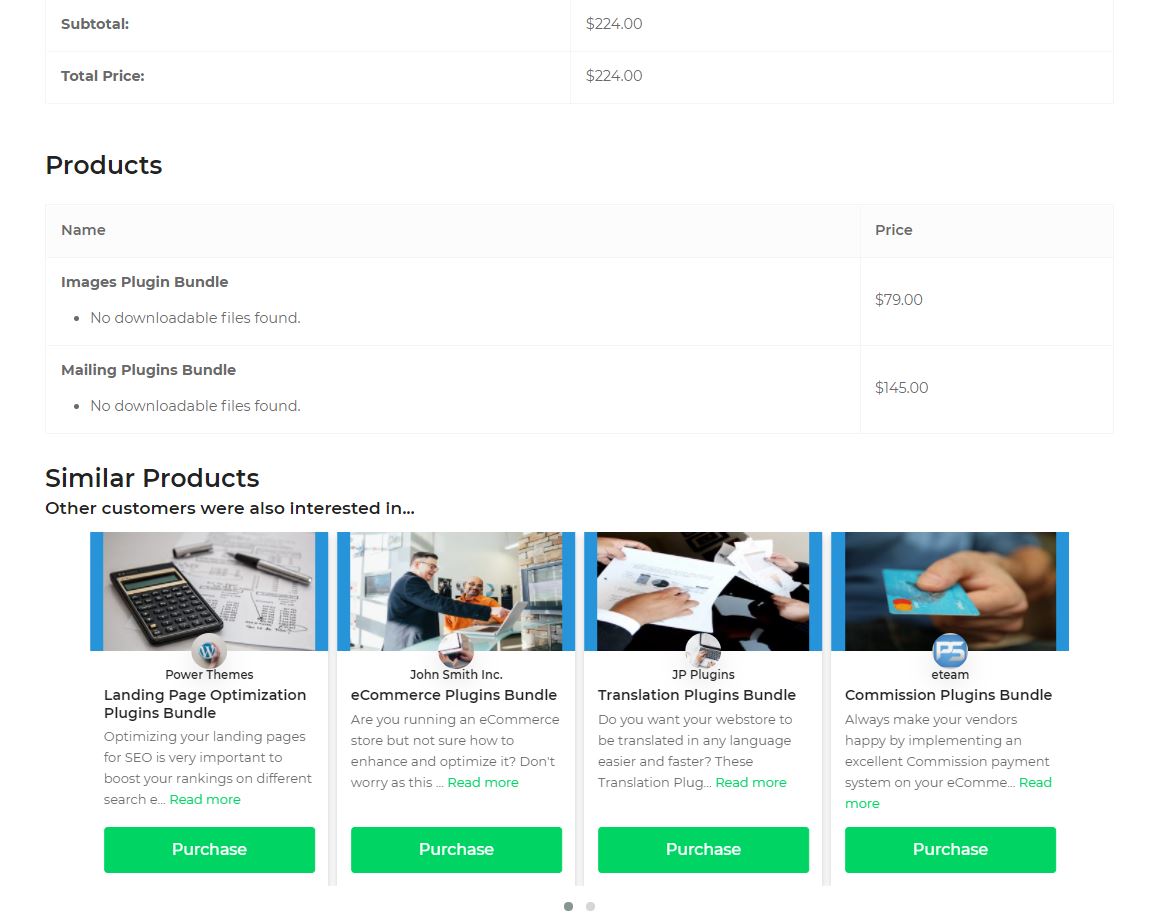
Purchase Receipt Page
Once your customers purchased the product they desired, a final reminder would be good by placing Upsells on the Purchase Receipt page, and once again show them related products they might also want to check out and purchase.
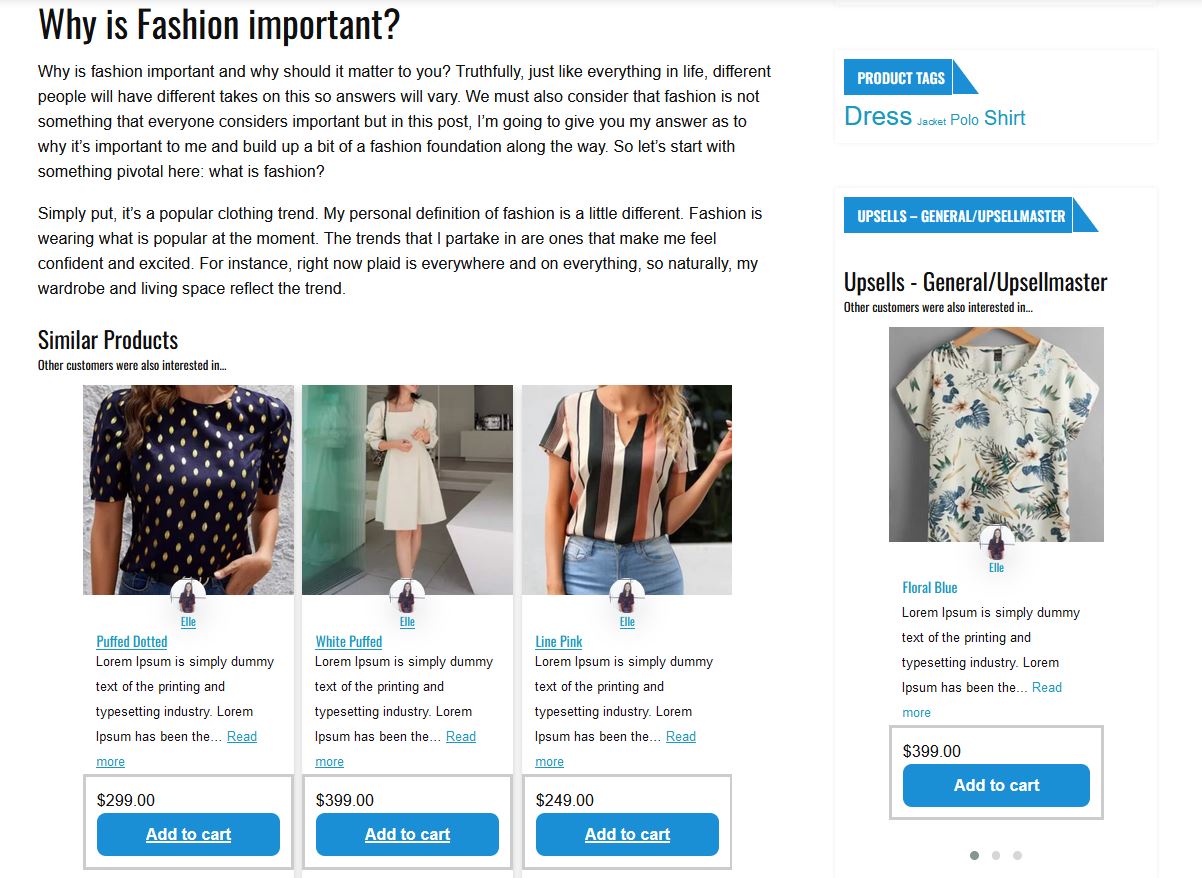
Any page via Shortcode or Gutenberg Block
If you want to show Upsells or Recently Viewed Products on any page or post, you can just insert a Gutenberg Block – UpsellMaster or a Shortcode on the content section.
Using this feature, we now have more places to show Upsells and Recently Viewed Products and gently push customers to purchase products they might be interested in whichever page they land on your website.
Any page with sidebars
For instance, customers didn’t proceed with the checkout but got distracted with your other pages such as a Blog Post, you don’t have to worry since you can also place Product Upsells on any page throughout your website with Sidebars using the Upsells Widget. Gently push them to products they might be interested in and might want to purchase later on.
WooCommerce Supported
This plugin is well-integrated with WooCommerce. You can simply install and activated this plugin on any WooCommerce WordPress webstores, configure the settings same as the one explained here for Easy Digital Downloads stores, and enjoy the automatic product upselling that can save you a lot of time from manually adding upsells product per product.

Settings Page
Here are the configuration options available when using this plugin.
General Settings
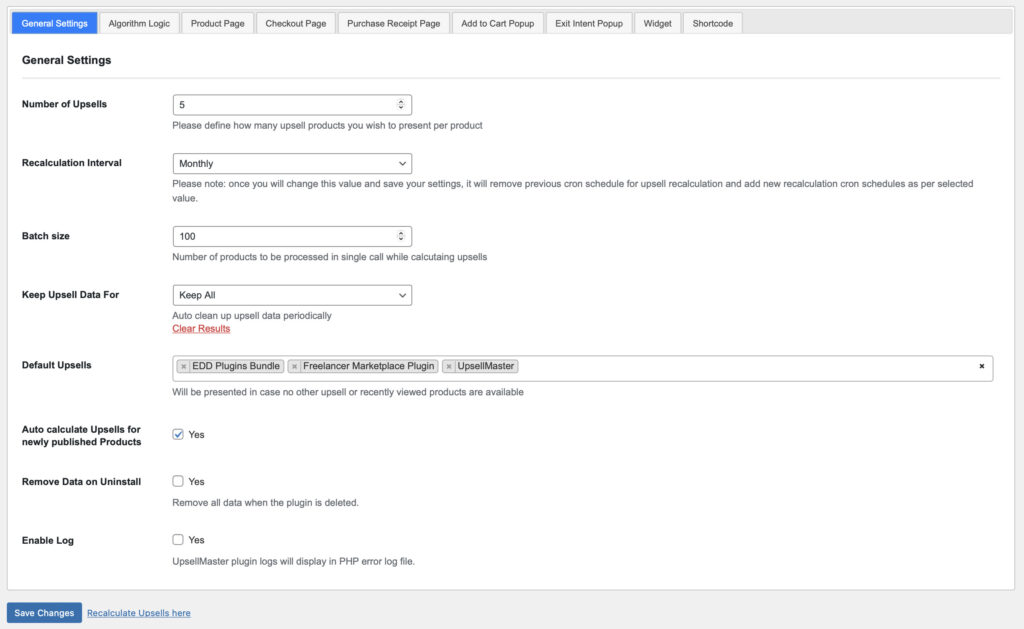
Number of Upsells – Define how many upsell products you wish to present per product.
Recalculation Interval – This is how frequently you want to change and recalculate the generated upsells per product. Please note that once you changed this setting, it will remove the previous cron schedule for upsell recalculation and add new recalculation cron schedules as per the selected value.
Batch size – Set the number of products to be processed in a single call while calculating upsells. This is important if you have too many products and need to calculate by batch.
Keep Upsell Data For – Define how many months or years you want to keep Upsells data. After that, the plugin will automatically clean it.
Default Upsells – Define which Upsells to show every base product throughout your website.
Auto calculate Upsells for newly published Products – Enable/Disable automatic calculation of upsells per new product added.
Remove Data on Uninstall – Option to allow the removing of all data when plugin is deleted, or not.
Enable Log – Enable/Disable logs that will be displayed in the PHP error log file.
The next settings section is the Algorithm Logic which is already discussed in the earlier part of this Documentation.
Algorithm Logic
The first thing you might want to know is how to enable Automatic Product Upselling – it’s very easy! First thing, head towards your WordPress Admin Page > Upsells Menu Bar > Settings.
Locate the Algorithm Logic – this is where we need to configure the Automatic Upselling Strategy. Below is what you should see on it.
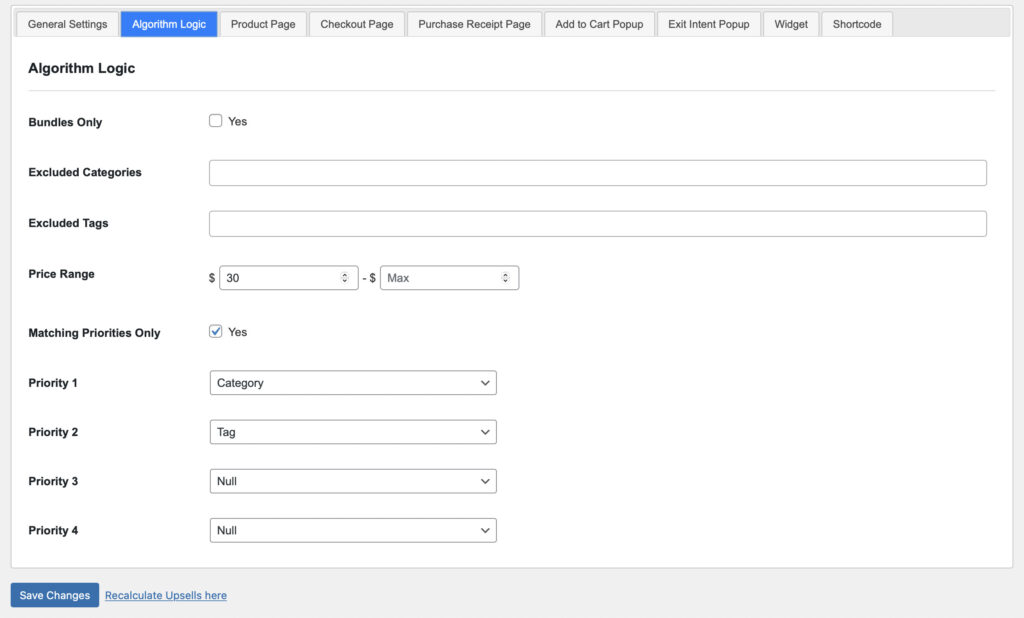
Exclude Categories and Tags – Simply indicate specific Download Categories and Tags to exclude when generating product upsells.
Price Range – You can set the minimum and maximum value o products you want to offer as Upsells.
Matching Priorities Only – Allows site admins to manipulate the display of Upsells in showing only matching priorities to the base product as Upsells.
Priority 1 to 4 – Decide which should be the priority factor when generating upsells to all your products. You can set either Vendor, Lifetime Sales, Category, Tag, and Null.
For example, you set Categories as Priority 1, therefore the plugin will calculate upsells within the same category as the base product first, and so on.
Product Page
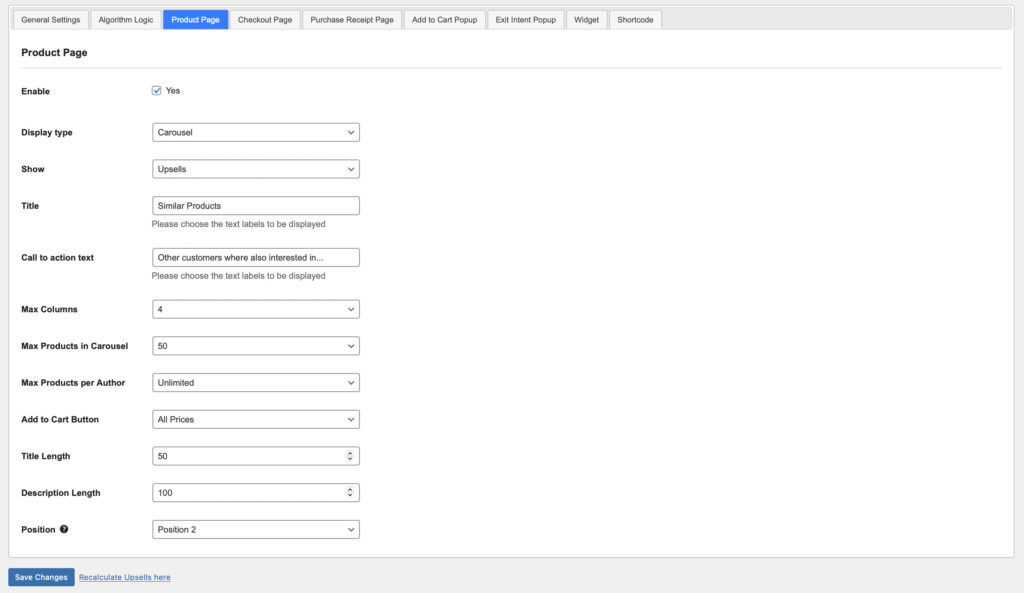
Enable – This allows you to enable or disable the display of Product Upsells on the Product Page.
Display Type – Choose either to display Product Upsells in a List or Carousel.
Show – Choose either to display Upsells or Recently Viewed Products.
Title – Define the title for this section.
Call to action text – Add more text to attract customer’s attention.
Max Columns – Define how many columns to show your Upsells.
Max Products in Carousel – Define how many Upsells to show in your carousel.
Max Products per Author – Define how many Upsells to show per product author.
Add to Cart Button – Define whether to show all price points or just the highest value of the product upsells.
Title Length – Define the number of title characters.
Description Length – Define the number of description characters.
Position – Select the position where to show the List/Carousel Upsells on the Product Page.
Checkout Page
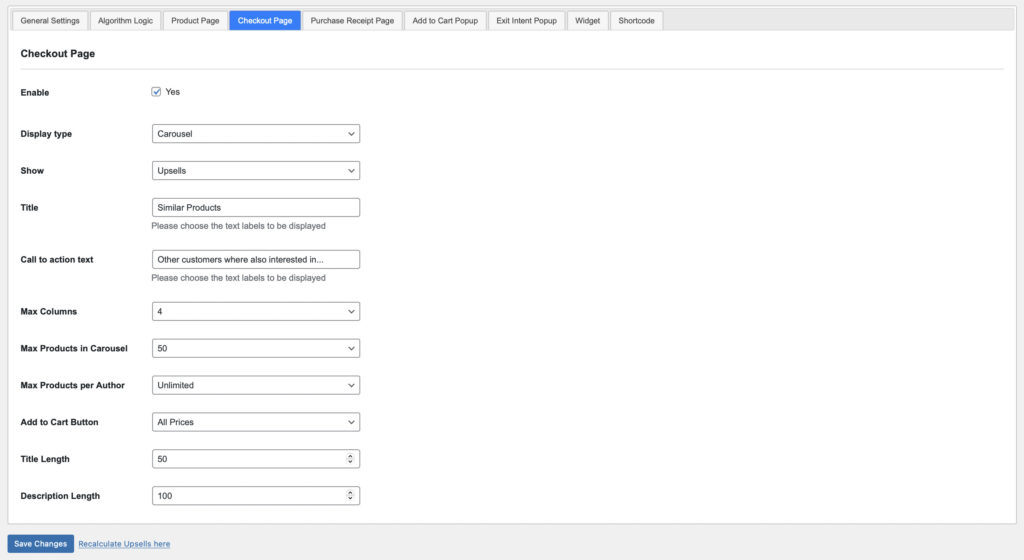
Enable – This allows you to enable or disable the display of Product Upsells on the Checkout Page.
Display Type – Choose either to display Product Upsells in a List or Carousel.
Show – Choose either to display Upsells or Recently Viewed Products.
Title – Define the title for this section.
Call to action text – Add more text to attract customer’s attention.
Max Columns – Define how many columns to show your Upsells.
Max Products in Carousel – Define how many Upsells to show in your carousel.
Max Products per Author – Define how many Upsells to show per product author.
Add to Cart Button – Define whether to show all price points or just the highest value of the product upsells.
Title Length – Define the number of title characters.
Description Length – Define the number of description characters.
Purchase Receipt Page
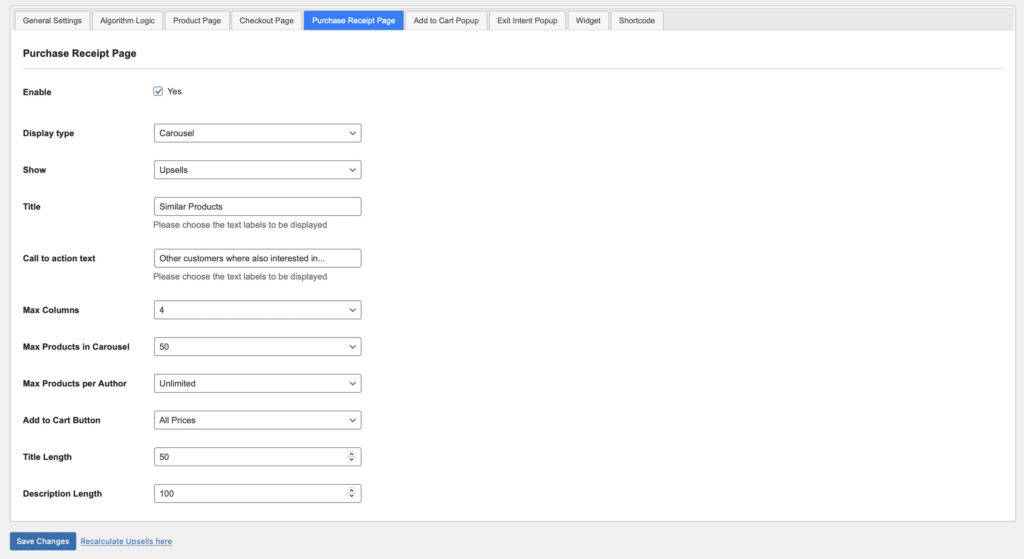
Enable – This allows you to enable or disable the display of Product Upsells on the Purchase Receipt Page.
Display Type – Choose either to display Product Upsells in a List or Carousel.
Show – Choose either to display Upsells or Recently Viewed Products.
Title – Define the title for this section.
Call to action text – Add more text to attract customer’s attention.
Max Columns – Define how many columns to show your Upsells.
Max Products in Carousel – Define how many Upsells to show in your carousel.
Max Products per Author – Define how many Upsells to show per product author.
Add to Cart Button – Define whether to show all price points or just the highest value of the product upsells.
Title Length – Define the number of title characters.
Description Length – Define the number of description characters.
Add to Cart Popup
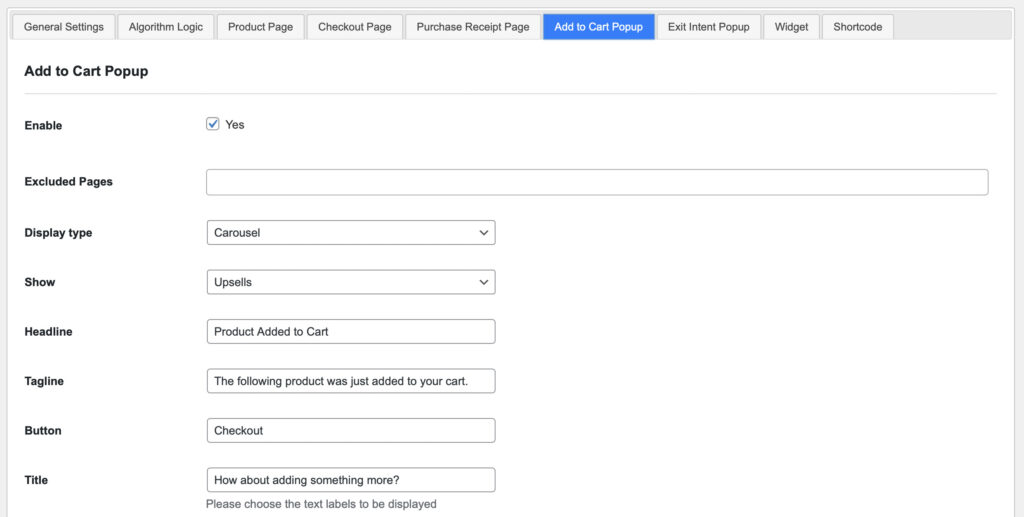
Enable – This allows you to enable or disable the display of Add to Cart Popups on your pages.
Excluded Pages – Select which pages to restrict Add to Cart Popup to show.
Display Type – Choose either to display Product Upsells in a List or Carousel.
Show – Choose either to display Upsells or Recently Viewed Products.
Headline – Define the title for this section.
Tagline – Define a subtitle for this section.
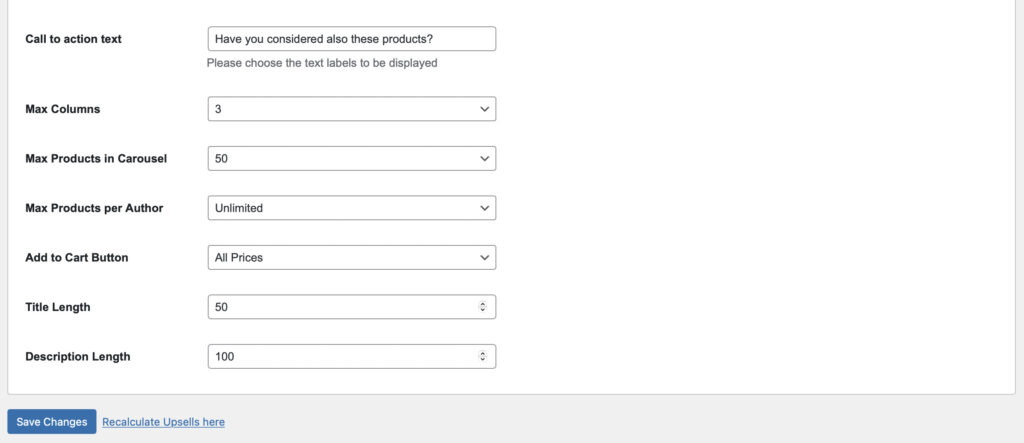
Call to action text – Add more text to attract customer’s attention.
Max Columns – Define how many columns to show your Upsells.
Max Products in Carousel – Define how many Upsells to show in your carousel.
Max Products per Author – Define how many Upsells to show per product author.
Add to Cart Button – Define whether to show all price points or just the highest value of the product upsells.
Title Length – Define the number of title characters.
Description Length – Define the number of description characters.
Exit Intent Popup
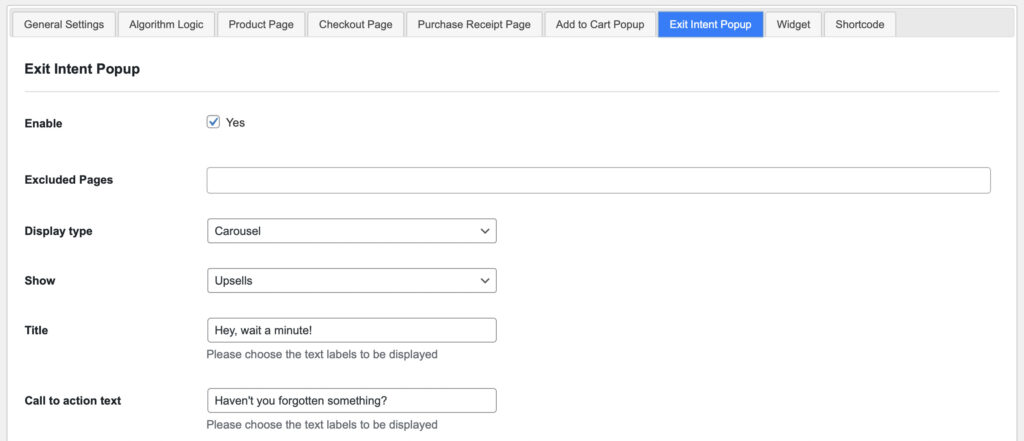
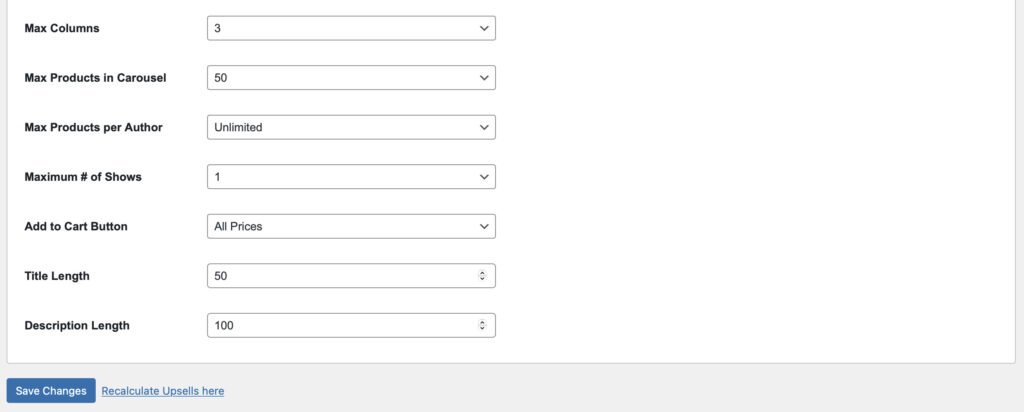
Enable – This allows you to enable or disable the display of Exit Intent Popups on your pages.
Excluded Pages – Select which pages to restrict Exit Intent Popup to show.
Display Type – Choose either to display Product Upsells in a List or Carousel.
Show – Choose either to display Upsells or Recently Viewed Products.
Title – Define the title for this section.
Call to action text – Add more text to attract customer’s attention.
Max Columns – Define how many columns to show your Upsells.
Max Products in Carousel – Define how many Upsells to show in your carousel.
Max Products per Author – Define how many Upsells to show per product author.
Maximum # of Shows – Define how much this popup would show up on user end.
Add to Cart Button – Define whether to show all price points or just the highest value of the product upsells.
Title Length – Define the number of title characters.
Description Length – Define the number of description characters.
Widget

The Widget tab basically reminds the user about the UpsellMaster Widget and easily redirects him/her to the Widget Settings area. There, you can customize your UpsellMaster Widget.
Shortcode
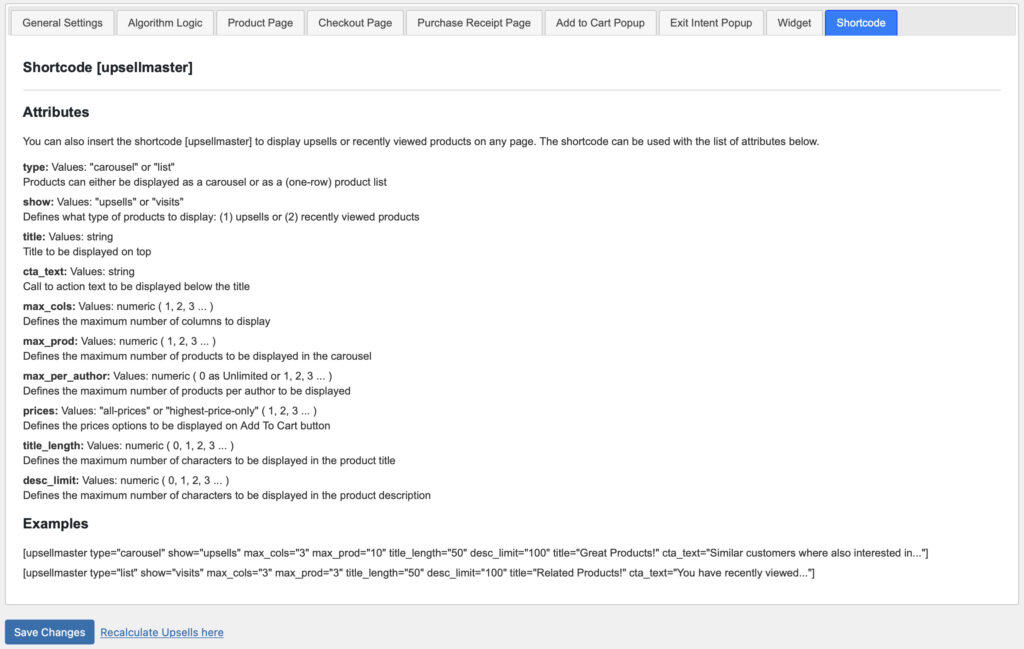
This section provides the shortcode and attributes you can use to easily insert Upsells or Recently Viewed Products on any page of your choice.
Main Shortcode: [ upsellmaster ]
The shortcode can be used with the list of attributes below.
- type: Values: “carousel” or “list”
Products can either be displayed as a carousel or as a (one-row) product list - show: Values: “upsells” or “viewed”
Defines what type of products to display: (1) upsells or (2) recently viewed products - title: Values: string
Title to be displayed on top - cta_text: Values: string
Call to action text to be displayed below the title - max_cols: Values: numeric ( 1, 2, 3 … )
Defines the maximum number of columns to display - max_prod: Values: numeric ( 1, 2, 3 … )
Defines the maximum number of products to be displayed in the carousel - prices: Values: “all-prices” or “highest-price-only” ( 1, 2, 3 … )
Defines the prices options to be displayed on Add To Cart button - desc_limit: Values: numeric ( 1, 2, 3 … )
Defines the maximum number of characters to be displayed in the product description
Examples
- [ upsellmaster type=”carousel” show=”upsells” max_cols=”3″ max_prod=”10″ desc_limit=”100″ title=”Great Products!” cta_text=”Similar customers where also interested in…” ]
- [ upsellmaster type=”list” show=”viewed” max_cols=”3″ max_prod=”3″ desc_limit=”100″ title=”Related Products!” cta_text=”You have recently viewed…” ]
Frequently Asked Questions
Can I exclude a specific Download Categories/Tags when generating Upsells?
Yes. There are two ways to do this:
First, is by going to the Settings Page > Algorithm Logic > Exclude Categories / Tags. Here you can enter the specific Download Category or Tag that you want to be excluded when generating Upsells throughout your website.
Another one is to go to the specific base product, scroll down to the page, and enable exclude and define upsells you don’t want to be generated for this base product.
What are the priorities I can set by generating automatic upsells?
You can set either by Vendor, Lifetime Sales, Category, Tag, and Null for the algorithm logic of the automatic upselling.
Can I know which Base Product an Upsell Product was bought with?
Yes. You can check the list of all Upsells bought, as well as the Base Product they are bought with by going to the Upsell Summary page.
Can I know which location of webpage does an upsell product were first clicked?
Yes. To check which location the Upsell product was first clicked and added to the cart of the customer, you can go to the Upsell Summary Page, scroll down on the list, and check the Location per Upsell bought.
Can I disable Product Upsells for a specific Base Product?
Yes. To do this, go to Upsells > Products > Choose the specific download you want to exclude from generating upsells, and then click on Disable.
Can I display Product Upsells on a blog post or any other page?
Yes. You can do this by setting up the Upsells Widget and add it to page sidebar available.
Is there a Recalculation Interval if I want to frequently change the Product Upsells?
Yes. On the settings page, you can set the Recalculation Interval either daily, weekly, monthly, or never (if you want to turn it off).
Are Upsells Data deleted after recalculation or not?
This depends on the configurations on the Settings page. To do this, go to Settings > General Settings > Keep Upsell Data For. Here you can define how many months or years you want to keep Upsells data or just never keep it. After that, the plugin will automatically clean it.
Are Upsells automatically calculated for newly added products?
Depends on whether you enable or disable the automatic generation of Product Upsells on every newly published product. You can do this by going to the Settings Page > General Settings, and locate the specific settings.
Does your plugin support Custom Taxonomies?
Yes. Our plugin’s algorithm now includes custom taxonomies that can be used to generate tailored upsells, as well as filter the Upsell Product List and Results Summary Chart.
Upsells do not show up on product page?
Here are the steps you can do to fix this problem:
- Add Default Upsells by going to the Settings page.
- Make sure that Upsells are enabled.
- If you use EDD, try changing to Position 2 in the Settings > Product Page. This is to work around a conflict with WP Bakery.

