Whenever you offer a file upload on your WordPress website, the question is where these files are uploaded to. In WordPress, the uploaded files typically end up in a subfolder in the /wp-content/upload/ directory.
The problem with file uploads is the security aspect. “As is” the files would be accessible to anybody as they are unprotected. Therefore, if unauthorized people know the file path and file name, they can easily download the files from your WordPress directory. This poses a significant security threat as you do not want anyone unauthorized to enter your website and steal important files. This is even more critical, if you run a digital web store by using Easy Digital Downloads where you rely on selling downloadable files.
The same is true for the Freelancer Marketplace plugin. Files uploaded by users need to be protected against unauthorized file access.
Security Concept
The solution is to implement security measures which first checks if somebody indeed is duly authorized to access the files. This can only be done when cross-checking the user’s privileges inside the WordPress user database. This means, every user needs to run through a specific php script which checks this and we need protection from users which are trying to access files from the web without authorization.
Depending on the server type, we either need to use .htaccess files or server rules to prevent unauthorized file access.
Apache Servers
One solution for Apache-powered websites is to deny access to the file download directory of Freelancer Marketplace Plugin in WordPress by using an .htaccess file in /wp-content/uploads/freelancer_marketplace/ folder which contains rules to prevent access by unauthorized users. The contents of the .htaccess file can be as follows:
Options -Indexes deny from all
NGINX Servers
Like Apache, Nginx is a contemporary and quick web server software and is mostly used by advanced users which require faster performance than Apache servers can offer. .htaccess files do not work when using Freelancer Marketplace Plugin on a WordPress website powered by NGINX.
What we need to do here is to define a server redirect rule within the NGINX server configuration. Please note, you might need to contact your web hosting provider to get help implementing such a rule.
These are the steps to follow:
Define a list of File Types such as docc, pptx, pdf, zip, which need to be protected against unauthorized download
Setup a redirect rule in the NGINX Server such as the following:
What the rule will do is to rewrite the file path whenever somebody tries to access a file matching on these file types via browser access. This now also means, files can only be accessed when using a php function. In Freelancer Marketplace Plugin, we are exactly
doing this, checking every time if a user has the rights and privileges to access certain files.
Check out the Freelancer Marketplace Plugin pages below:
Every time a user registered on your website, the site
admins will receive a notification email that tells them to whether accept or
reject the user’s registration.
What happens
when the users do not activate their accounts?
If the Freelancer and Customer Profiles are not
activated, they simply cannot use the features of this plugin only until they
activate their accounts.
What happens
when the admin deletes a user profile?
Only the Freelancer profile will be deleted but not the
user itself. If you wish to also delete the user, you need to go to the User
table and delete.
What happens
when the admin suspends a freelancer profile?
During profile suspension, freelancer’s Open Bids will be removed and Accepted Projects will be aborted.
Can the users login/register using Social Accounts?
Yes. Our plugin is very much compatible with the OneAll Social Login plugin that gives users a very easy registration procedure by just using their social accounts.
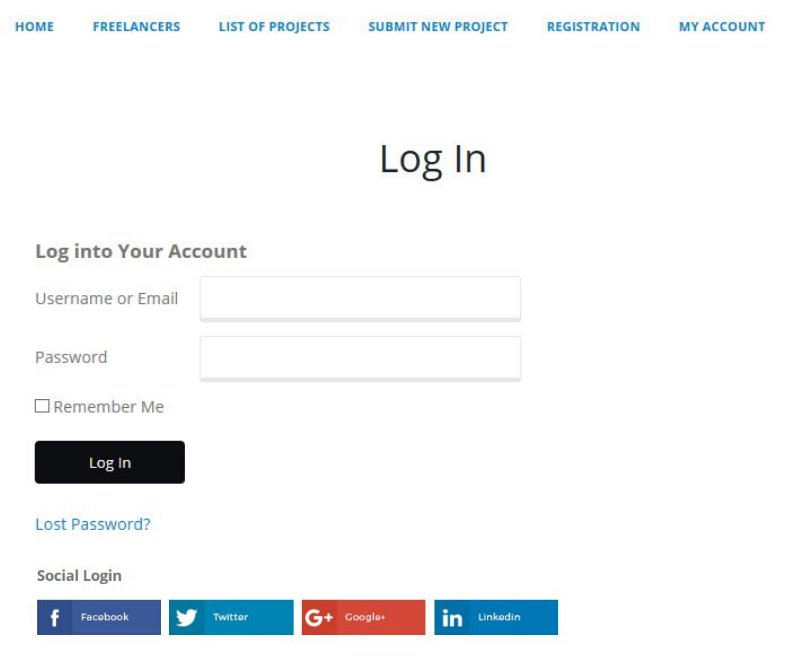
Freelancer Marketplace Plugin Social Login Buttons at Login Page
Projects
How are
submitted projects approved?
Every time a project has been submitted on your website,
the site admins will receive a notification email that tells them to check the
project and approve/decline it. They can choose to set the project approval to
auto and manual approval modus.
What if a
submitted project got declined?
The customer will also get notified through email asking
to edit and modify the project for it to be approved.
Can a customer choose a specific freelancer to work on his/her project?
Yes. With our very smooth and easy onboarding process, customers can choose a specific freelancer to work with by going on the list of Freelancers and clicking on the Hire Me button.
When can a user add milestones to the project?
Upon bid submission, the Freelancer can outright define his suggested project milestones, and if approved, the Customer will accept and pay it.
During project execution, both users can still add more milestones in the project.
Will all projects be published on the public list?
No, some projects are private when they are initiated by using the Hire Me Button of a Freelancer
Freelancers
Can Customers
become Freelancers?
Yes. If a user initially registered at either role, he/she
can subsequently register for another role, which must also be approved and
activated first.
Can
freelancer submit his/her own projects?
Yes. Anytime, a Freelancer can also be a Customer by
submitting a project and having his/her Customer profile approved and
activated.
Can
freelancers submit bids lower than the Project Budget?
Yes. You can turn on/off this settings on Freelancer Marketplace > Settings > Main Settings. Tick/Untick the box for “Allow bids less than the minimum project budget”.
Bids
Can bids be
changed after submission?
Yes. After
submitting a bid, you can still change, edit and even cancel it.
Can
freelancers see bids of other freelancers?
This depends on the settings set by the site admins which can be either hidden or not.
Payments
How does a
freelancer get paid?
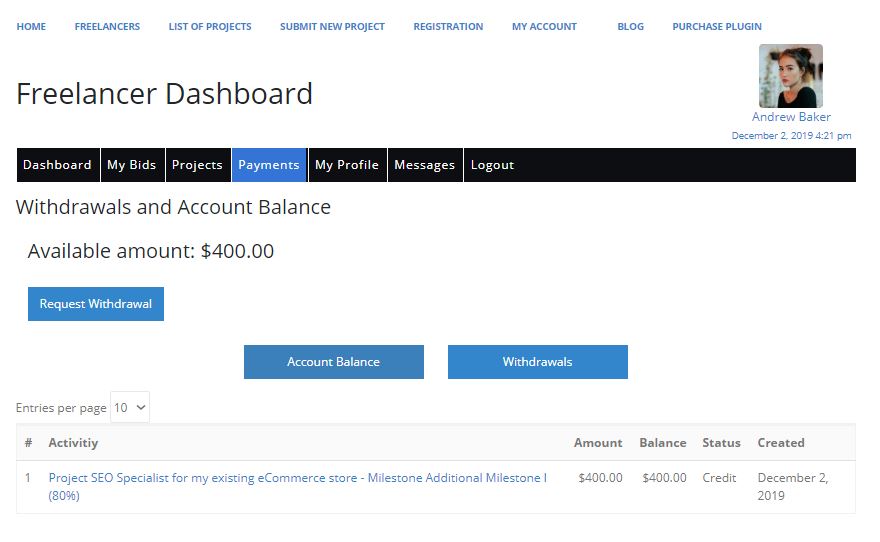
If the Freelancer wishes to get paid, he/she can simply go to Freelancer Dashboard > Payments. Then click on Request Withdrawal button that triggers an email to be sent to site admins that this Freelancer wishes to get paid.
Translation
How to translate
the plugin using different languages?
If you need this plugin to be translated to your native language other than English, you can able to do so with the normal .mo and .po files. You can do this by using the Poedit software. Follow the instructions in this article to learn how to do it.
Template Override
How to override templates in our plugin?
To create an Template Override file such as for our Freelancer Profile, Project Page and others, you have to create folder “fm_templates” inside the Child Theme or Parent Theme and place modified template files of Plugin which is under “templates” folder inside our plugin.
Also, if you want to replace Email Template Design that our plugin use to send emails then you can follow the same steps above by creating “email/template.html” file inside the “fm_templates” of Child/Parent theme. So Final path should be “fm_templates/email/template.html” you can copy this file from the plugin and make appropriate changes that you want.
Editor Block
Does this plugin work with the WordPress Gutenberg Block Editor?
Yes, the Freelancer Marketplace Plugin can work with the Gutenberg Block Editor when creating the frontend pages. The plugin also has several shortcodes you can use to insert on a Gutenberg Block to build a certain page.
To create an Template Override file such as for our Freelancer Profile, Project Page and others, you have to create folder “fm_templates” inside the Child Theme or Parent Theme and place modified template files of Plugin which is under “templates” folder inside our plugin.
Also, if you want to replace Email Template Design that our plugin use to send emails then you can follow the same steps above by creating “email/template.html” file inside the “fm_templates” of Child/Parent theme. So Final path should be “fm_templates/email/template.html” you can copy this file from the plugin and make appropriate changes that you want.
7.2 Languages
If you need this plugin to be translated to your native language other than English, you can able to do so with the normal .mo and .po files. You can do this by using Poedit software. Follow the instructions in this article to learn how to do it.
7.3 Backups
It is very important
to have a backup of your
website ready especially when
you experience a hack or things go wrong during an internal action or
update. This way, you’ll
have an easy access to a clean
version of your website right before
something goes wrong.
Although it may sound overly technical to do, it’s actually
quite easy. Many hosts provide simple ways to create backups within their
customer control panels and even if they don’t, there are several backup
plugins made specifically for WordPress that are easy to use.
A good backup website tool we recommend you to use are ManageWP and BlogVault.
7.4 Social Login
Freelancer Marketplace Plugin enables the site admins to give users the capacity to register and/or log in using their Social Accounts. You can do this by installing and configuring the OneAll Social Login Plugin. This gives an easier and smoother registration process for all users on your platform. The Freelancer Market Plugin is very much compatible with the OneAll Social Login Plugin.
Freelancer Marketplace Plugin Social Login Buttons at Login Page
7.5 Page-Speed
When it comes to page speed, if your website takes more than
2 seconds to fully load, it can be a serious concern. A slow-loading website
can cause significant loss – also it will dramatically increase your bounce
rate and affects your SERPs standing.
To maintain a fast and stable page speed with this plugin, we advise you to use an external email service such as SendGrid or Mailgun. This is because there are tons of emails to be sent out to different parties during the plugin’s processes.
It is also important to regularly test your page speed using tools such as Google Page Speed Insights and GTmetrix. This enables you to correctly measure and check the page loading time of your website.
7.6 Stage Server
If you are operating a large website and marketplace where
you have frequent software updates, we recommend you to also set up a stage
server. This is to check and test if your software updates run smoothly and is
compatible all of your other plugins, which prevents further complications and
problems on your website.
Take note to use a dev subdomain to setup your stage server as
this way you can also update your plugins even if you only have a single page
license. As this is only a subdomain, updating your plugins with single site
license won’t be an issue.
7.7 Security
Hacking is regularly performed by automated scripts written
to scour the internet in an attempt to exploit known website security issues in
software. Especially when you are
operating a Freelancer Marketplace Website, where users store a lot of personal
and sensitive information, you need to enhance your website security using WordPress
Security Plugins that actively prevent website hacking attempts. Each of the
main CMS options has security plugins available, many of them for free.
Wordfence Security Plugin is the most popular WordPress Security Plugin with over 2 million active installs and that is really impressive considering how many great security plugins exist. Learning how to protect your Freelancer Marketplace platform against hackers is a big part of keeping it healthy and safe in the long run.
7.8 Themes
This plugin is compatible with free WordPress Themes such as DigiFly, Astra, PopularFX, and Storefront. Also, this plugin has been tested to work well with our Fiery Theme. A Beta Version of this theme will only be available on request. We are currently looking for Theme Developers who might want to test and use our plugin.
Enumerated below are the main settings available for this plugin that you can change and configure.
6.1 Main Settings
Projects
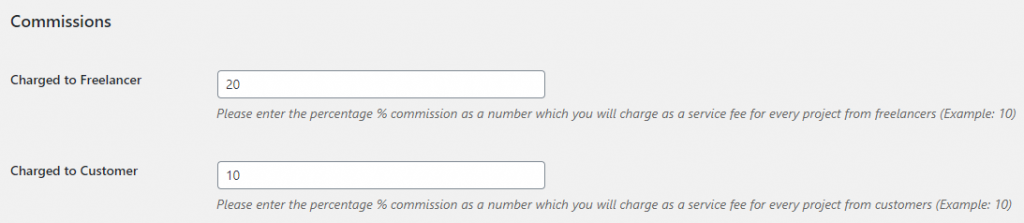
Commissions
Charged to Freelancer – Enter the percentage % commission as a number which you will charge as a service fee for every project from freelancers (Example: 10)
Charged to Customer – Enter the percentage % commission as a number which you will charge as a service fee for every project from customers (Example: 10)
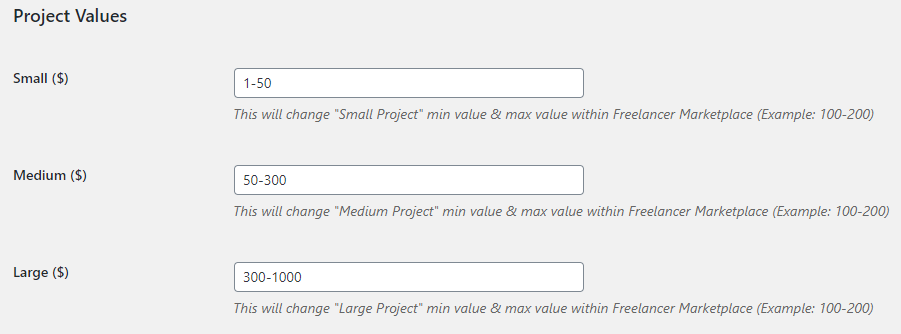
Project Values
Small ($) – Enter a value here that will change “Small Project” min value & max value within Freelancer Marketplace (Example: 100-200)
Medium ($) – Enter a value here that will change “Medium Project” min value & max value within Freelancer Marketplace (Example: 100-200)
Large ($) – Enter a value here that will change “Large Project” min value & max value within Freelancer Marketplace (Example: 100-200)
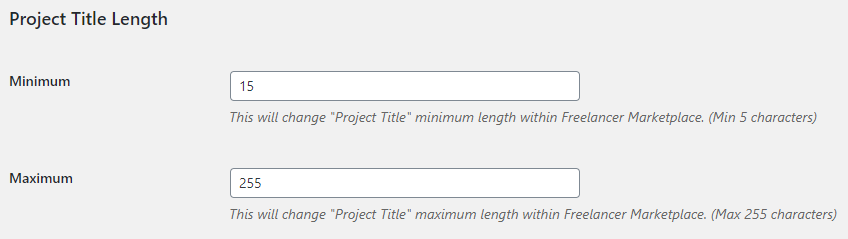
Project Title Length
Minimum – Enter a value here that will change “Project Title” minimum text length within Freelancer Marketplace. (Min 5 characters)
Maximum – Enter a value here that will change “Project Title” maximum text length within Freelancer Marketplace. (Max 255 characters)
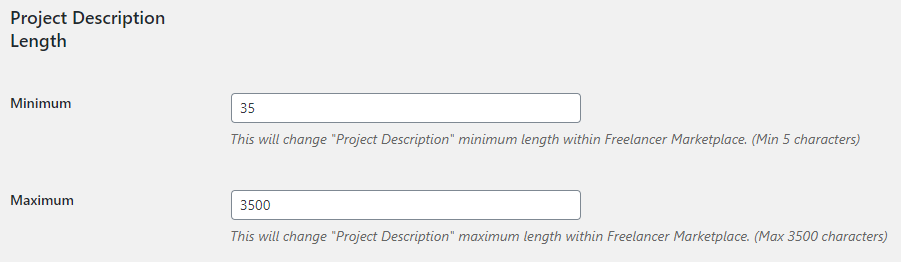
Project Description Length
Minimum – Enter a value here that will change “Project Description” minimum text length within Freelancer Marketplace. (Min 5 characters)
Maximum – Enter a value here that will change “Project Description” maximum text length within Freelancer Marketplace. (Max 3500 characters)
Project Settings
Automatic Project Deactivation (Days) – Set the number of days here that after will automatically deactivate projects which do not receive a valid bid. (0 means Off, Max 100 Days)
Projects per page (pagination) – Set the number of how many projects are shown per page in backend list of projects.
Maximum file size – Set a value here that will serve as the “Message and Project Files” maximum size (MB) within Freelancer Marketplace. (Max 100 MB)
File upload limit – Enter a value here that specifies the maximum number of files a user can upload when submitting a project.
Allow ratings before projects are completed – Tick/Untick this box to decide if you’ll allow ratings submission even before the projects are completed.
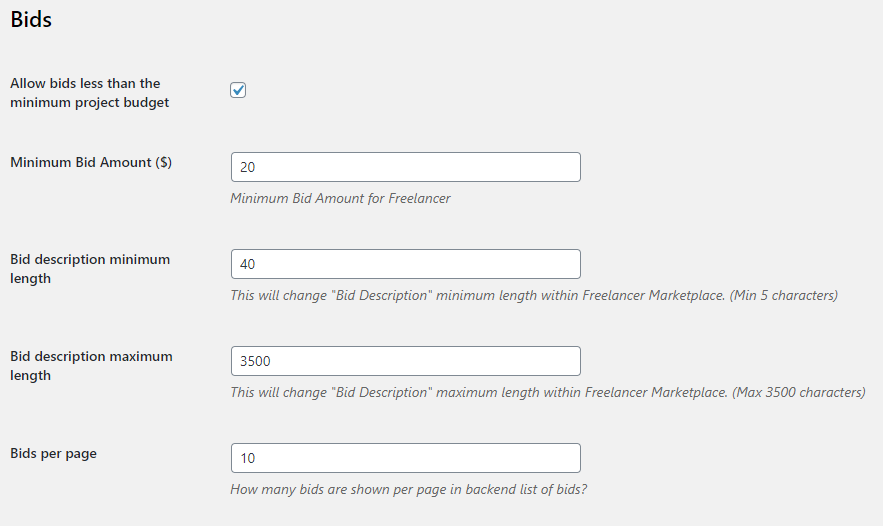
Bids
Allow bids less than the minimum project budget – Tick/Untick this box to decide if you’ll allow bid submission less than that of the minimum project budget set by the Customer.
Minimum Bid Amount ($) – Set a value here that will serve as minimum Bid Amount for Freelancer
Bid description minimum length – Enter a value here that will change “Bid Description” minimum text length within Freelancer Marketplace. (Min 5 characters)
Bid description maximum length – Enter a value here that will change “Bid Description” maximum text length within Freelancer Marketplace. (Max 3500 characters)
Bids per page – Set a number here of how many bids are shown per page in backend list of bids.
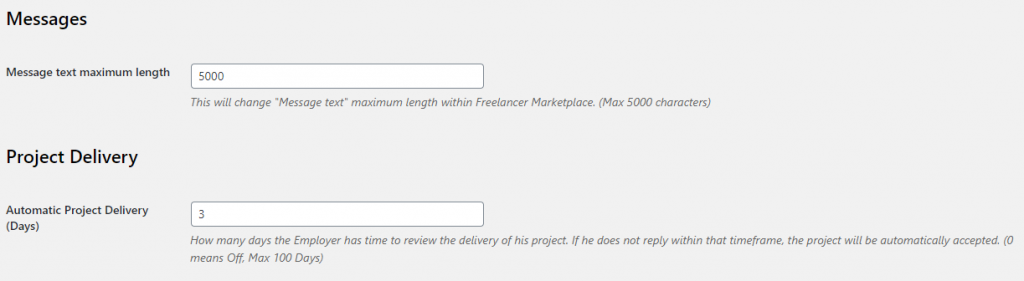
Messages
Message text maximum length – Enter a value here that will change “Message text” maximum text length within Freelancer Marketplace. (Max 5000 characters)
Project Delivery
Automatic Project Delivery (Days) – Set the number of days here that the Employer has to review the delivery of his project. If he does not reply within that timeframe, the project will be automatically accepted. (0 means Off, Max 100 Days)
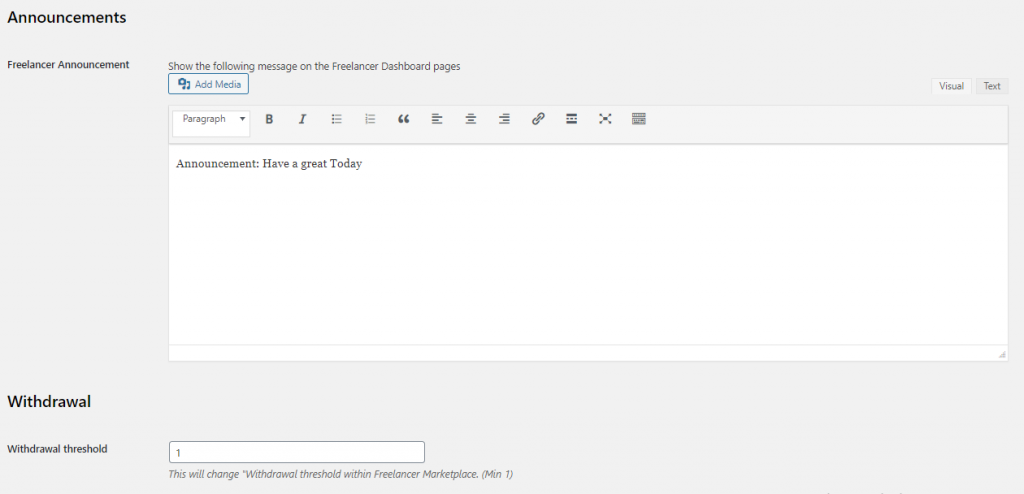
Announcements
Freelancer Announcement – Enter a message here that will show on the Freelancer Dashboard pages.
Withdrawal
Withdrawal threshold – Enter a value here that will serve as the withdrawal amount threshold within Freelancer Marketplace. (Min 1)
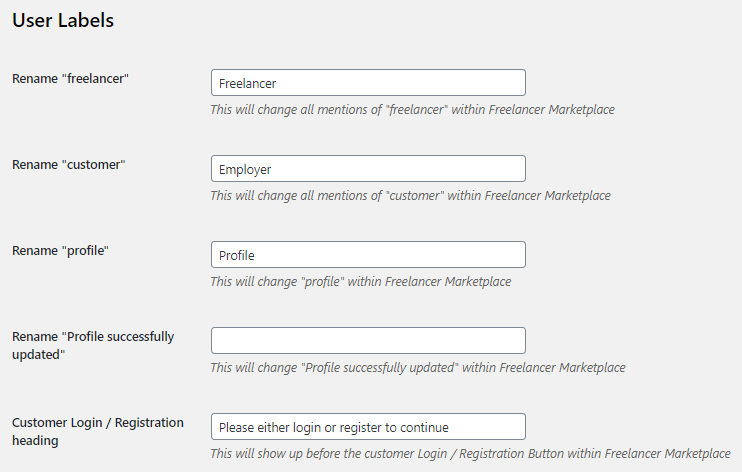
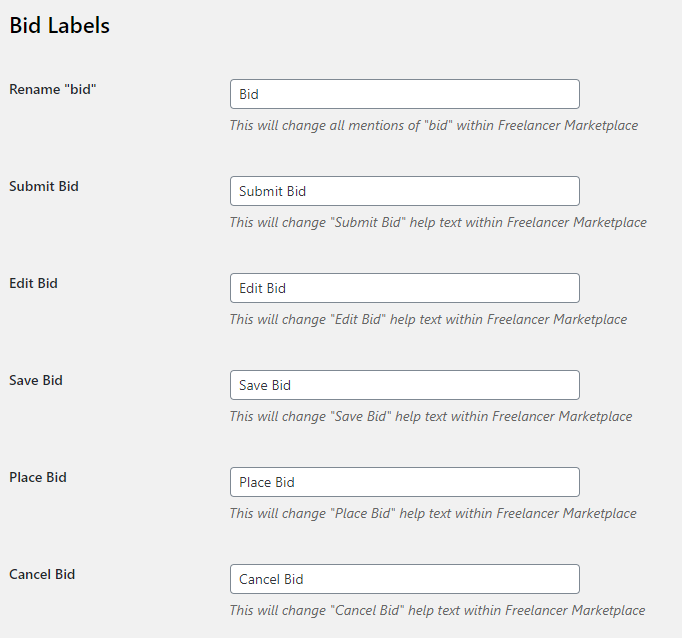
6.2 Labels
The following are the labels/text
which you can change and rename throughout the Freelancer Marketplace. When you
enter another text label on each, it will change all mentions of that label
within this plugin.
User Labels
freelancer
customer
profile
Profile successfully updated
Customer Login / Registration heading text
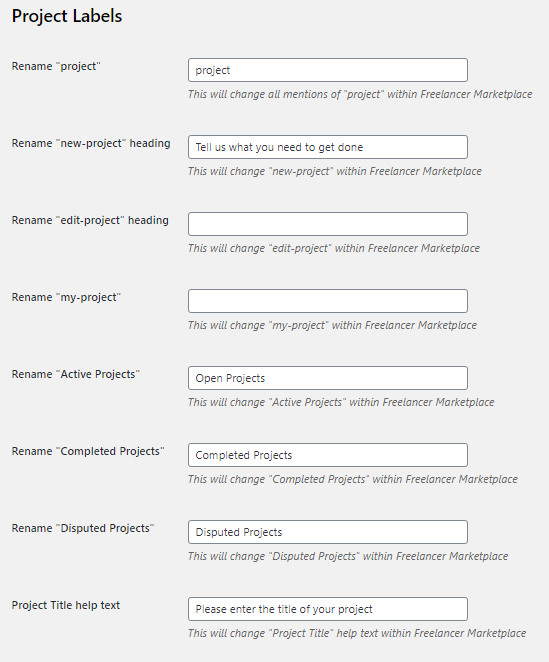
Project Labels
project
new-project
edit-project
my-project
Active Projects
Completed Projects
Disputed Projects
Project Title help text
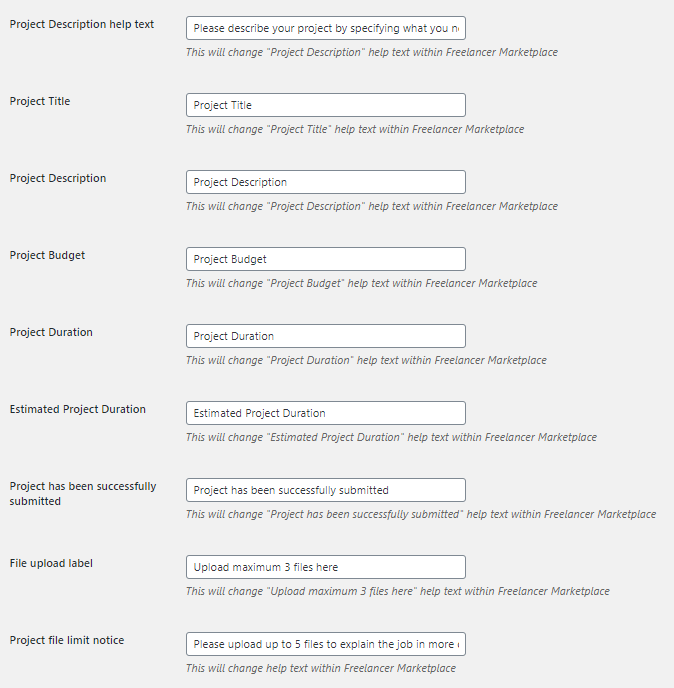
Project Description help text
Project Title
Project Description
Project Budget
Project Duration
Estimated Project Duration
Project has been successfully submitted
File upload label
Project file limit notice
Skill Labels
skill
Skills required
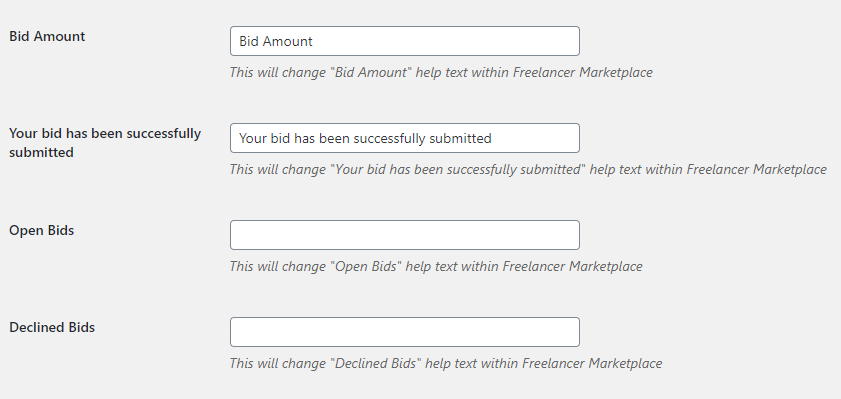
Bid Labels
Bid
Submit Bid
Edit Bid
Save Bid
Place Bid
Cancel Bid
Bid Amount
Your bid has been successfully submitted
Open Bids
Declined Bids
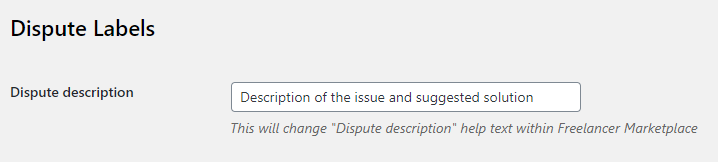
Dispute Labels
Dispute description
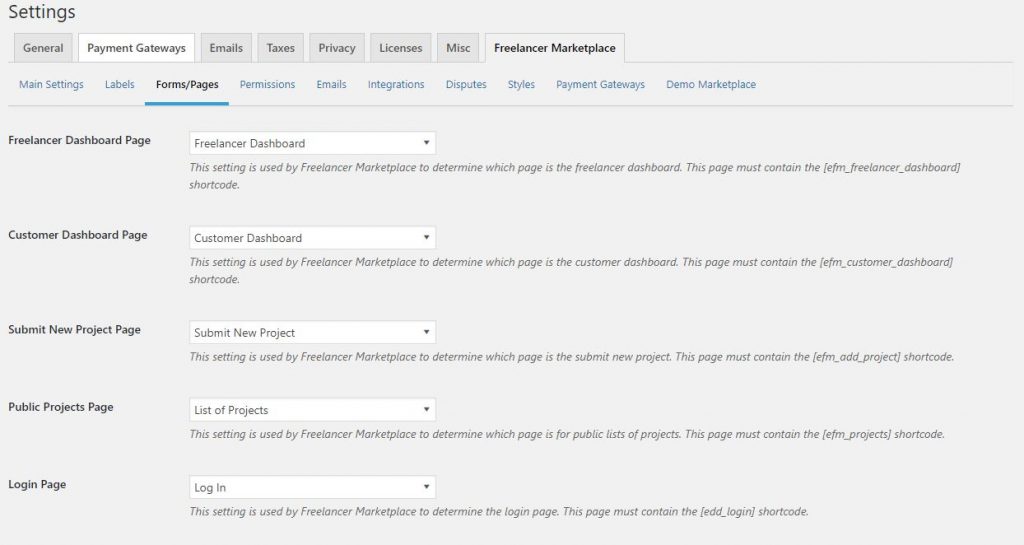
6.3 Forms/Pages
The following are the settings which will enable you to set
a default form/page on each.
Freelancer Dashboard Page – This setting is used by Freelancer Marketplace to determine which page is the freelancer dashboard. This page must contain the [efm_freelancer_dashboard] shortcode.
Customer Dashboard Page – This setting is used by Freelancer Marketplace to determine which page is the customer dashboard. This page must contain the “[efm_customer_dashboard]” shortcode.
Submit New Project Page – This setting is used by Freelancer Marketplace to determine which page is the submit new project. This page must contain the [efm_add_project] shortcode.
Public Projects Page – This setting is used by Freelancer Marketplace to determine which page is for public lists of projects. This page must contain the [efm_projects] shortcode.
Login Page – This setting is used by Freelancer Marketplace to determine the login page. This page must contain the [edd_login] shortcode.
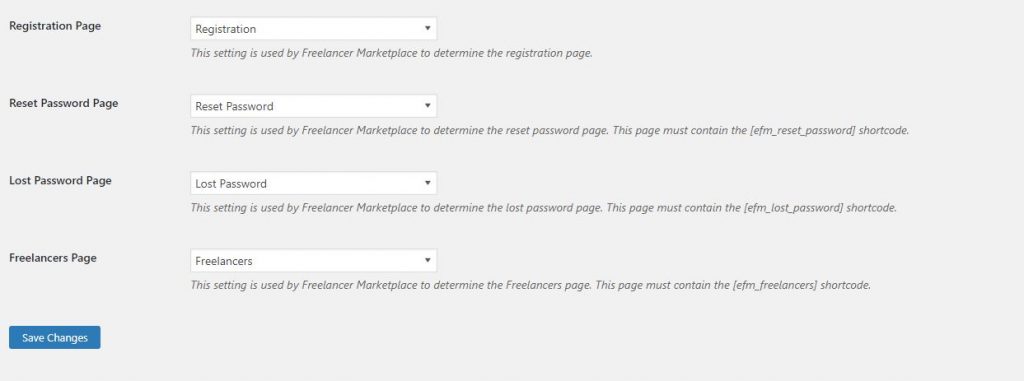
Registration Page – This setting is used by Freelancer Marketplace to determine the registration page.
Reset Password Page – This setting is used by Freelancer Marketplace to determine the reset password page. This page must contain the [efm_reset_password] shortcode.
Lost Password Page – This setting is used by Freelancer Marketplace to determine the lost password page. This page must contain the
6.4 Permissions
The following are the permission settings which you either
turn on or off depending on your preference.
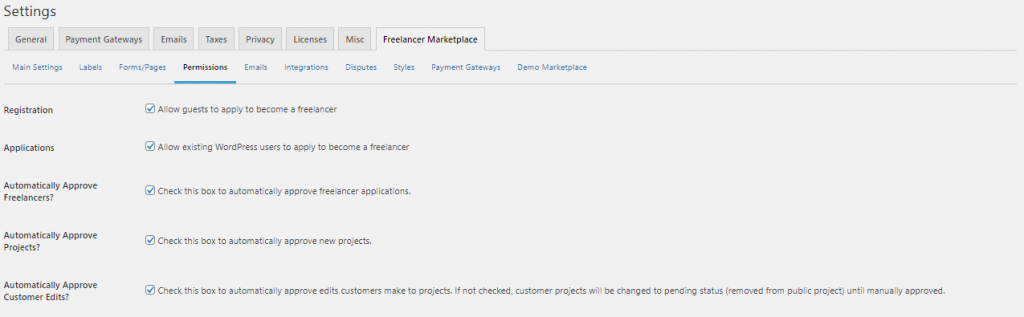
Registration – Check this box to allow guests to apply as a freelancer
Applications – Check this box to allow existing WordPress users to apply as a freelancer
Automatically Approve Freelancers? – Check this box to automatically approve freelancer applications.
Automatically Approve Projects? – Check this box to automatically approve new projects.
Automatically Approve Customer Edits? – Check this box to automatically approve edits customers make to projects. If not checked, customer projects will be changed to pending status after editing (removed from public project) until manually approved.
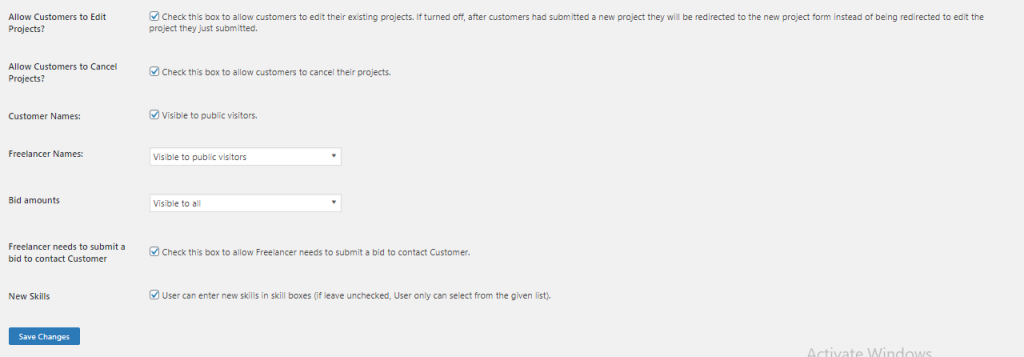
Allow Customers to Edit Projects? – Check this box to allow customers to edit their existing projects. If turned off, after customers had submitted a new project they will be redirected to the new project form instead of being redirected to edit the project they just submitted.
Allow Customers to Cancel Projects? – Check this box to allow customers to cancel their projects.
Customer Names – Turn on/off to make customer names visible or not to public visitors.
Freelancer Names – Turn on/off to make freelancer names visible or not to public visitors.
Freelancer needs to submit a bid to contact Customer – Check this box to allow the need for the Freelancer to submit a bid first to be able to contact Customer.
New Skills – Check this box to allow users to enter new skills in skill boxes. If left unchecked, users can only select from the given list ok skills.
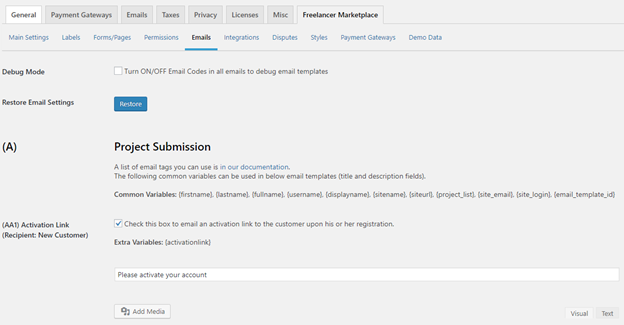
6.5 Emails
Freelancer Marketplace Plugin Emails Backend
The following are the different Email Main Sections. Each
contains related emails that will be sent out every time the users trigger some
actions on your website. Take note the email recipients for these are the
Freelancers, Customers and Site Admins.
Project
Submission
This
section will send out emails if actions such as Submitted a New Project, Project
Updated, Approved, Declined, Canceled, Aborted and an Invitation to submit a
Bid are triggered or done.
Freelancer
Registration
This
section will send out emails if actions such as a New Freelancer has applied,
Application Approved/Declined and a Freelancer Profile is Suspended/Unsuspended
are triggered or done.
User
Accounts
This
section will send out emails such as a Resend Activation Link and a Reminder to
Activate Account.
Bidding
Process
This
section will send out emails if actions such as a Bid has been submitted,
Project Invitation is accepted by the Freelancer and a Bid Updated, Canceled,
Declined are triggered or done.
Messages
This
section will send out emails if actions such as when New Messages has been
received and a notification email for an Unread Message.
Milestone
This section will send out emails if actions such as when New Milestone has been created, Notification email to respond to a requested milestone and Milestone Canceled, Paid, Delivered, Accepted as Completed, Completion Rejection are triggered or done.
Dispute
Process
This
section will send out emails if actions such as when a Dispute has been opened
and settled.
Project
Completion and Rating
This
section will send out emails if actions such as a when a Project has been
Completed, Reminded to provide a Project Rating, Received a New Rating, Project
Reopened, Freelancer requests payments to the Admin and when the Admin pays the
Freelancer.
Lost
Password
This
section will send out emails to a Password Reset link.
Email Tags
Here are the email tags which you can use in creating and
customizing your emails.
User Name Tags
{firstname}
{lastname}
{fullname}
{username}
{displayname}
{customer_name}
{freelancer_name}
{from_userdisplayname}
{from_fullname}
Project Tags
{project_list}
{project-content}
{project-date}
{project-status}
{project-title}
{project_url}
{projectduration}
{projectamountmin}
{projectamountmax}
{projectcompletiondate}
Bid Tags
{bid-description}
{bid-amount}
{bid-days}
Milestone Tags
{milestone_amount}
{milestone_status}
{milestone_description}
Rating Tags
{rating}
{ratingcomment}
Other Tags
{sitename}
{siteurl}
{site_email}
{site_login}
{email_template_id}
{activationlink}
{auto_accept_days}
{amount}
{reset_link}
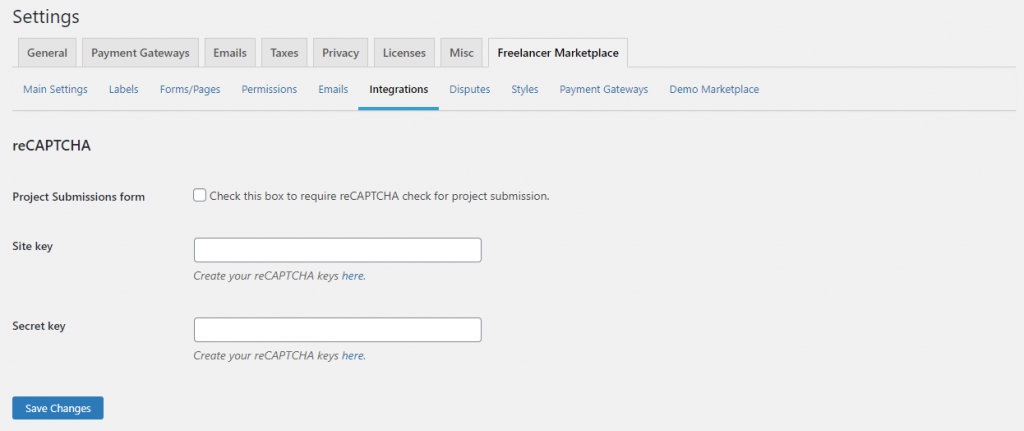
6.6 Integrations
reCAPTCHA – This will enable a more secured project submission that can turn bots and spammers away from your website.
Project Submissions form – Check this box to require reCAPTCHA check that will appear when a user submits a project.
Site key and Secret key – Enter your keys in each of these. You can create your reCAPTCHA keys by clicking on the link text “here”.
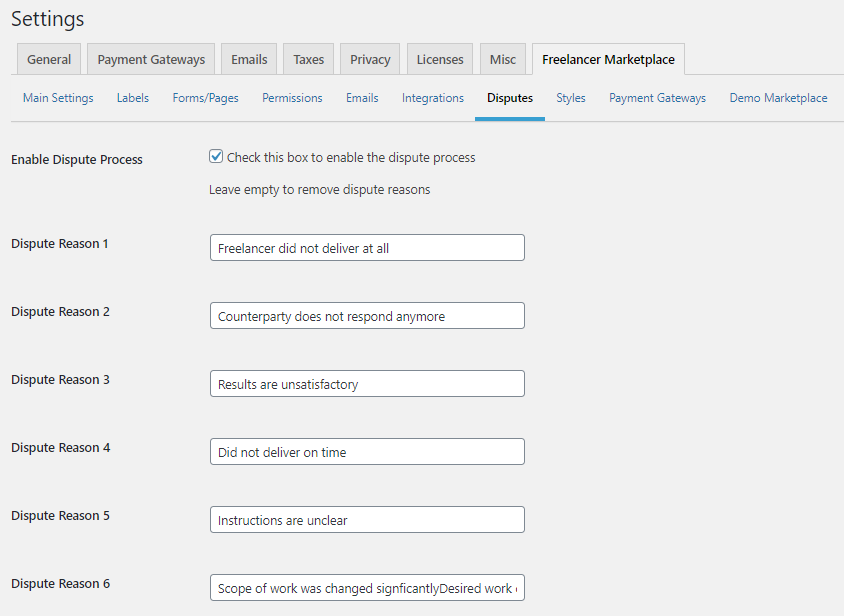
6.7 Disputes
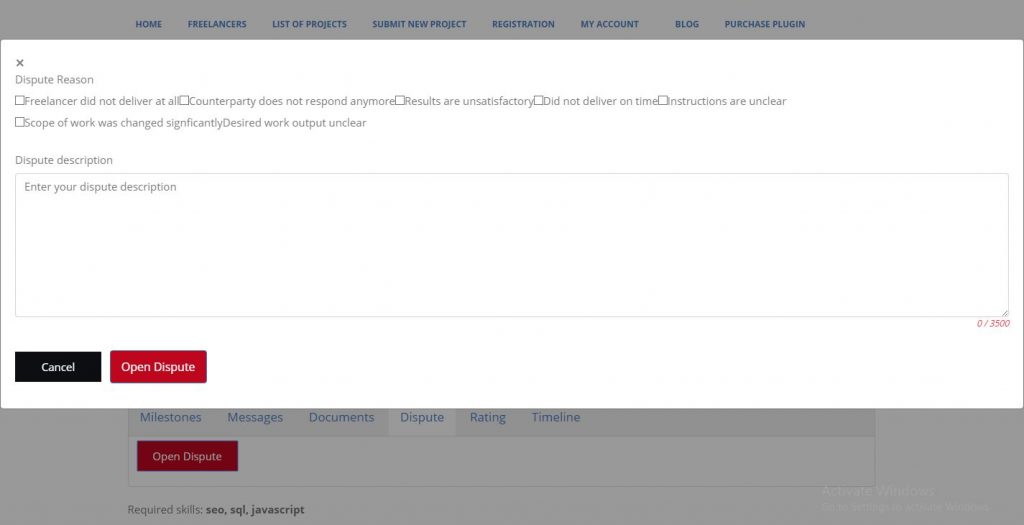
Enable Dispute Process – Check this box to enable the dispute process. Leave empty to remove dispute reasons.
Here are the Default Dispute Reasons. You can either change
them or add more on this page. (Can add up to ten reasons.)
Freelancer did not deliver at all
Counterparty does not respond anymore
Results are unsatisfactory
Did not deliver on time
Instructions are unclear
Scope of work was changed significantly
Desired work output unclear
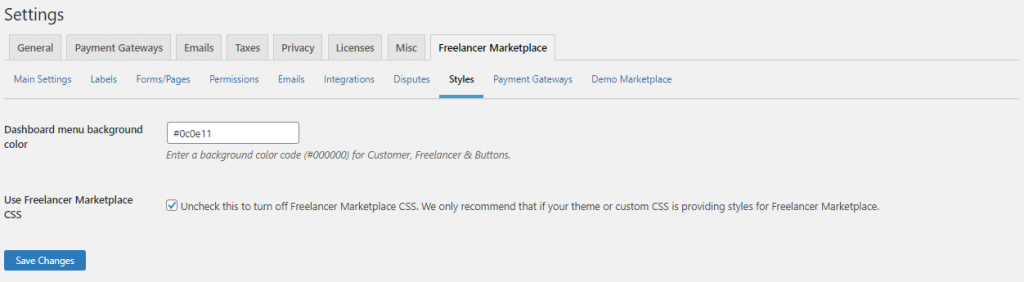
6.8 Styles
Dashboard menu background color – You can select and change the color of your Dashboard Menu Background. Can also enter a background color code (#000000) for Customer, Freelancer & Buttons.
Use Freelancer Marketplace CSS – Uncheck this to turn off Freelancer Marketplace CSS. We only recommend that if your theme or custom CSS is providing styles for Freelancer Marketplace.
You might need to check and visit each Payment Gateway link
to get more information. If you have any questions and clarifications you can
send us an email at [email protected].
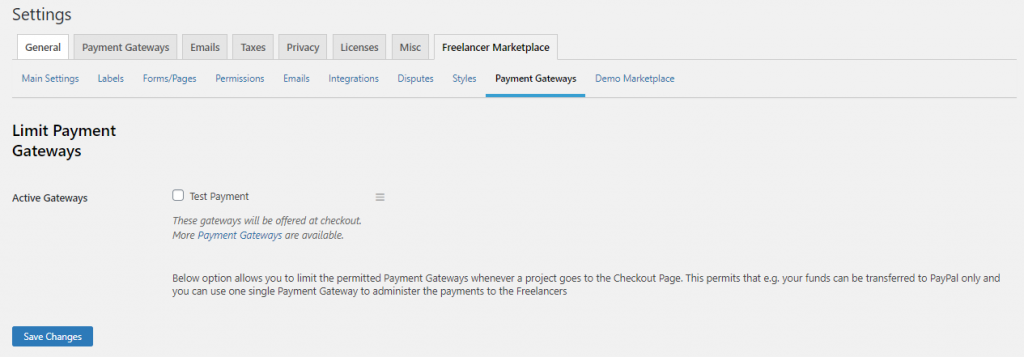
Limit
Payment Gateways
This settings can be seen when you go to Freelancer Marketplace > Settings >
Payment Gateways.
Active Gateways – Choose and check to activate payment
gateways you would want your customers to choose from during checkout.
This option allows you to limit the permitted Payment Gateways whenever a project goes to the Checkout Page. This is if you have multiple payment gateways activated on your website. This permits that e.g. your funds can be transferred to PayPal only and you can use one single Payment Gateway to administer the payments to the Freelancers.
In this section, we will discuss all basic pages that every users (Visitors, Customers, Freelancers, and Admins) will encounter brought by using this plugin. Here are as follows:
5.1 Front End Pages
Listed below are pages which Visitors, Freelancer and
Customers can access upon going to the website’s frontend using our Freelancer
Marketplace Plugin. Here are as follows:
5.1.1 Public Pages
Main page
(Homepage) – Default page for any kinds of website. The site admins have
the control what content to display or add here.
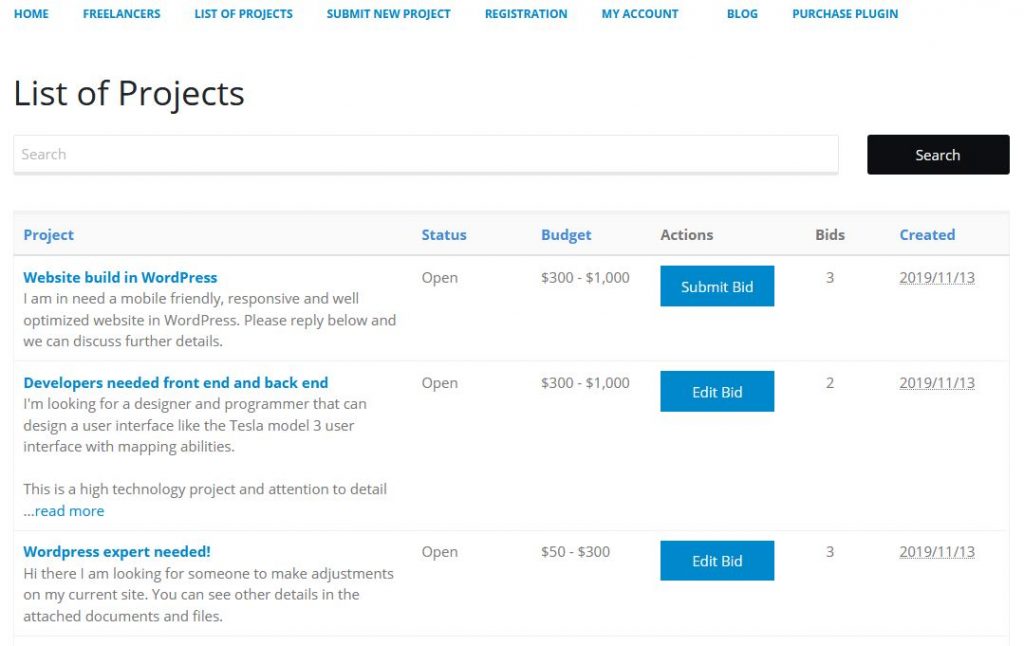
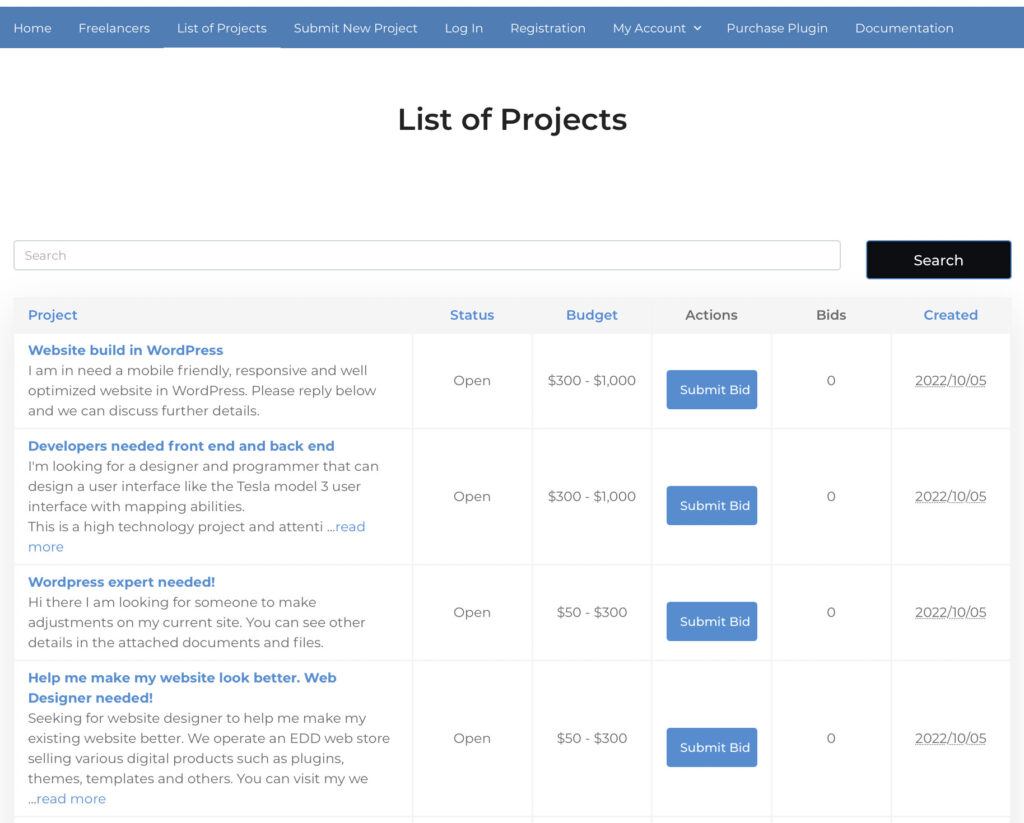
List of Projects – In this page, the users can see current available Freelance Projects waiting for proposals. This page shows the Project Title, Project Status, Project Budget, Submit Bid button, Number of bids received and date the project was created.
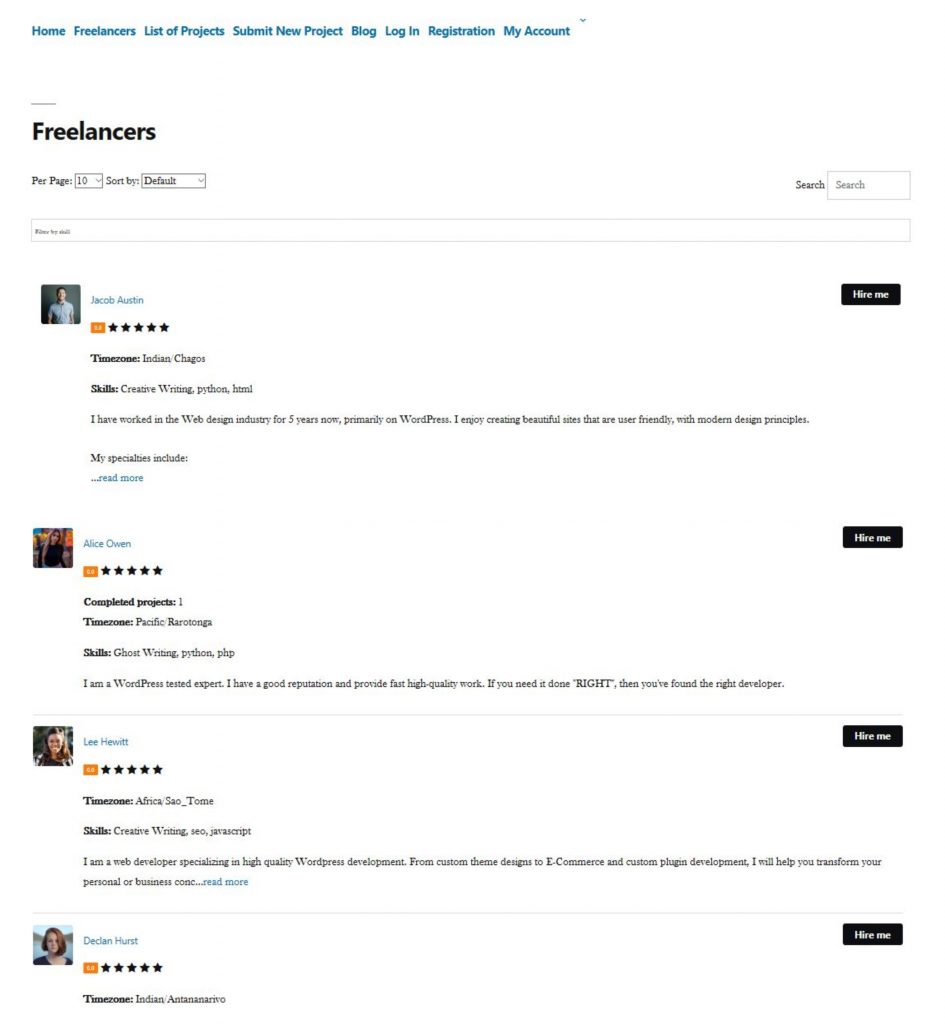
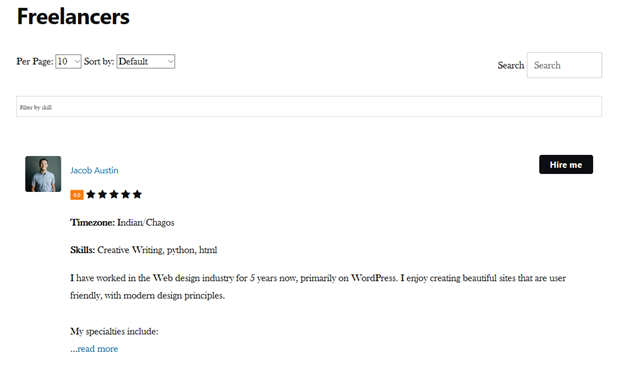
List of Freelancers – By going on this page, you can see the list of all Active Freelancers. This is essential for visitors and customers who wanted to search for Freelancer themselves that could help them with their projects.
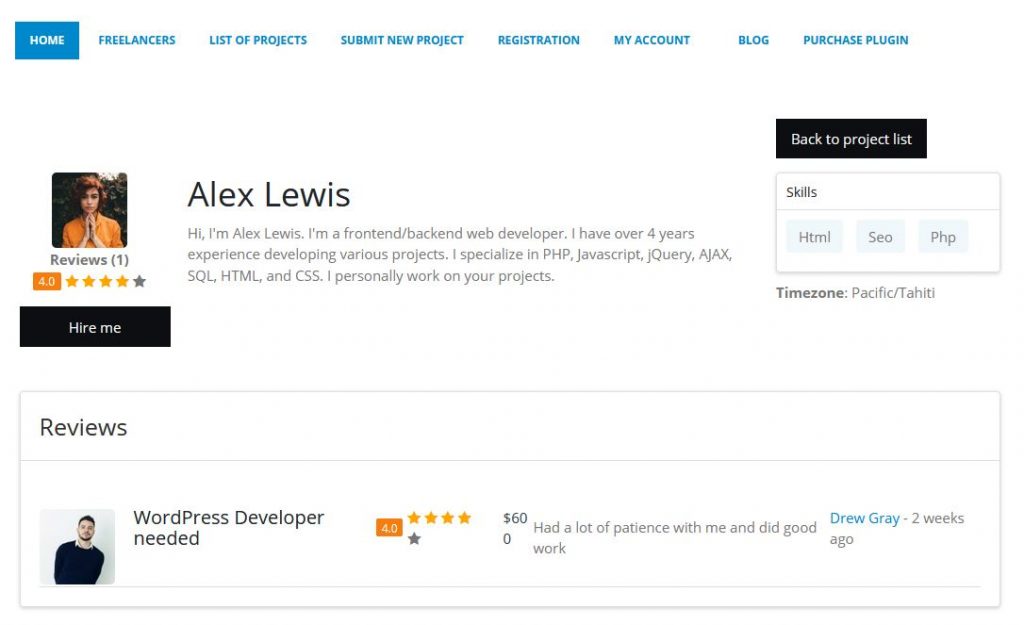
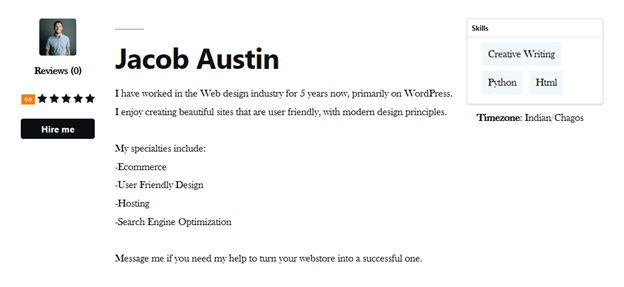
Freelancer Profiles – If a visitor clicks on a Freelancer Name on the List of Freelancers, it will take him straight to the Freelancer’s Public Profile Page. Here the visitor can see detailed information of the Freelancer such as Reviews, Skills, Time zone and Social Accounts.
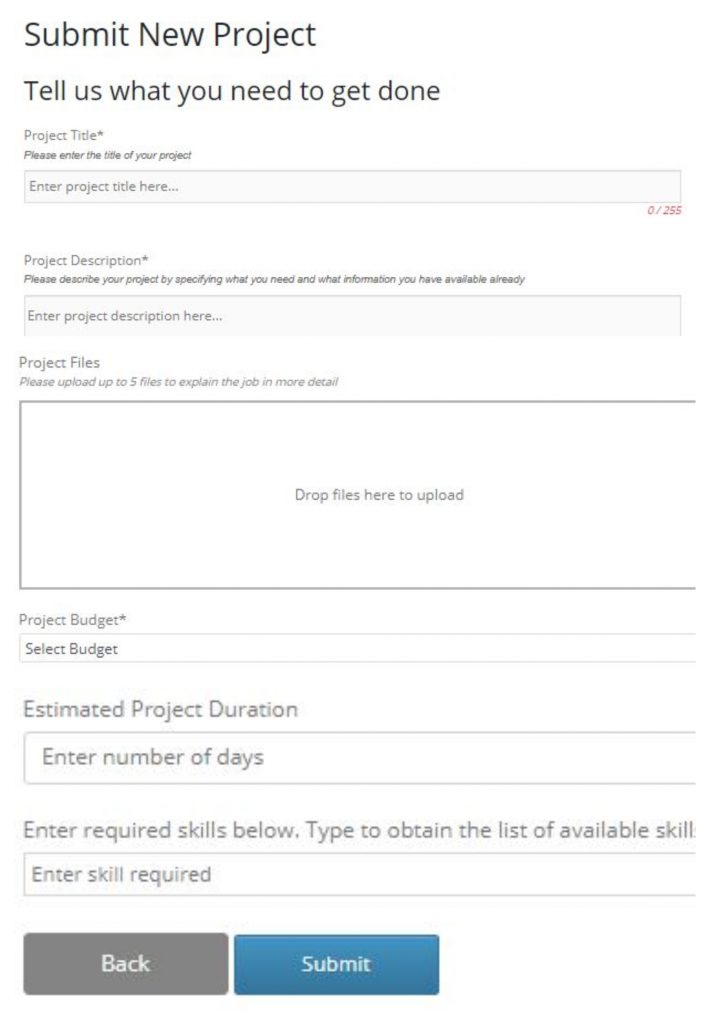
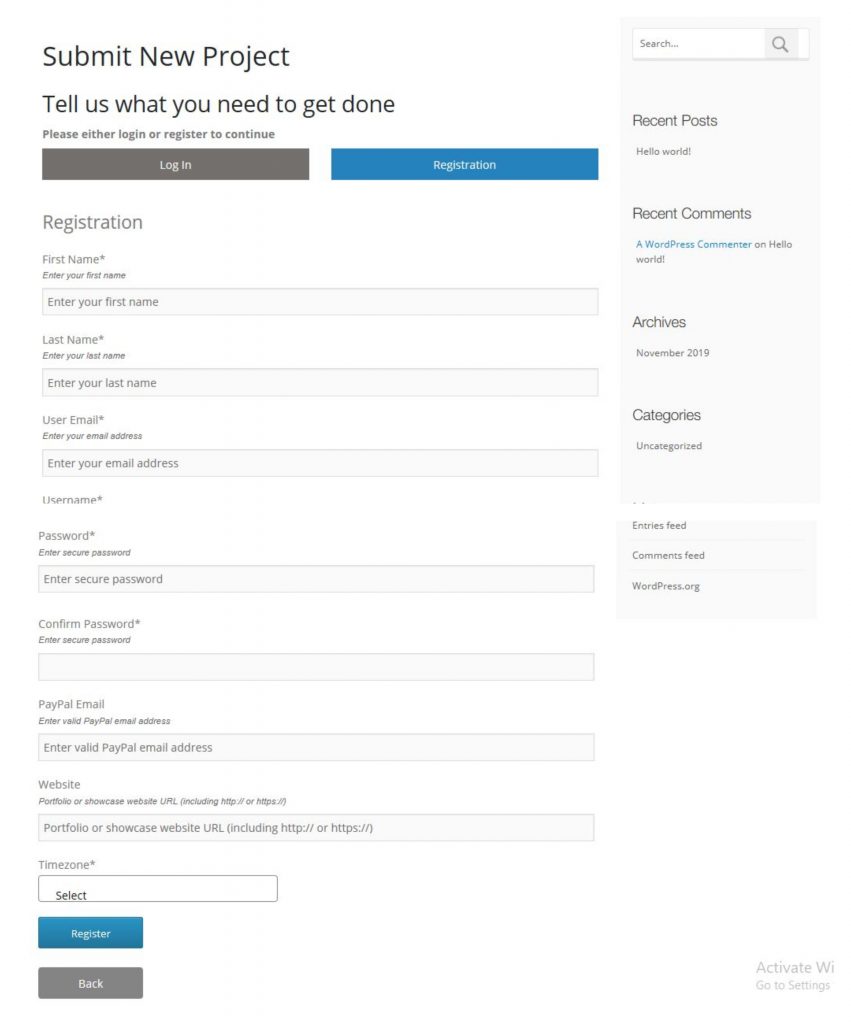
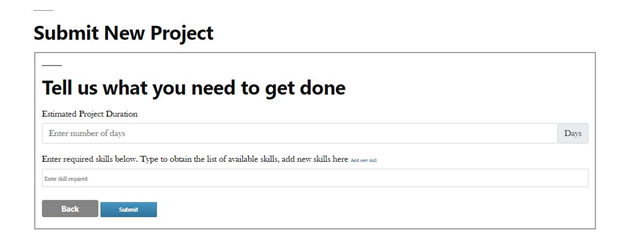
Submit New Project – This page gives the customer easy and fast access to directly fill the project form, register or login as a customer and submit that new project right after. Both the freelancers and customers can have the capacities to submit a project, but their profiles must be verified (clicking on the confirmation link from the email received) and approved (done by site admins) first as a customer.
Freelancer Marketplace Plugin Submitting New Project
Blog
– Default WordPress page for Blog Posts. This is not a plugin page but one page
which would be available by WordPress. The site admins have the control what
content to display or add here.
Login/Registration – In this page, users can choose whether to register as a customer or a freelancer, or even both. Fill out the registration forms, verify your account, wait to get approved by site admins and you’re done.
5.1.2 Pages for Logged In Users
Freelancer
Dashboard – After your Freelancer profile is approved, you can now have
accessed to your own Freelancer Dashboard.
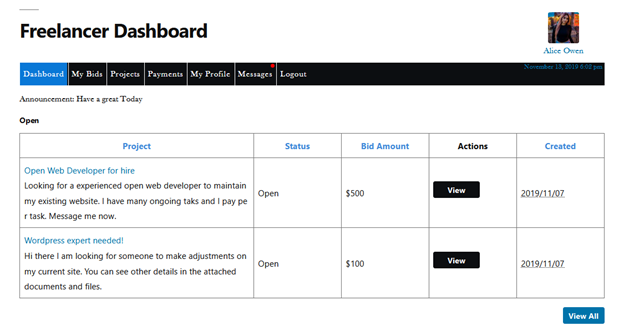
Dashboard
– Displays three of your projects per project status. It also show the
Project Details such as Project Name, Status, Bid/Project Amount, Action
Buttons and Date Created. You can click on View All button to view all projects
on that specific category.
My Bids –
If you hover on this tab, it lists your Open Bids, Declined Bids, Canceled Bids
and Lost Bids. If you click one of them, you can now see all of your bids on
that specific category, if you have.
Projects
– If you hover on this tab, it lists your Available, Private, Open,
Accepted, Under Dispute, Completed and Aborted projects. If you click one of
them, you can now see all of your projects on that specific category, if you
have.
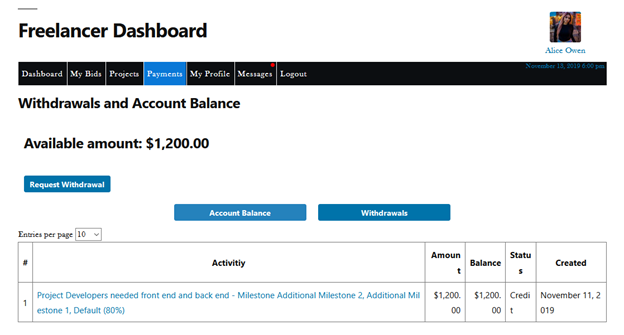
Payments – This tab now shows your Withdrawals and Account Balance, and most importantly, Available Amount for withdrawal. If you have an available balance, there will be a button here that lets you request that amount for withdrawal. There are two buttons here: Account Balance and Withdrawal. Account Balance shows your Account Activity, Amount, Balance Status, and Date Created. While Withdrawal button shows your Withdrawal Description, Amount Status, and Date Created. In summary, you can see here your Account Activity for checking and monitoring.
My Profile – If you click on this tab, it shows your Profile Information in Edit Mode. After editing, click Save Changes below. If you wish to have a look on your published profile, click on View Profile button. There are certain settings on the backend which can either hide/unhide your Profile for visitors that are not logged in/registered. It protects your profile information this way.
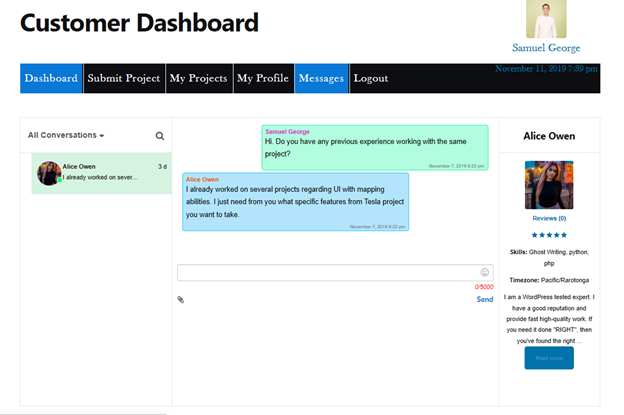
Messages – This tab shows all of your conversation with every users. You can also send them a message right here.
Customer Dashboard
– After your Customer profile is approved, you can now have accessed to
your own Customer Dashboard.
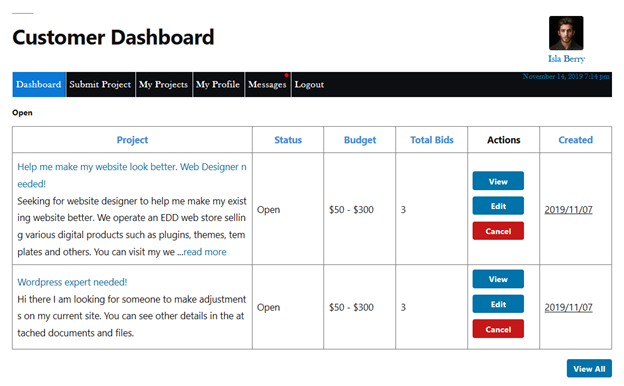
Dashboard
– Displays three of your projects per project status. It also show the
Project Details such as Project Name, Status, Bid/Project Amount, Action
Buttons and Date Created. You can click on View All button to view all projects
on that specific category.
Submit
Project – This tab basically lets you submit new project right on your
Dashboard.
My
Projects – If you hover on this tab, it lists your Pending, Open, Accepted,
Disputed, Aborted, Canceled, Expired and Completed projects. If you click one
of them, you can now see all of your projects on that specific category, if you
have.
My
Profile – If you click on this tab, it shows your Profile Information in
Edit Mode. After editing, click Save Changes below. If you wish to have a look
on your published profile, click on View Profile button. There are certain
settings on the backend which can either hide/unhide your Profile for visitors
that are not logged in/registered. It protects your profile information this
way.
Messages –
This tab shows all of your conversation with every users.You can also send them a message right here.
Logout – Clicking on this tab will
automatically log you out.
Freelancer
Profile Page: This page displays all details about the freelancer such as
skills, time zones andrating depending
on the settings set by the admins.
Customer Profile Page: This page displays all details about the freelancer such as skills, time zones andrating depending on the settings set by the admins.
5.2 Back End Pages
Now, let’s go to your WordPress Website Backend Settings. On
the left menus, locate for the Freelancer Marketplace tab. By simply hovering
on it, you can see below tabs which we will discuss one by one below.
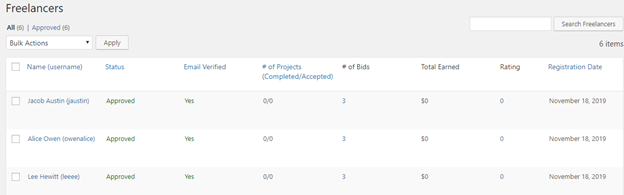
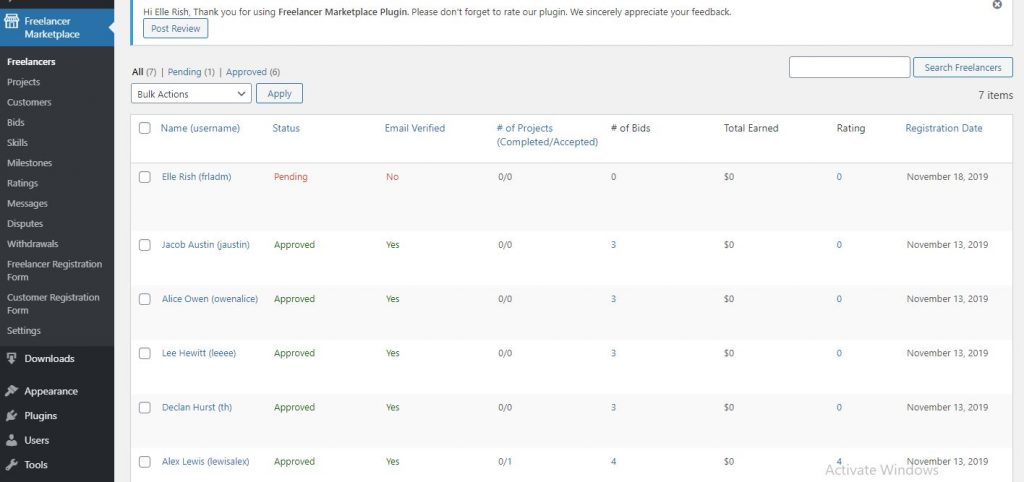
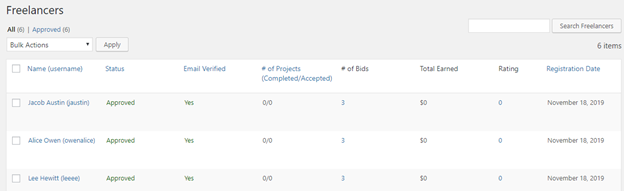
5.2.1 Freelancers
You can see here the complete list of Freelancers that had
registered on your website.
Top Filters: All (x) |
Pending (x) | Approved (x) | Suspended (x) | Trash (x).
When clicked it shows you Freelancer profiles for each filter, to have
a better and quick view on each. (x) means
the number of Freelancer profiles per status as filtered.
Bulk Actions: You can also
apply bulk actions to the Freelancer profiles on the list to save time on
manually applying certain actions on each. Available actions are:
Approve Freelancers
Decline Freelancers
Suspend Freelancers
Unsuspend Freelancers
Move to Trash Freelancers
Search Bar: You can also
search for Freelancer names using the search bar on the Top Right.
Freelancer Table List: There
are a total of 9 Columns for our Freelancer Table which shows each Freelancer
Profile details. These are:
Select
All – This appears as a checkbox which we can mark for applying Bulk
Actions.
Name
(username) – Shows the Freelancer’s name and Username.
Status –
Shows the Freelancer’s Status (Approve, Pending)
Email
Verified – Shows whether the Freelancer’s email is verified or not. (Yes,
No)
# of
Projects (Completed/Accepted) – Shows the number of Completed over Accepted
projects of this Freelancer.
# of Bids
– Shows the total number of all Bids submitted.
Total
Earned – Shows the total amount of money ($) earned.
Rating –
Shows how many ratings this Freelancer had received.
Registration
Date – Shows the date on which this Freelancer had first registered.
Freelancer
Name submenus – By hovering on the Freelancer names will show you options
such as: View Profile | View | Approve | Decline | Trash.
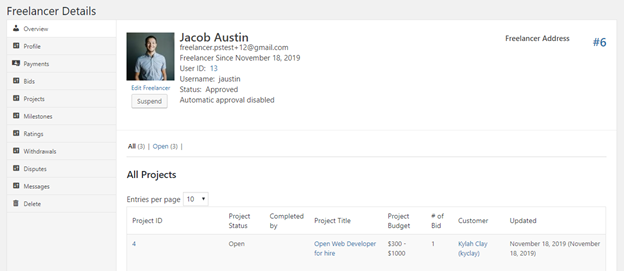
5.2.2 Freelancer Profile
If you hover on a Freelancer Name on the list, you can see
one submenu option called “View Profile”. It shows you the Freelancer Profile
in Frontend view.
In the backend view of the Freelancer Profile, you can see
all detailed information pertaining to that Freelancer in Overview tab. These
are:
Freelancer Avatar Image
Edit Freelancer button
Suspend button
Freelancer Name
Freelancer Email Address
User ID Number
Username
Status
Automatic approval disable/enabled
Freelancer Address which links to the Frontend
Profile View
All Projects list
Here are the menus on the left of the page: Overview, Profile,
Payments, Bids, Projects, Milestones, Ratings, Withdrawals, Disputes, Messages
and Delete
When clicked, it shows you information specifically for the
Freelancer in each specific tab. These tabs basically shows the site admin all
details and information commonly found on the Frontend View. This way, site
admins can easily have access on them on the backend settings.
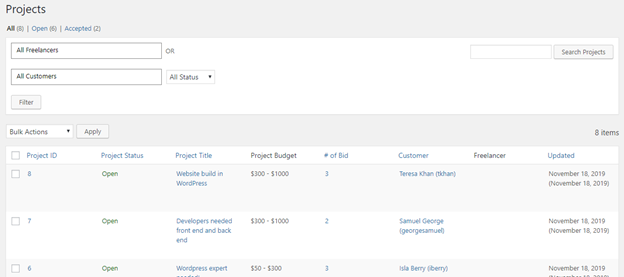
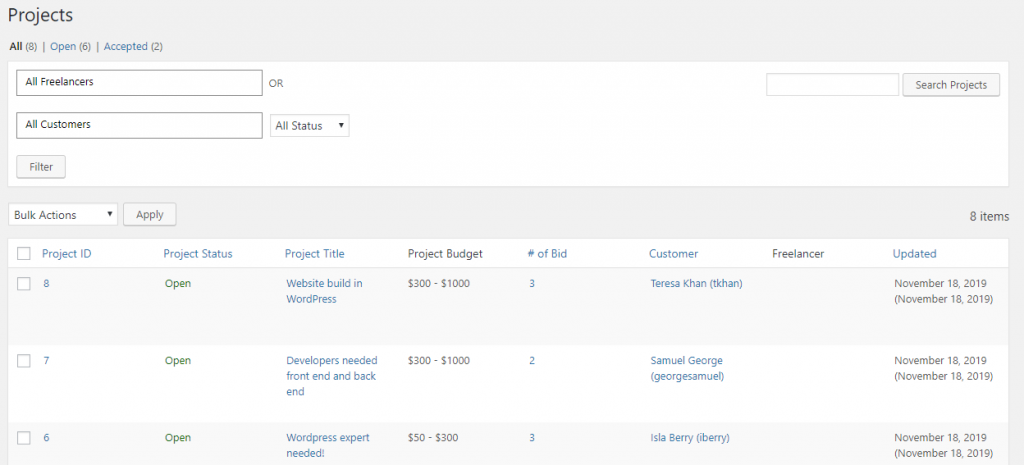
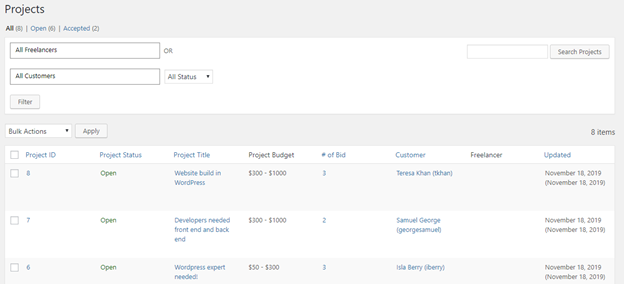
5.2.3 Projects
You can see here the complete list of Projects that been
submitted on your website.
When clicked it shows you the Project for each filter, to have a better
and quick view on each. (x) means
the number of Freelancer profiles per status as filtered.
Filter Box: This section
allows you to filter out projects depending on a specific Freelancer, Customer
and Project Status.
Bulk Actions: You can also
apply bulk actions to the Projects on the list to save time on manually
applying actions on each. Available actions are:
Approve & Open
Pending
Decline
Cancel
Abort
Undispute
Move to Trash
Search Bar: You can also
search for Projects using the search bar on the Top Right.
Projects Table List: There
are a total of 10 Columns on our Projects Table which shows each Project
details and information. These are:
Select
All – This appears as a checkbox which we can use for applying Bulk
Actions. Click on it and it will automatically mark everything on the list.
Project
ID – Every project has a corresponding Project ID. When clicked, it will
take you to the detailed project page at backend. Also, if you hover over the
Project ID, you will see options: View | Trash | View Milestone
Project
Status – Shows the Project Status. (Accepted, Open, Trash, Aborted,
Pending)
Completed
by
Project
Title – Shows theProject Title.
When clicked, it will take you to the detailed project page at backend.
Project
Budget – Shows the Project Budget set by the Customer who made the project.
# of Bid –
Shows the total number of bids submitted by the Freelancers for this project.
Customer –
This shows the Customer name who submitted this project.
Freelancer
– When a bid has been accepted, Winning Freelancer’s name will be shown in
this column to show.
Updated –
Shows the date when this project has been last updated.
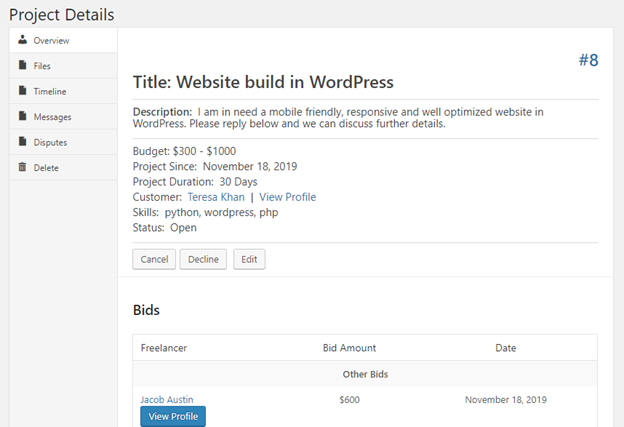
5.2.4 Project Page
If you hover on a Project Title on the list, you can see one
submenu option called “View”. This will take you to the backend page to see a more
complete Project details.
You can see the following information on the Project
Overview Tab:
Project Title
Project Description
Budget
Project Since
Project Duration
Customer
Status
Completed By
After these details you can see Cancel, Decline and Edit
buttons. Further below, it lists down all the Bids received by this Project as
well as the Milestones requested by the Freelancer.
Left Menus: Overview,
Files, Timeline, Messages, Dispute and Delete
When clicked, it shows you filtered information specifically
for that project in each tab. These tabs basically shows the site admin all
details and information commonly found on the Frontend View. This way, site
admins can easily have access on it at the backend settings.
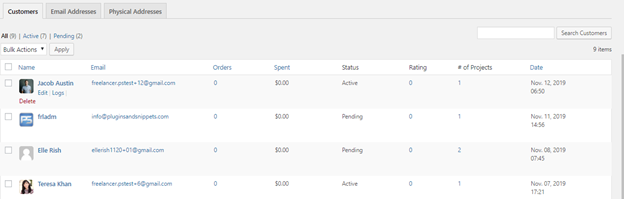
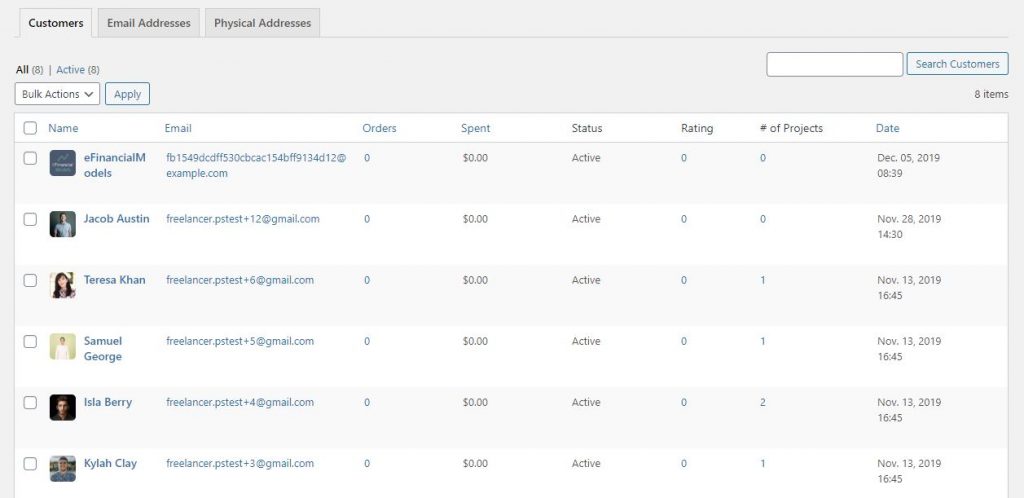
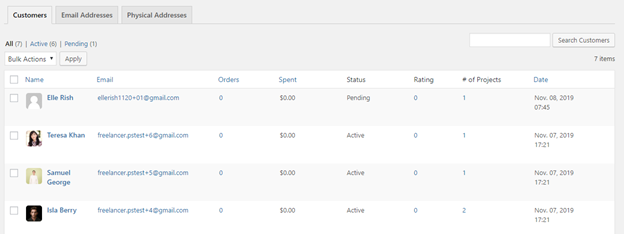
5.2.5 Customers
You can see here the complete list of Customers that had
registered and submitted a project on your website.
Top Filters: All (x) |
Active (x) | Pending (x)
When clicked it shows you the Project for each filter, to have a better
and quick view on each. (x) means
the number of Customer profiles per status as filtered.
Bulk Actions: You can also
apply bulk actions to the Customer profiles on the list to save time on
manually applying certain actions on each. The only available bulk action is
Delete.
Search Bar: You can also
search for Customer names using the search bar on the Top Right.
Customer Table List: There are a total of 8 Columns for our Customer Table
which shows each Customer Profile details. These are:
Select
All – This appears as a checkbox which we can use for applying Bulk
Actions. Click on it and it will automatically mark everything on the list.
Name
(username) – Shows the Customer’s name.
Email –
Shows the Customer’s email address.
Orders
– Shows the number of orders this Customer has paid.
Spent – Total
amount spent on all of the orders.
Status – Shows whether
Customer’s status is Active or Pending.
Rating –
Shows how many ratings this Freelancer had received.
# of
Projects – Shows the number of projects this Customer has.
Date – Shows the date when the Customer had registered.
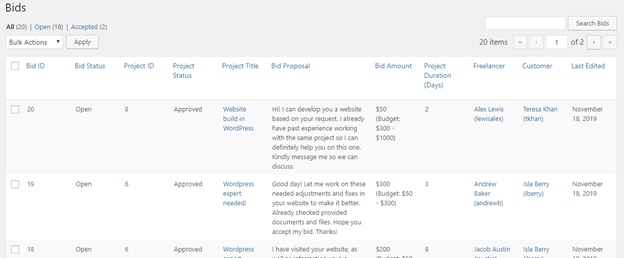
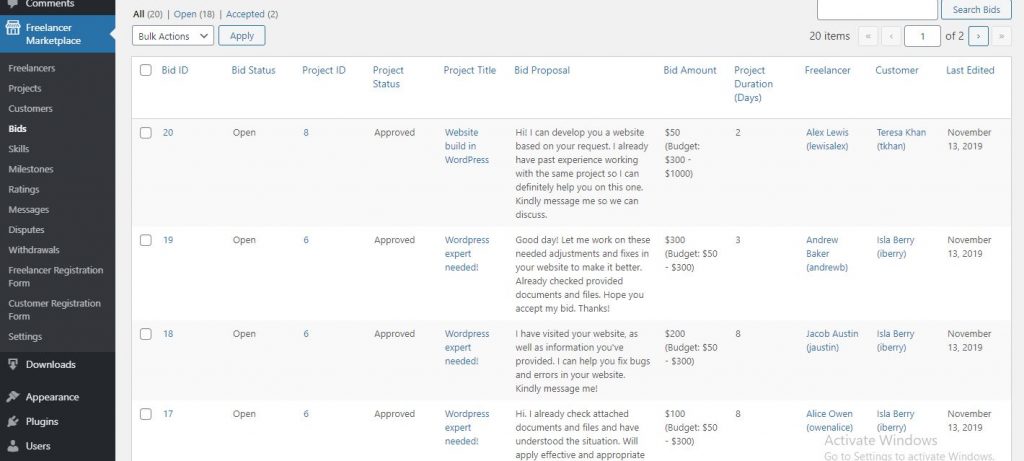
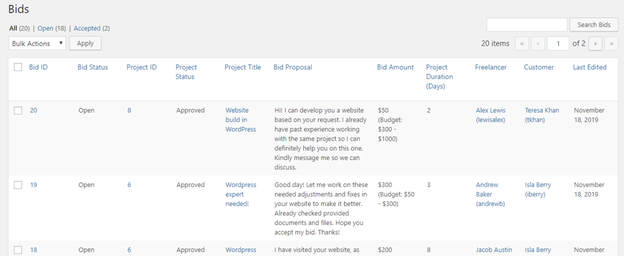
5.2.6 Bids
You can see here the complete list of Bids that had been
submitted for a project on your website.
Top Filters: All (x) | Open
(x) | Accepted (x) | Decline (x) | Canceled (x)
When clicked it shows you the Bid for each filter, to have a better and
quick view on each. (x) means
the number of Bids per status as filtered.
Bulk Actions: You can also
apply bulk actions to the Bids on the list to save time on manually applying
certain actions on each. The available bulk actions are:
Active
Bids
Declined
Bids
Canceled
Bids
Move
to Trash
Search Bar: You can also
search for Bids using the search bar on the Top Right.
Bids List: There are a total of 12 Columns for our Bids List which shows
each Bid details. These are:
Select
All – This appears as a checkbox which we can use for applying Bulk
Actions. Click on it and it will automatically mark everything on the list.
Bid ID –
Shows the Bid ID and links to the Bid Overview page.
Bid
Status – Shows the Bid Status (Open, Accepted, Declined, Canceled)
Project
ID – Shows the Project ID and links to the Project Overview and Details
page.
Project
Status – Shows the corresponding Project Status.
Project
Title – Shows the Project Title to which this bid has been submitted.
Bid
Proposal – Shows the Bid Proposal entered by the Freelancer.
Bid
Amount – Shows the Bid Amount (Set by the Freelancer) and the Project
Budget (Set by the Customer).
Project
Duration (Days) – Shows the project’s duration in day’s set by the
Customer.
Freelancer
– Shows the Full Name and Nickname of the Freelancer.
Customer
– Shows the Full Name and Nickname of the Customer.
Last
Edited – Shows the date when this Bid has been last edited.
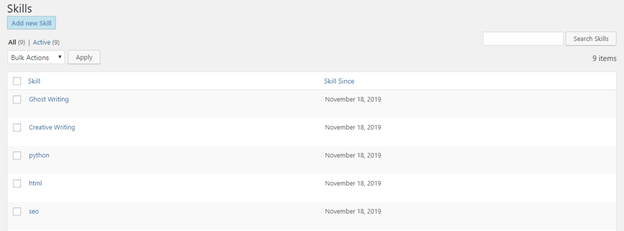
5.2.7 Skills
You can see here the complete list of Skills that had been
entered by a user on your website.
Top Filters: All (x) |
Active (x) | Trash (x)
When clicked it shows you the Skills for each filter, to have a better
and quick view on each. (x) means
the number of Bids per status as filtered.
Bulk Actions: You can also
apply bulk actions to the Bids on the list to save time on manually applying
certain actions on each. The only available bulk action is Move to Trash.
Search Bar: You can also
search for Skills using the search bar on the Top Right.
Skills List: This simply displays the name of the Skill and the Date when
this skill has been first added on your website system.
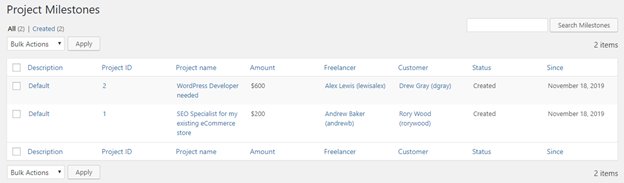
5.2.8 Milestones
You can see here the complete list of Milestones that had
been requested for a project on your website.
Top Filters: All (x) | Paid
(x) | |Delivered (x) | Completed (x) | Canceled (x) | Rejected (x)
When clicked it shows you the Milestone for each filter, to have a
better and quick view on each. (x) means
the number of Milestones per status as filtered.
Bulk Actions: You can also
apply bulk actions to the Bids on the list to save time on manually applying
certain actions on each. The only available bulk actions are Paid and Move to trash.
Search Bar: You can also
search for Milestones using the search bar on the Top Right.
Bids List: There are a total of 9 Columns for our Milestones List which
shows each Milestone details. These are:
Select
All – This appears as a checkbox which we can use for applying Bulk
Actions. Click on it and it will automatically mark everything on the list.
Description
– Shows the Milestone Description. When clicked, it will take you to a
screen to edit this Milestone. When you hover on this, it will show options
like Restore, Delete Permanently
and Trash.
Project
ID – Shows the Project ID and links to the Project Overview and Details
page.
Project Name
– Shows the Project Name and links to the Project Overview and Details page.
Amount –
Shows the Bid Amount.
Freelancer
– Shows the Full Name and Nickname of the Freelancer.
Customer
– Shows the Full Name and Nickname of the Customer.
Status –
Shows the Milestone Status (Paid, Delivered, Completed, Canceled, and Rejected).
Since –
Shows the date when this Milestone has been first requested.
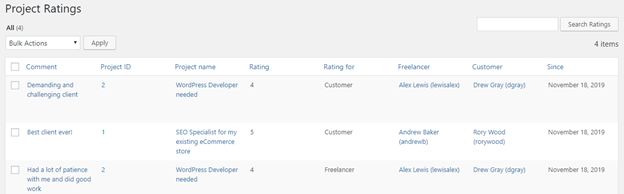
5.2.9 Ratings
You can see here the complete list of all Ratings received
for both the Customers and Freelancers.
Bulk Actions: You can also
apply a bulk action to the Ratings on the list to save time on manually
applying certain actions on each. The only available bulk action is Delete
Permanently.
Search Bar: You can also
search for Ratings using the search bar on the Top Right.
Ratings List: There are a total of 9 Columns for our Ratings List which
shows each Rating details. These are:
Select
All – This appears as a checkbox which we can use for applying Bulk
Actions. Click on it and it will automatically mark everything on the list.
Comment –
Shows the rating comment for the user. When clicked, it will take you to a
screen to edit this Rating. When you hover on this, it will show options like Edit and Delete Permanently.
Project
ID – Shows the Project ID and links to the Project Overview and Details
page.
Project Name
– Shows the Project Name and links to the Project Overview and Details page.
Rating –
Shows the number of rating given (1 to 5)
Rating
For – Shows whether the rating is for Customer / Freelancer.
Freelancer
– Shows the Full Name and Nickname of the Freelancer involved.
Customer
– Shows the Full Name and Nickname of the Customer involved.
Since –
Shows the date when this Rating has been first given.
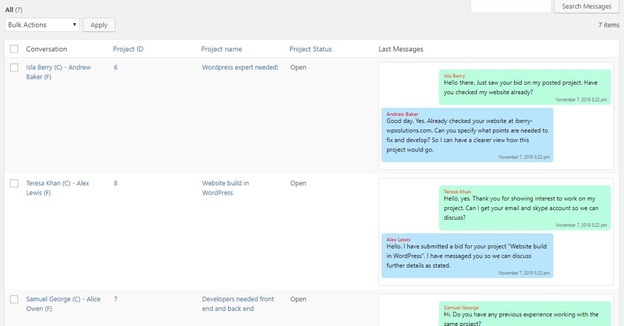
5.2.10 Messages
You can see here all the Conversations from both the
Customers and Freelancers.
Bulk Action: You can also
apply a bulk action to the Messages on the list to save time on manually
applying certain action on each. The only available bulk action is Delete
Permanently.
Search Bar: You can also
search for Messages using the search bar on the Top Right.
Messages List: There are a total of 6 Columns which shows each Conversation
details. These are:
Select
All – This appears as a checkbox which we can use for applying Bulk
Actions. Click on it and it will automatically mark everything on the list.
Conversation
– Shows the name of both Customer and Freelancer involved in this
conversation.
Project
ID – Shows the Project ID and links to the Project Overview and Details
page.
Project Name
– Shows the Project Name and links to the Project Overview and Details page.
Project Status
– Shows the corresponding Project Status.
Last
Messages – Shows a preview of the last message sent on this conversation.
5.2.11 Disputes
Freelancer Marketplace Plugin Opening a Dispute
You can see here the complete list of all Disputes received
from all projects.
Bulk Actions: You can also
apply a bulk action to the Disputes on the list to save time on manually
applying certain actions on each. The available bulk actions are Open and Close
Dispute.
Search Bar: You can also
search for Disputes using the search bar on the Top Right.
Disputes List: There are a total of 11 Columns for our Disputes List which shows each Dispute details. These are:
Select
All – This appears as a checkbox which we can use for applying Bulk
Actions. Click on it and it will automatically mark everything on the list.
Dispute
ID – Shows the Dispute ID which links to the Dispute Overview and Details
Page.When you hover on this, it
will show options like View,
View Milestone, View Bid and Close Dispute.
Status – Shows
the Dispute Status (Open or Closed)
Project
ID – Shows the Project ID and links to the Project Overview and Details
page.
Project Name
– Shows the Project Name and links to the Project Overview and Details page.
Reason – Shows
the Dispute Reason.
Description
– Shows the Dispute Description.
Freelancer
– Shows the Full Name and Nickname of the Freelancer involved.
Customer
– Shows the Full Name and Nickname of the Customer involved.
Opened By
– Shows which user has opened this Dispute.
Updated –
Shows the date when this Dispute has been last updated.
You can see here the complete list of all Withdrawals
requested and paid on your website.
Generate Payout File:
If you click on this button, it will first let you decide the Start and End
Date of the payout report to be generated for you. Beside this button, you can
see the Total Amount of all transactions, depending on the filter status you’re
currently on.
Top Filters: All (x) | Paid
(x) | Requested (x)
When clicked it shows you the Withdrawals for each filter, to have a
better and quick view on each. (x) means
the number of Withdrawals per status as filtered.
Bulk Actions: You can also
apply a bulk action to the Withdrawals on the list to save time on manually
applying certain actions on each. The available bulk actions are Paid and Requested.
Search Bar: You can also
search for Withdrawals using the search bar on the Top Right.
Withdrawals List: There are a total of 5 Columns which shows each Withdrawal
details. These are:
Select
All – This appears as a checkbox which we can use for applying Bulk
Actions. Click on it and it will automatically mark everything on the list.
Amount
– Shows the corresponding amount for this withdrawal.
Freelancer
– Shows which Freelancer is needed to get paid for this withdrawal.
Status
– Shows the Withdrawal Status (Requested or Paid).
Since
– Shows the date when this withdrawal is first requested.
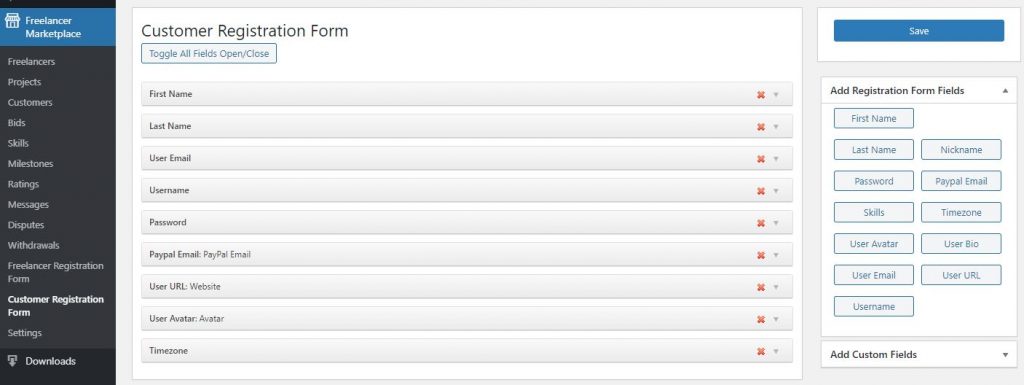
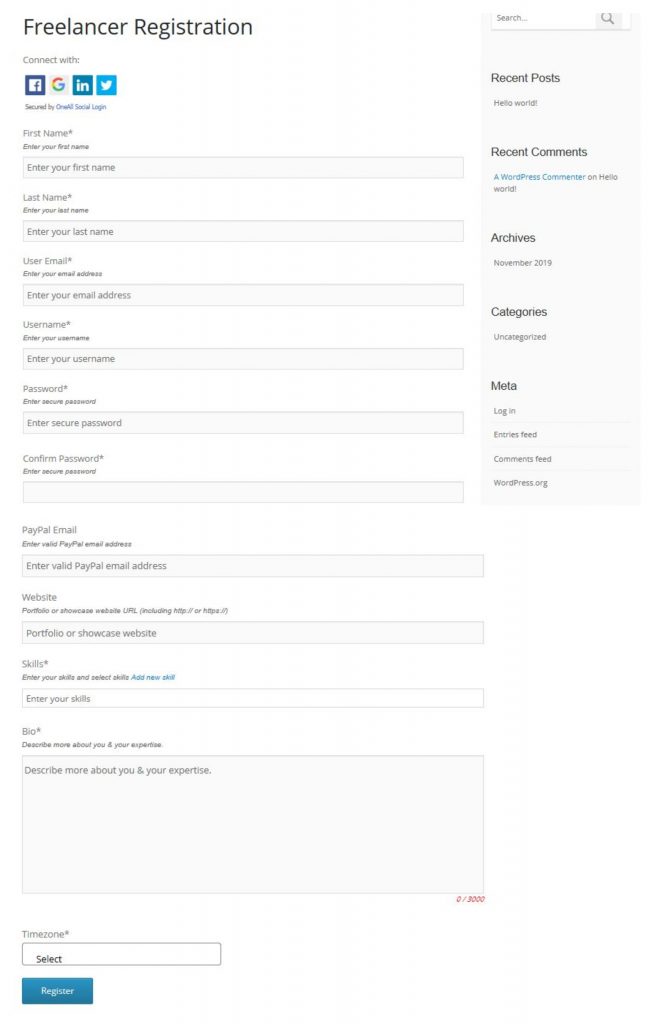
5.2.13 Registration Forms
The site admins can customized the fields to be added on
both the Freelancer and Customer Registration Forms. By default, the following
are the fields on each registration forms:
Freelancer Registration Form
FirstName
LastName
User Email
Username
Password
PayPal Email
User URL
Avatar
Skills
Bio
Timezone
Customer Registration Form
FirstName
LastName
User Email
Username
Password
PayPal Email
User URL
Avatar
Timezone
In each field there are several settings you can change and
customized such as:
Required – determine whether the field is
required or not (Yes, No)
Forms – check whether to show field on the
registration or profile, or both.
Enter a Field Label
Enter a Help Text
CSS Class Name
Enter a Placeholder Text
Set the Character Limit for this field
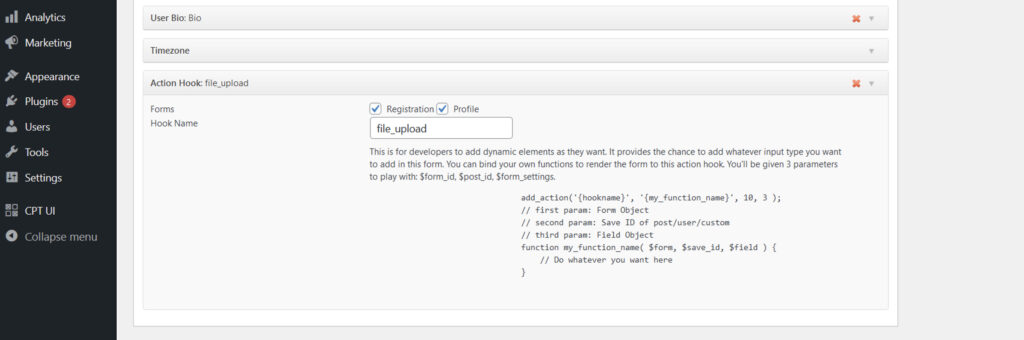
Besides these default fields on the registration form, you can see on the right additional Form and Custom Fields that you can add depending on how you want your forms to look like and have.
You will encounter different status throughout this plugin
which rule the access rights, actions of how the plugin works. To help you
better understand the plugin workflow, an overview of all statuses used within
this plugin is provided as follows.
Freelancer
Status
Pending – The Freelancer registration is under review by the admin and is pending for approval.
Approved – The Freelancer registration is either automatically or manually approved by the Admin.
Declined – The Freelancer registration is declined by the admin.
Suspended – The Freelancer profile is suspended caused by various reasons against him.
Freelancer Marketplace Plugin Freelancer List at Backend
Project
Status
Open – The project submitted has been either automatically or manually accepted by the admin, and is waiting for bids to be submitted.
Pending – The project submitted is under review by the admin and is pending for approval.
Accepted – The customer of the project already accepted a bid. There is an ongoing work for this project.
Disputed – The project is under dispute by claims from either the Freelancer or Customer.
Aborted – The assigned freelancer has either aborted the project, or his freelancer profile has been suspended.
Canceled – The project is canceled by the customer.
Completed – The project is now marked as completed, meaning the work for this project is already finished. But, the customer can freely open this project again anytime by requesting additional milestones.
Expired – No freelancer has been working on this project.
Freelancer Marketplace Project List at Backend
Customers
Active – The customer registration is either automatically or manually approved by the Admin.
Pending – The customer registration is declined by the admin.
Bids
Open – All submitted bids awaiting to be accepted by the customer.
Accepted – These are the bids that have been accepted by the customer.
Declined – These are the bids that have been declined by the customer.
Canceled – These are the bids submitted but afterward is canceled by the freelancer.
Suggested – These are bids suggested by the Customer by clicking directly on the Hire Me button from the Freelancer Public Profile.
Freelancer Marketplace Plugin Bids List at Backend
Milestones
Pending Payment – These milestones are not yet paid by the customer.
Paid – These are milestones already paid by the customer.
Requested – These are milestones requested by the freelancer.
Delivered – These milestones are already delivered by the Freelancer is now awaiting confirmation and release from the Customer.
Disputes
Open – These are the opened disputes that are not yet resolved.
Closed – These are the disputes already resolved and closed. Freelancer can now resume working on the project.
Withdrawals
Paid – These
are the paid withdrawals.
Unpaid – These
are the unpaid withdrawals.
Requested – These
are amount withdrawals requested by the Freelancer. The admin may pay this any
time of his/her convenience and afterward mark this Withdrawal as paid.
4.2 Shortcodes
Shortcodes are used to create functional pages. This plugin
comes with the following shortcodes:
[ps_fm_freelancers] – This creates the Freelancer List on your page.
[ps_fm_freelancer_dashboard] – This creates the Freelancer Dashboard on your page.
[ps_fm_customer_dashboard] – This creates the Customer Dashboard on your page.
[ps_fm_add_project] – This creates the Project Submission Form on your page.
[ps_fm_projects] – This creates the Public List of Projects on your page.
[ps_fm_login_form] – This creates the Login Form on your page.
[ps_fm_reset_password] – This creates the Reset Password Form on your page.
[ps_fm_lost_password] – This creates the Lost Password Form on you page.
To set the pages intended to be used with these shortcodes, simply go to Freelance Marketplace > Settings > Forms/Pages.
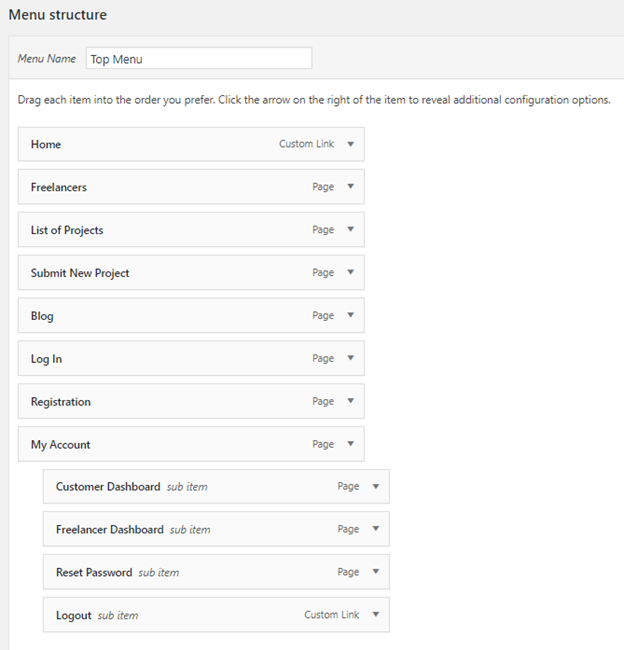
4.3 Navigation & Menus
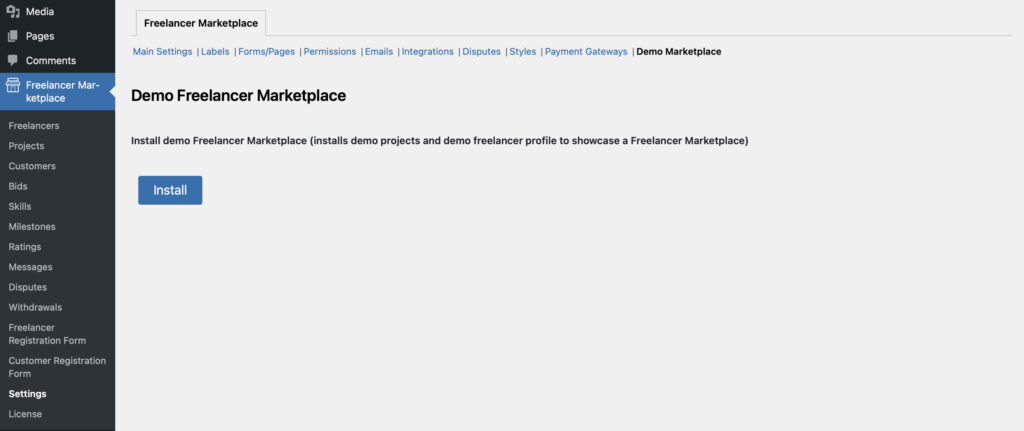
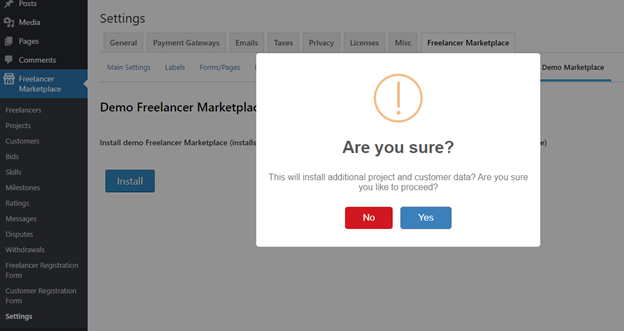
Our plugin has several Navigation Menus that are automatically added when you try to install the Demo Data. They are:
In order to add a navigation menu on your EDD website, an excellent and flexible plugin we have been using is the Nav Menu Roles. This plugin lets you hide custom menu items based on user roles – which is a must-have for this Freelancer Plugin.
If you want this Navigation
Structure changed, you can go directly at Appearance > Menus.
4.4 Emails
The idea of this plugin is to initiate and facilitate the execution of freelancer project work. Therefore, disciplined follow-up is very important and therefore this plugin triggers a variety of emails which ware described in the Settings.
4.4.1 Email Processors
In order to avoid slowing down your website, it’s important
to install an efficient email service together with this plugin. There are
basically 3 options what to do:
WP Mail SMTP – This plugin fixes your email deliverability by reconfiguring WordPress to use a proper SMTP provider when sending emails. The goal is to make email deliverability easy and reliable
Mailgun – Mailgun is the email automation engine trusted by over 10,000 website and application developers for sending, receiving and tracking emails. It has a free account that lets you send up to 200 emails per day, which is great for testing.
Sendgrid – Their cloud-based email infrastructure relieves businesses of the cost and complexity of maintaining custom email systems.
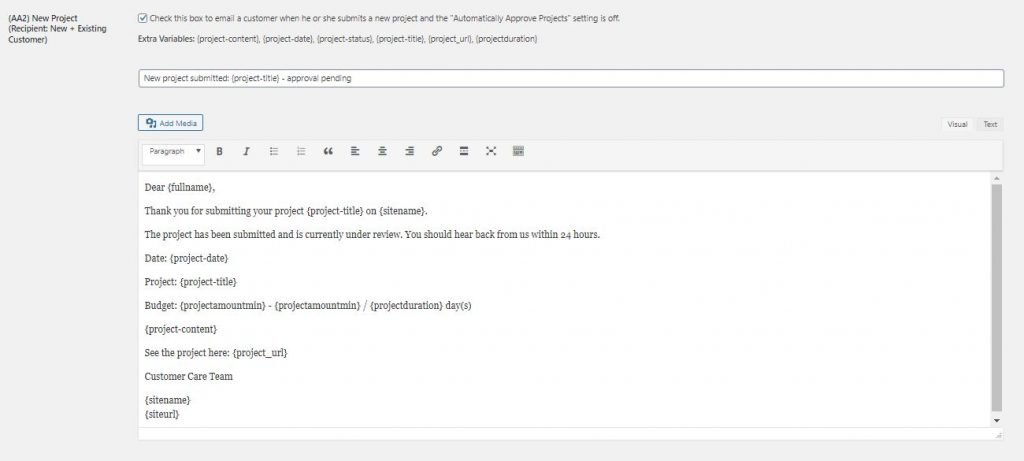
4.4.2 Email Templates
A great future of this plugin is that you are able to customize tons of automated emails to be sent for every process done. Web admins can customize and edit a lot of automated emails as you like to be sent to every party, including the admins, whenever a certain action or process is made.
Freelancer Marketplace Plugin Emails BackendSample of an Email Template Settings
4.5 Skills
Skills simply means the expertise and abilities a user has. So,
where and how can we add skills?
Freelancer Registration: During the Freelancer Registration, he/she can immediately add the skills he/she possess that could be later on relevant and helpful to the customers trying to hire him/her for a project. If the freelancer wanted to add more skills after registration, he/she can simply visit his/her Profile and edit it there.
Project Submission: During Project Submission, the customer also has the option to specify what skills are needed to work or accomplish his project well.
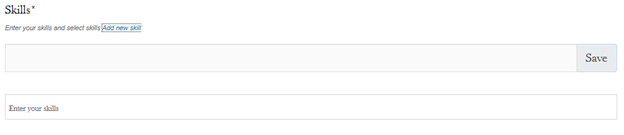
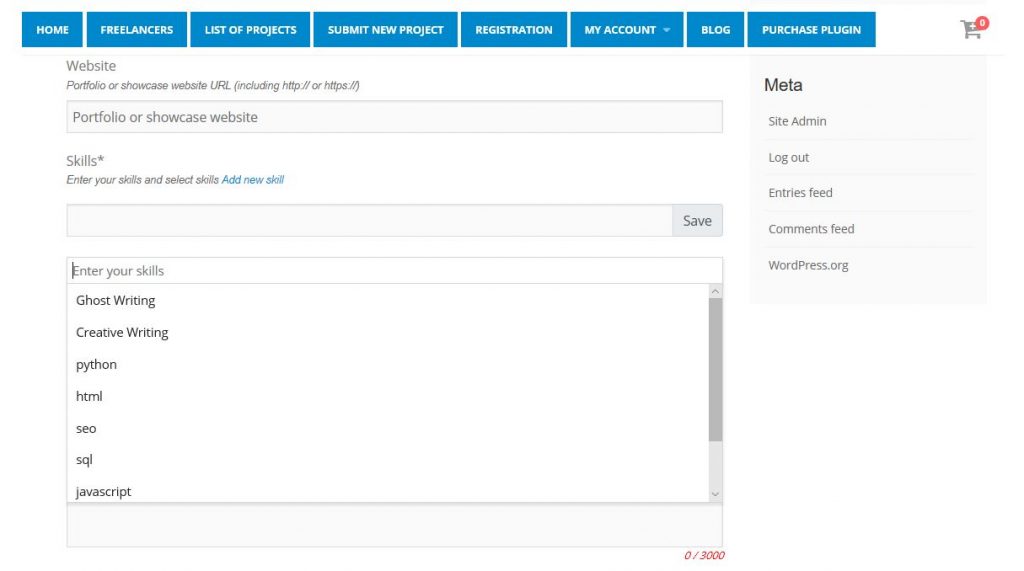
Take note that by adding skills, simply click on the box field where a dropdown menu will appear listing predefined skills that the users can just choose on.
These skills are added by the Site Admins by going to Freelancer Marketplace > Skills> Add new Skill.
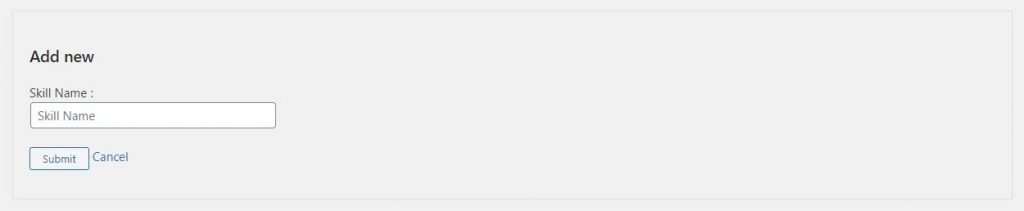
Another option: If his desired skills are not on the list, New Skills can also be added by clicking on Add new skill link, enter Skill Name and click on Save.
Also, you can opt to choose whether to let users add new skills (to benefit from their ideas) or to only permit the admin to add skills. You can change this setting by going to Freelancer Marketplace > Permissions > New Skills.
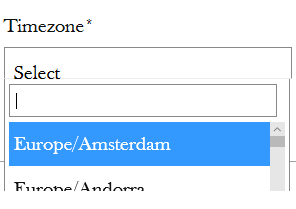
4.6 Time Zones
During user registrations, both Freelancers and Customers
can be able to specify their local time zones. The purpose is to let other
users know the time at the user’s certain location. This way, other users can
have an idea of the best time to contact that user.
To add Timezone, you can see the box field down below the Registration Form. Click on it and a drop down menu will appear. Use the search box and enter your local time to quickly locate it. This can be seen on your Public Profile View.
4.7 User Registration Forms and Profile Page
A very important step for every visitor to be able to enter
your platform is through the Registration Process. Users can register either
Roles (Customer, Freelancer, or even both) by simply filling in the
registration form fields and get your profile approved and activated.
Default Registration Form Fields for both users are already
set on this plugin, but the site admins can still change/add form fields they
prefer by going to Freelancer
Marketplace > Freelancer Registration Form and Customer Registration Form.
After a user had successfully entered and registered, the user profile can still be edited/changed by going to Freelancer/Customer Dashboard > My Profile. If then a user wanted to see how his/her Public Profile looks like, simply click on the View Profile button. It will redirect to a page that is visible to the Public Visitors.
Freelancer Marketplace Plugin Freelancer RegistrationFreelancer Marketplace Plugin Customer Registration Form
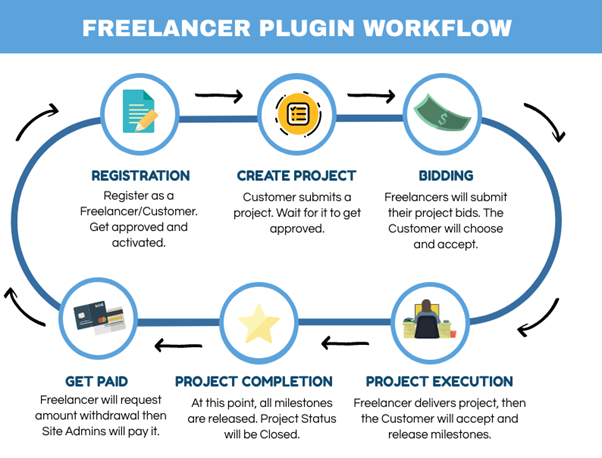
Below explains the overall workflow using this Freelancer Marketplace Plugin – from user registration up to completing, paying and rating vendors. This is to help you get a clearer view of how this plugin operates and work.
3.1 Registration
Now, to start discussing the overall workflow, first thing on the list is the User Registration. Parties can register with either roles: (1) Freelancer and (2) Customer.
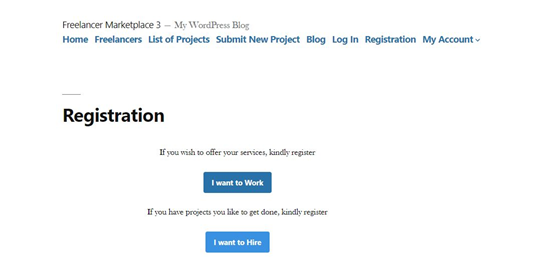
3.1.1 Freelancer Registration
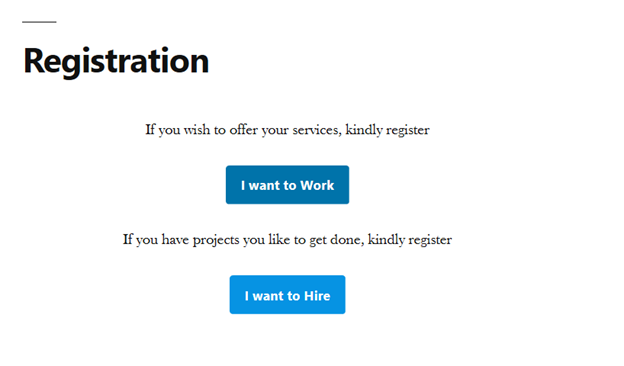
To register as a Freelancer, simply go to Login > Registration.
There you will see “If you wish to offer your services,
kindly register”. Below, click on button I
want to Work. It will then take you to the Freelancer Registration Form.
The important details you must enter in order to proceed with the registration
are:
First and Last Name, User Email, Username, Password, Bio, PayPal Email and Phone Number.
After registering, your Freelancer Profile can either be Auto Approved or Manually Approved by the Site Admins. This depends on the settings which you can change at Freelancer Marketplace > Setting > Permissions. Check/Uncheck the box “Automatically Approve Freelancers?” to configure this.
Once approved, the Freelancer will now be added on the Public Freelancer List on your website so that interested customers can look upon his/her profile. Required information at registration is ruled via the Freelancer Registration Form.
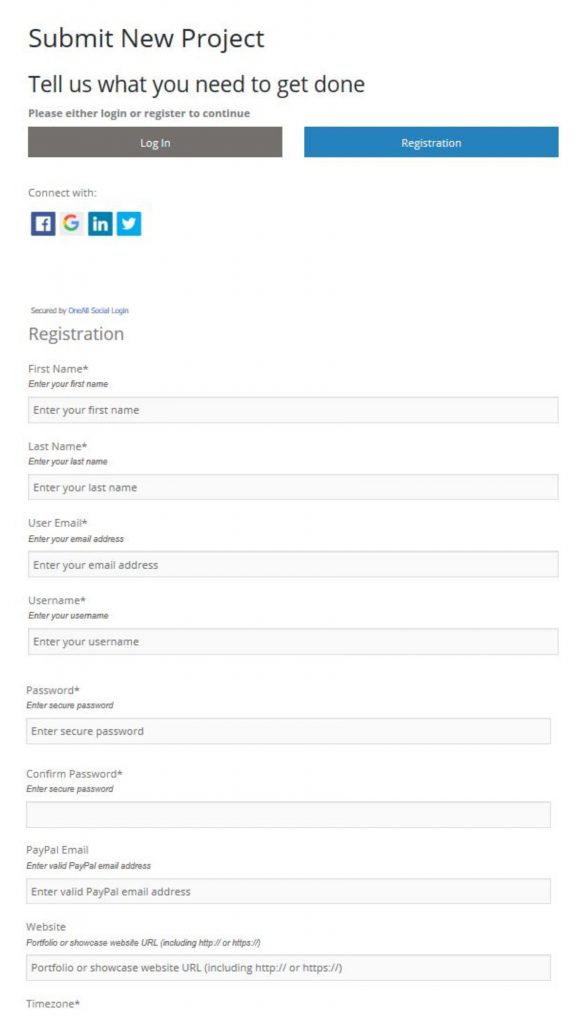
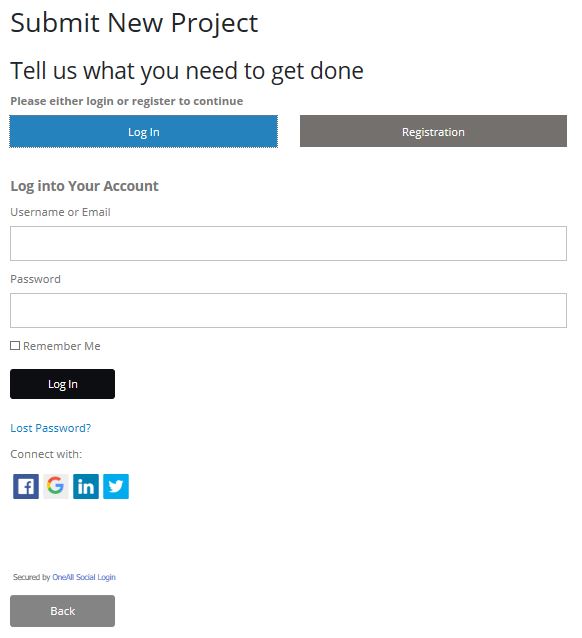
3.1.2 Customer Registration
Registration as a customer happens when you submit a new project as this process allows a better onboarding experience. You will need first need to fill out the details of your new project you like to list and once finished you will have the option to either login or register as a new customer.
Required information at registration is ruled via the Customer Registration Form.
Application is
pending for approval: After completing and submitting both user
registration forms, it will take you to the screen which shows that your
registration is pending for approval (If automatically approving freelancers
and customers is disabled in the settings). Once approved, you will be notified
in your email inbox to get started with checking and submitting projects.
Activating Account: It will also ask you to activate your account first. Go to your email inbox, find the message received and click on the link provided to activate your account.
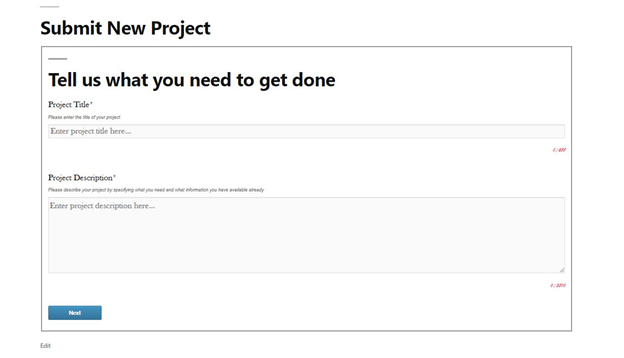
3.2 Submitting Projects
Submitting
Projects
Even before registering as a customer, you can get started
with submitting a project by going to Submit
New Project tab. It will redirect to the Project Submission Form which will
require you to enter:
Project
Title – This will be the title of your Project.
Project
Description – Explain
what your project is all about, what needs to be done, how it will be done, and
any other explanations that will give light to the freelancers what you require
to do.
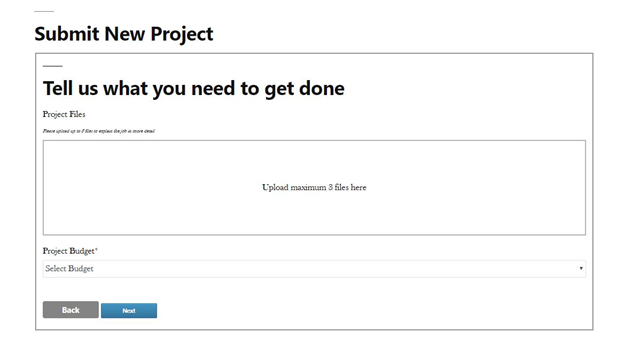
Project
Files – You are able to upload attachments necessary for this project.
Project
Budget – The drop down menu shows option from Small to Big Projects, with
corresponding and ranging amounts (set by the admins). You can choose which
range your new project belongs too. But, you can also enter a customize budget
yourself.
Estimated
Project Duration – This is the estimated duration of your project
completion in days.
Skills
Required – To easily get freelancer’s attention to take interest to your
project, it is better to specify the skills necessary to complete it. If you
click on the field, a drop down menu containing suggested skills will appear,
but you can also add your own skills by clicking on Add New.
After entering all project details, click on the Submit button. If you are not yet logged in or registered, it will redirect you to enter your login details, or to register as a customer.
Customer Registration Form right after submitting a project
But, if you are already logged in, it will redirect you to your Customer Dashboard > My Projects tab.
Accepting
Projects by the Admin
Submitted projects can either be Automatically Approved or Manually Approved by the Site Admins. This depends on the Settings which you can see at the backend settings, Freelancer Marketplace > Settings > Permissions, where the admin can opt to turn “Automatically Approve Projects?” on or off.
If enabled, submitted projects are automatically approved
without the admin approval. But if disabled, the admins will be notified that a
project has been submitted and will be ask to either approve/decline it.
Project is Accepted: If
your project is approved by the admin, you will receive an email saying that
your project is now live and freelancers can now view and submit bids on it. This
means that accepted projects will automatically appear on the Public List of
Projects at “Available Freelance Projects” page where Freelancer can view the
details and submit their bids.
Project is
Declined: If your project is declined by the admin, you will
also receive an email saying that your project requires some other
modifications before it can be approved.
Updating
Projects
After successfully submitting a project, the Customer can still make amendments and changes to the project details and information as long as the project status is Open. This is only possible if the Admins allow projects edits or not. This settings can be changed by going to Freelancer Marketplace > Settings > Permissions > On/Off “Allow Customers to Edit Projects?”.
Updates made to the project are also either Automatically Approved or Manually Approved by the Site Admins. You can change this by going to Freelancer Marketplace > Settings > Permissions >On/Off “Automatically Approve Customer Edits?”. White waiting for project edits to get approved, the Project Status will become Pending until approved.
After the Project becomes accepted, no further changes can be made to the Project Details. Customers can simply discuss further project changes and additional information directly to the Freelancer in charged.
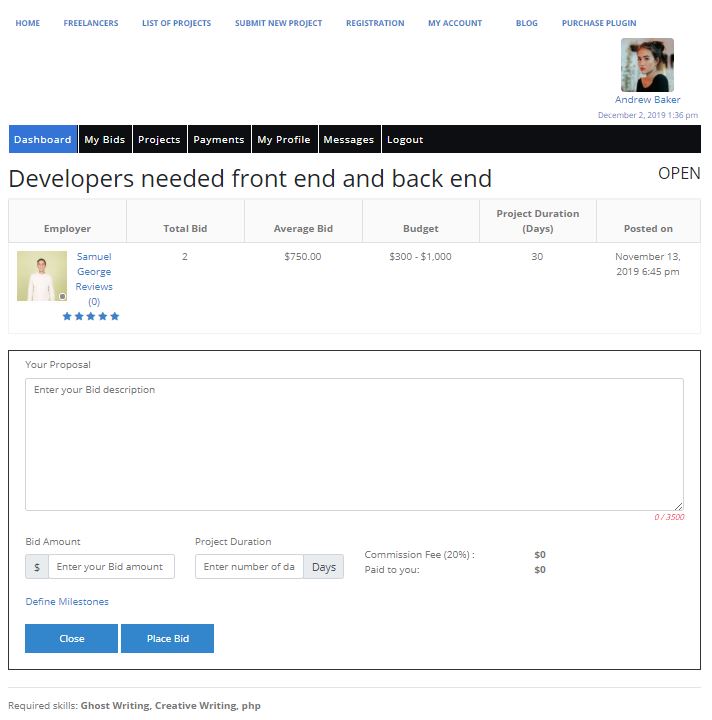
3.3 Submitting Bids
Submitting
Bids
After your Freelancer profile is approved and activated, you
can now visit available projects by going to the Available Freelancer Projects tab. Click on it and you will see the
list of all available projects you can review and submit bids.
If you’ve found a project that you know you’ll do well,
click on the Submit Bid button then
fill up the following details:
Your Proposal
– This is also the Bid Description. Discuss why you wanted to take this
project and what can you do, also further questions you might have.
Bid
Amount – Specify here the Bid Amount you’re intending to propose. This
amount can be less, more or equal to the Project Bid set by the Customer.
Project
Duration – Estimation of the number of days you can complete this project.
Commission
Fee and the Amount paid to you – This simply shows the breakdown of the
Commission Percentage and Fee and the remaining amount to be paid to you.
Proposed
Milestones (Optional) – Upon submitting your bid, you can now also add your
proposed milestones. Just enter the description and the amount. When the
customer accepts your bid, he/she will also decide whether your proposed
milestones will be accepted or not.
When you’re done, just click on the Place Bid button.
After the bid has been successfully submitted, the Freelancer can now able to contact the Project Customer for further inquiries and questions. The Site Admins can turn this on/off by going to Freelancer Marketplace > Settings > Permissions > Freelancer needs to submit a bid to contact Customer. Also, the Customer can now contact the Freelancer by clicking on the Chat button at the Project Bid list.
Updating
Bids
After successfully submitting a Bid, the Freelancer can
still make amendments and changes to the bid details and information as long as
it is not yet accepted.
Bid Amounts
Visibility
You can also change and configure the visibility of the Bid
Amounts. Go to Freelancer Marketplace
> Settings > Permissions > Bid Amounts. There you can see a dropdown
menu to choose how you would set the visibility of the Project Bid Amounts.
Choose either Visible to All, Visible to registered users only and Visible to
customers only (Blind Bidding.)
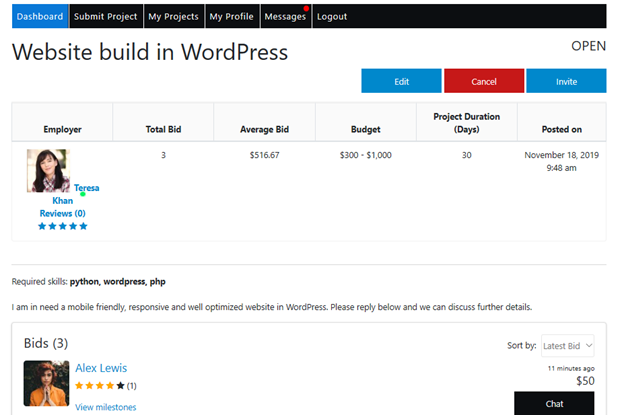
3.4 Invite Freelancers
Inviting Freelancers for a newly submitted project makes the hiring process much easier and faster. This is helpful for Customers to immediately invite or notify those Freelancers that possessed the required skills or criteria for the project.
The customer can invite freelancers by going to Project View > Invite button. Clicking on it will take you to the list of all Freelancers. Sort the list (A to Z, Z to A, Low/High Rating) depending on what you prefer, search for a freelancer name or scroll down through the list. Then, simply click on the Invite button near the Freelancer’s name. An email will be sent to the Freelancer telling that he/she is invited to participate in a project.
3.5 Hire Me
This is another feature of our plugin that would help make
the hiring process faster and easier. This is helpful for Customers who might already
have a target freelancer that he/she think would be a good fit to work on the
project. So how does this work?
The Customer can directly hire a specific Freelancer that
leads to the creation of a Private Project exclusive for them. Private Projects
won’t show up in the Public List of Available Projects. Only the Project
Customer and the Invited Freelancer have access to it, except when the Customer
decides to Invite other Freelancers to the project, like what is previously
discussed above.
Freelancer List
Visitors and Customers can visit the Freelancer List located on the Top Menu. Search for Freelancer Profiles that you specifically looking for to do your project. You can filter the list depending on the skills, sort by (Default, A to Z, Z to A, High Rating, Low Rating) or even use the Search Bar.
Freelancer Profile
You can also visit a Freelancer Profile and click on the Hire Me button. It will redirect to the New Project Form to create a Private Project. After that, users involved will be notified by email.
When the invited Freelancer visited
his/her dashboard, new Project Category “Private” will be added. Below the Private
Project Name, a note in read is written “Bid has been suggested by the
customer. You need to accept or decline to proceed”. The invited Freelancer can
edit the Bid and make some changes before accepting and submitting the Bid.
3.6 Starting a Project
To start a project, a customer needs to accept a bid and pay
the full bid amount upfront to the platform operator.
Accepting
Bids
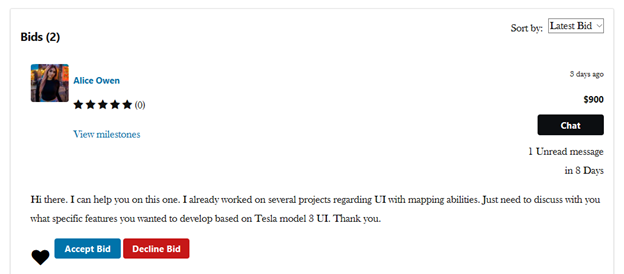
When several freelancers submit bid for a single project,
all bids can be located at the lower part of the Project Page. There it shows
the Freelancer’s name, the Bid Proposal, time lapsed from when the freelancer
submits the bid, Bid Amount and the Work Duration in days.
Every bid, the customer has three options:
Mark the Bid as favorite
Accept the Bid
Decline the Bid
Also, even before accepting the freelancer’s bid, the customer can also first have a discussion with the freelancer by clicking on the Chat button on the right side of the bid, below the Bid Amount. This way, the customer can clarify any questions from the freelancer, or ask if he/she can really do the project.
Accept Bid: When
the customer clicks on the Accept Bid button,
it will redirect to the Checkout page, where will the customer pays for the Bid
Amount, along with its milestones.
Decline Bid: When
the customer clicks on the Decline Bid button, an email will be sent to the
freelancer notifying that his/her bid is declined. But also, the customer can
click on the Undecline Bid if it
happens to be done accidentally or just because of changes in decision.
3.7 Executing a Project
3.7.1 Adding additional Milestones
During Bid Submission, the Freelancer may directly add and propose Project Milestones. Remember, the total amount of the Proposed Milestones should not be the same with Bid Amount. Also take note that if there are no milestones given during bid submission, a Default Milestone will automatically be created having the total amount of the Bid.
After the bid has been accepted, Freelancer and Customer
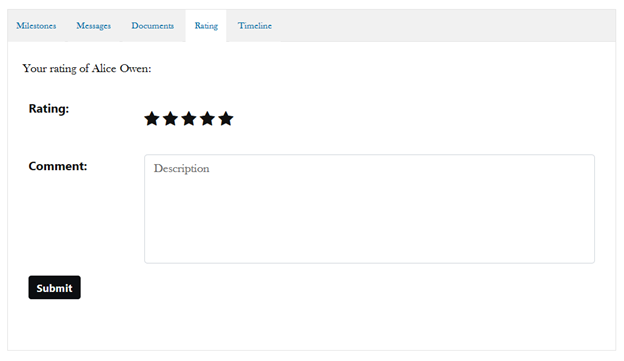
have the capacity to add more milestones on the project. The main idea is to
make it easy for both parties to extend and amend the project simply by
agreeing on additional milestones. These can be added anytime.
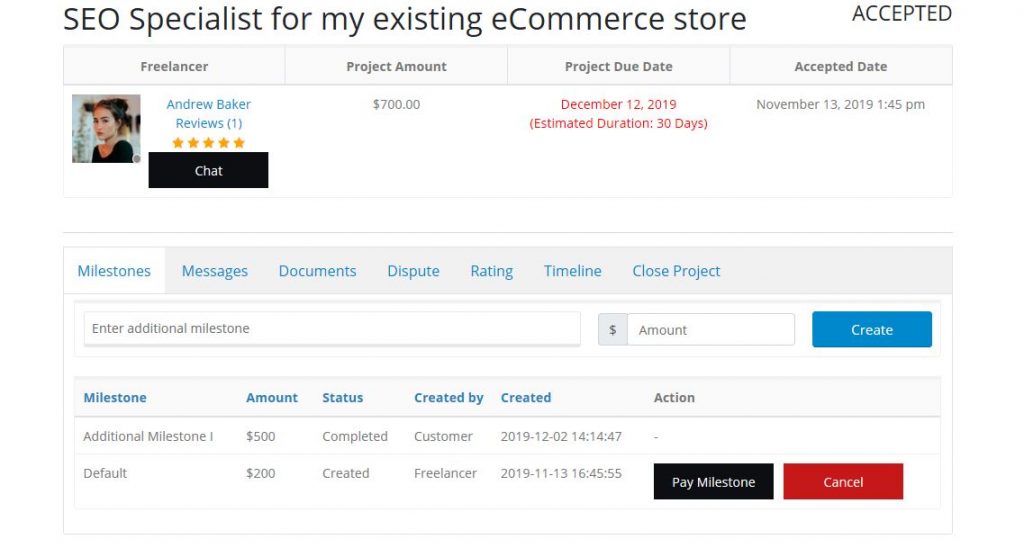
To add milestones in an accepted project, go to View Project > Milestones tab.
If the freelancer requests milestone, the status would be
Pending Payment. This means that the customer needs to pay this milestone first
as a form of acceptance. If the customer creates milestone, he/she must pay
afterward to confirm it.
3.7.2 Completion of Milestones
After the Milestone has been paid, status will change to “Paid”. The Freelancer can now submit the work required to the Customer then after push Delivered button on the left of the Milestone. This would change the milestone status to Delivered.
Upon checking the delivered work, the Customer must react within a given timeframe which could be set by going to Freelance Marketplace > Settings > Main Settings > Automatic Project Delivery (Days). Here, the site admin can set how many days the Customer has before the project/milestone will be automatically accepted by him.
Now the customer can check if the required work is met and if yes, he/she can now push Release button to accept and if not, push the Reject button instead. When a milestone has been rejected, the freelancer can simply redeliver the required work.
Every time a milestone has been released, it triggers payment to the Freelancers account which increases the Available Amount he/she can request to withdraw in the future. This amount can be seen at Freelancer Dashboard > Payments.
3.7.3 Opening Disputes
Conflicts and Misunderstandings may arise between customer
and freelancer of a project. These negative issues might cause serious problems
on the ongoing project. Thus, a Dispute Process has been made in order to
easily report any misunderstandings, and therefore take action for it. The idea
for this is that both parties have an opportunity to bring forward their
arguments and that the platform operator will need to serve as the judge
between the parties.
Either parties can open a dispute. How? Simply go to View Project, and click on the Dispute Tab. Push the button Open Dispute and fill-out the fields. Click again on the Open Dispute, and you’re done!
Freelancer Marketplace Plugin Opening a Dispute
Note: The site admins can add predefined Dispute
Reasons on the backend settings which will be discussed later on.
In order to settle the Dispute, both parties, including the
site admin/operator, must come and agree to a fair decision that will help end
the argument. After that, and if they are ready to resume working accordingly
with the project again, the party who submitted the Dispute can simply go to Project View > Dispute > Close
Dispute.
3.7.4 Messaging System
This is one good feature of our plugin which help maintain
smooth communication between customers and freelancers.
a) Upon bid submission, customers will immediately have the
capacity to send that freelancer a message. It enables the customer to:
Ask some questions to the freelancer
Clarify any misunderstandings with the Project
Instruction
Provide further information
Know if the freelancer is actually qualified
Answer freelancer’s question and many others
When the freelancer is online, he/she will receive a popup
notification located on upper right corner of the page, which says a new
message has been received. Also, even if the freelancer is either online or
offline, he/she will receive an email about a new message received.
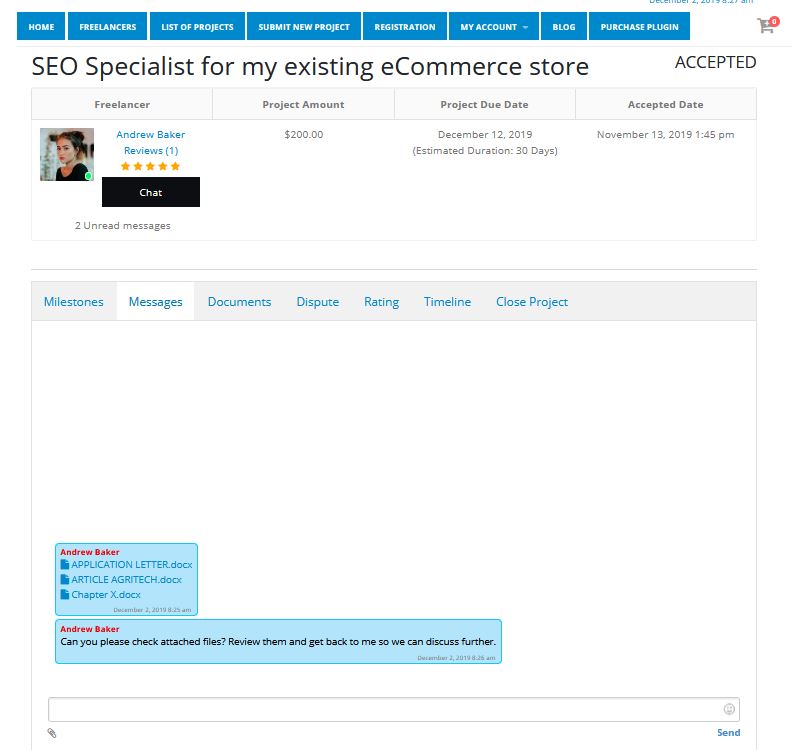
b) When the bid is accepted, tabs will appear on the View Project including Messages tab. Both users can communicate there and even make attachments.
c) Messages can also be accessed on the users Dashboard >
Messages. On the left of the screen, it shows all conversations the users had,
on the middle, the message view when opened, and at the right of the screen, it
shows the following:
Name of the user you’re talking to in the
current opened message
Number of reviews this user has
User Skills
User Time zone
User Bio
Right here, you can also see if the user is currently online or offline. Green dot on the user’s profile image means online, and gray dot if offline.
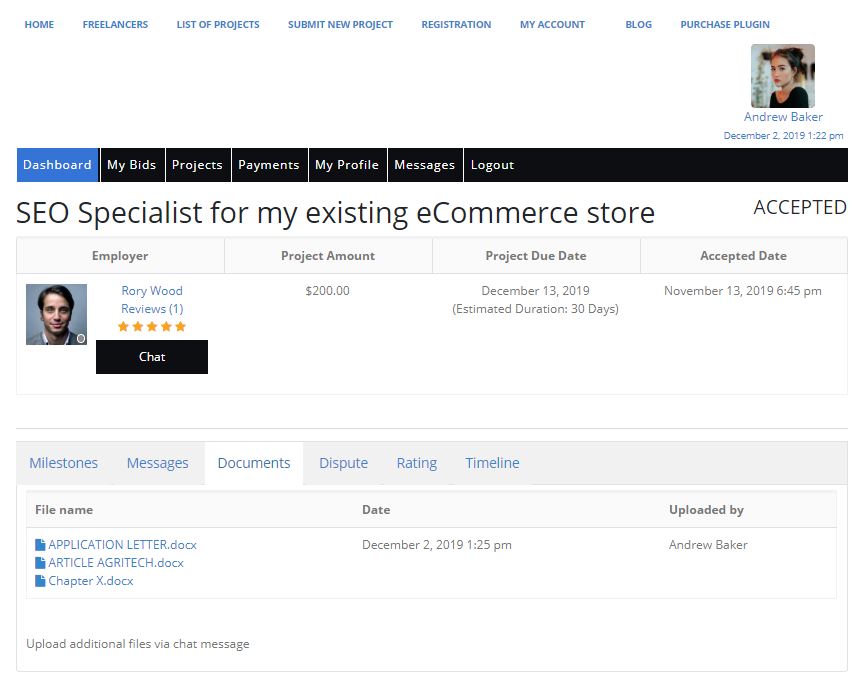
3.7.5 Documentation and Files
When the project was first created by the Customer, he has the option to upload necessary document and files that could be relevant for the project. Take note that the number of files the customer can upload during project submission are set by the site admins at Freelancer Marketplace > Settings > Main Settings > File upload limit.
Once the project has been accepted, these documents will be stored and can be seen on View Project > Documents tab. In this tab, you can see details like the Project File Name, Date and Uploaded By.
Freelancer Marketplace Plugin Project Documents List View
During Project Execution, the Customer and Freelancer can add more documents and files by uploading through the Chat Message. The site admins can also set the Maximum Upload File Size a user can upload by going to Freelancer Marketplace > Settings > Main Settings > Maximum file size.
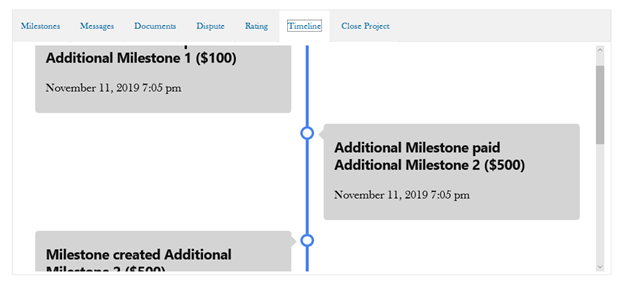
3.7.6 Timeline
The Timeline tab shows the user a visual representation of everything that is happening in the project. It shows updates on every action a party has done such as milestone creation, payment, delivery, accept, reject, rating submitted, dispute opened/closed and any other actions related to the project.
In this tab, you can see the title of the action done, and
the date and time it was executed. This way, the users can have a quick glance
with what happened in a span of time.
3.8 Paying Freelancers
Now, your question might be how would the freelancers get
paid?
When a Customer accepted a Project Bid, the Site Admin will
temporarily safe keep that amount he/she paid during Checkout. The amount do
not directly and automatically transfer to the winning Freelancer’s account. This
is to make sure that the Freelancer will keep his/her promise by working on the
project first before getting paid.
Now during Project Execution, when a Customer releases a
certain milestone, the corresponding amount will be automatically credited to
the Freelancer’s Available Amount. This means that the Customer must release Project
Milestones in order for the Freelancers to get paid.
Anytime, Freelancers can visit and check their Available
Balance by going to Freelancer Dashboard
> Payments. In this tab,
you can see the following:
Available Amount: This amount is the current total balance of your unpaid earnings.
Request Withdrawal button: Clicking here will send an email to the site admins and requests that you wish to get paid of the available amount you have.
Withdrawals: This now shows that you have submitted your withdrawal request. It also include the amount requested and the withdrawal status.
Account Balance: This shows a list of all transactions showing the credit and debit activity on your balance.
If the Freelancer
now wishes to get paid, he/she can simply click on Request Withdrawal button, which will trigger an email to be
sent to site admins that he/she wishes to get paid. The site admins will now
proceed on paying by depositing the amount through PayPal. After that, the site
admins can now mark this payment request as paid in the Admin Settings, by
which the Freelancer will be notified once again.
3.9 Closing a Project
When all milestones are paid, delivered and accepted and disputes are all settled, now it may be the time to close the project. This means that all work is done and completed. It is very easy to close a project by going to View Project > Close Project Tab. A popup will appear to confirm whether you are sure or not in closing the project.
3.10 Rating a User
Rating a user after project completion is very important
because it gives an idea to subsequent possible project partners of this user
of how is it working with them, or any positive and negative experience or
feedback towards them.
Rating a user is possible at any time in principle, for
example, when the Project has just been accepted, during project execution and
especially when the project is closed.
When a project has already been marked as completed, both users will be redirected to the Rating tab on Project View. Here, they can highlight how many stars to give the user they worked with (Lowest 1, Highest 5) and they may add a comment regarding overall experience with the project and towards the user.
Star ratings will appear on every Detailed Profile View of both the customers and freelancers, and mostly near their Profile Image so other users can easily see and check their ratings.
Freelancer Marketplace Plugin List of Project at Frontend view
This documentation covers the setup and installation of the Freelancer Marketplace Plugin. From configuring the Main Settings, introducing the Additional Tabs on your Website’s Backend, and the Complete Workflow using our Freelancer Marketplace Plugin. Once you acquire a copy of this plugin, just follow the steps below on how to install and set up for it to work properly on your web store.
2.1 Purpose
The Freelancer Marketplace Plugin will help you build a freelancer marketplace using WordPress and by benefiting from either WooCommerce or Easy Digital Downloads eco-system.
Our plugin offers a comprehensive collection of settings and configurations to give you much control over your own freelancer marketplace. This doesn’t only allow you to build a platform for customers and freelancers, but you can also sell digital products at the same time by using all the other functionalities of WooCommerce or Easy Digital Downloads. This ultimate freelancer marketplace solution can offer a valuable starting point in creating your own freelancer marketplace for WordPress websites.
2.2 Requirements
Here are some things you needed to check first on your
website before having this plugin installed. This is to ensure that our plugin
will work properly.
WordPress Version – You need to install this plugin in a Website where WordPress is installed. This plugin has been tested for WordPress versions 5.1 – 5.3
WooCommerce or Easy Digital Downloads (EDD) – For this plugin to work, either WooCommerce or Easy Digital Downloads needs to be installed. Freelancer Marketplace Plugin should work with all versions of both plugins, especially EDD Version 3 and WooCommerce Version 7.
External email service – Since there are lots of emails to be sent out for processing the workflows, you will need to install an external email service such as Mailgun, SendGrid or any other SMTP service on your website to outsource the creation and sending of the email and reduce the peak processing powers of your website.
2.3 Installation
These
are the required steps to install this plugin:
Go to your WordPress Dashboard. Select Menu Plugins on the left and Add New.
Select Upload Plugin.
Select the Browse Button to install the zip file with the plugin.
Activate the plugin if needed.
2.4 Demo Freelancer Marketplace Site
Whenever you need a demo site to study this plugin in more detail, simply go to the settings menu, use the Demo Install function of this plugin to quickly create a demo site.
After having the Freelancer Plugin installed, we have
prepared sample files in the plugin called a Demo Data which you can install to see how your Freelancer
Marketplace looks like during operation. This demo data will install:
Samples Freelancer and Customer Profiles
Sample Projects
Sample Bids submitted on the projects
Sample Messages among the test users
Default Skills
Default Email Templates
You can install this Demo Data by going on Freelancer Marketplace > Settings > Demo Data. Simply press the Install button, wait for it to load, and you can already see a Sample Freelancer Marketplace, all up and running.