This documentation explains how to set up and use the EDD Requests Plugin. The objective of this plugin is to facilitate customers engaging with vendors directly by submitting feedback and requests. This plugin can offer a great way to generate leads from customers.
Contents
1. Plugin Purpose
In your Digital Downloads Marketplace, managing numerous products and vendors often leads to customer inquiries and feedback that require prompt communication with product vendors. Unfortunately, customers frequently face challenges reaching vendors swiftly, whether on the product page or the author’s page.
To address this, you require a plugin that not only systematically collects leads and enhances service offerings but also saves your customers’ time by placing a direct contact button on Product, Author, and Purchase Receipt Pages. The EDD Requests Plugin not only streamlines communication but also provides a wealth of customizable emails and extensive plugin options to effectively address and manage customer feedback and requests.
2. Scope of the Plugin
Save time and streamline your customer interactions with the EDD Requests Plugin, a valuable tool for collecting leads and enhancing service offerings alongside your products. This plugin features a convenient Contact Button on Product, Author, and Purchase Receipt Pages, simplifying communication with vendors. The Vendor Requests Dashboard facilitates efficient management, tracking, and responses to requests directly on the vendor dashboard. Customers benefit from a dedicated Requests Page to easily monitor all inquiries sent to vendors.
The plugin also ensures seamless integration with email accounts, preserving copies of customer and vendor communications on the server. Further, it incorporates Social Login and Registration Integrations, Requests Internal Notes for admin management, and offers customizable, extensive Email Templates to enhance customer feedback and request processes.
3. Installation of EDD Requests Plugin
Install the EDD Requests Plugin in your Easy Digital Downloads website. You can simply upload the plugin via File upload or via FTP into the plugin folder.

Enter the Plugin License by going to the Downloads -> Settings -> Licenses. Add here the License Key of your EDD Requests Plugin.

4. Plugin Settings
Next is to configure the plugin settings. To do this, go to Downloads > Settings > Extensions > Requests.
Before we proceed to each individual settings, let’s have a look at the first part of the page.

Plugin Widget: Clicking on the first hyperlinked text will allow you to place the EDD Requests Widget on your download sidebar.
Plugin Shortcode: In order to add the request button on author profile pages, you need to place this shortcode on the page: [ edd_requests_vendor_contact_button ]
Customize your Emails: This plugin uses several email templates that will be sent to both the Customer and Vendor. If you want to customize these email templates, click on the second hyperlinked text.
List of Customer’s Requests: The site admins can also have a look at a full list of all customer requests received by the vendors, along with the important details for each. Click on the third hyperlinked text and it will take you to the corresponding page.
4.1 Case Types
With this plugin, you can set up to two different case types your customers can choose from. Here you can change the following:
- Change the Label Texts for Case 1 and 2
- Select which case to set as the Default Case Option
- Hide/Show the second case type
- Enable budget field for case 1 or 2, or even both

4.2 Request Form Settings
Here are the settings related to the Request Form:

- Widget: The EDD Requests to Vendors Widget can be placed in any sidebar. It will add a button to submit the request to the author of the download. It can be found in the Widgets Menu.
- Budget Label Text: Change the Budget Field Label Text here. Default is “Budget ($)”.
- Email Field: Choose whether to Show/Hide the Email field in Vendor Request Page and Reply Form.
- Form Title: Change the Request Form Title Text here. The default is “Vendor Contact Form”.
- Button Label: Change the Button Label Text here. The default is “Contact Me”.

In this section, you can set the button and background colors for each:
- Button Color
- Login/Register Tab Background Color
- Login/Register Active Tab Background Color
- Login/Register Tab Text Color
- Login/Register Active Tab Text Color
- Table Background Color

- Maximum Description Length: Define the maximum number of characters for the Description field.
- Minimum Description Length: Define the minimum number of characters for the Description field.
- Terms of Use Page: Select the Terms of Use Page to be used.
- Privacy Policy Page: Select the Privacy Policy Page to be used.
4.3 Vendor Page Settings
Here are the settings related to the Vendor Page:

- Enable Requests for new registrations? – Enable/Disable requests for new registrations
- Requests per page: Define the number of requests to show per page on Vendor Page.
- Show on Vendor Page: Check the box to display the button on the author page.
- Vendor reply popup title: Change the Vendor reply popup title. The default is “Customer Reply Form.”
- Thank You Text For Customer: Change the Thank You Text For Customer. Default is “Thank you for submitting your request. It has been sent to the Vendor and you will hear back from him shortly.”
- Thank You Text After Vendor Reply: Change the Thank You Text After Vendor Reply. Default is “Thank you for submitting your reply. It has been sent to the Customer and you will hear back from him shortly.”
4.4 File Upload and Misc Settings
Here are the settings related to the File Upload and Miscellaneous:

- File Upload Size: Enter a number here to define the file upload size limit in MB.
- File Upload Limit: Enter a number here to define the file upload limit a user can upload.
- Enter File Extensions: Enter here all file extensions that you allow to be submitted.
- Disable Bootstrap: Check this box to disable the included Bootstrap stylesheet and JavaScript scripts for the EDD Requests pages. Useful if your theme uses its own Bootstrap stylesheets.
4.5 Email Account Integration
This functionality revolutionizes communication between vendors and customers. By enabling this Email Integration, every message copy is stored on the server, making it accessible on the My Request Pages for both Customers and Vendors whenever they log in.
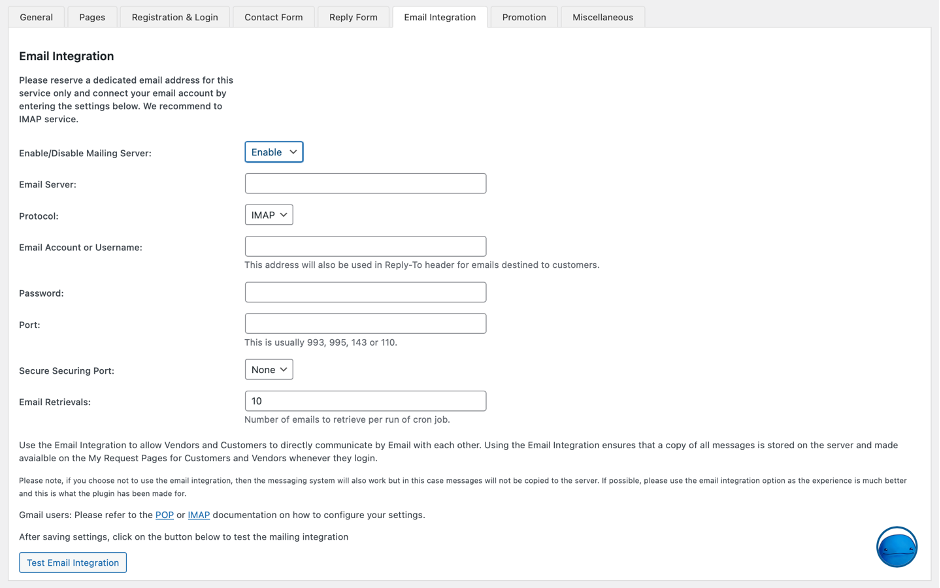
Take note, that if you opt not to utilize the email integration, the messaging system will still function; however, in this scenario, messages won’t be duplicated to the server. For a superior experience aligned with the plugin’s intended purpose, we recommend using the email integration option whenever possible.
5. Email Templates
Now, let’s introduce you to the available Email Templates we can customize. To do this, go to Downloads > Settings > Emails > Requests.
Email Template 1 – Email confirmation to Customer
This email template will be sent to the customer in confirmation that the request he/she submitted has been successfully delivered.

Email Template 2 – Request to Author
This email template will be sent to the Vendor upon successfully receiving the request submitted by the Customer.

Email Template 3 – Vendor replies to Customer
This email template will be sent to the Customer once the Vendor make a reply to the request submitted.

Email Template 4 – Email with Reply Confirmation to Vendor
This email template will be sent to the Vendor once the reply on the submitted request made by him/her is successfully sent to the Customer.

Email Template 5 – Email with Registration Details to Customer
This email template will be sent to the Customer upon registration directly on the plugin’s popup form. This contains the customer username/email, password, name and the activation link to activate his/her account.

You can see the above Default Email Subjects and Email Text Contents which you can customize whenever you want.
Email Template Tags
Also, you can use the following email tags to help you perfectly customize it.
- {sitename} – Site Name
- {siteurl} – Site URL
- {loginlink} – Login Link
- {customer_name} – Customer Name
- {customer_email} – Customer Email
- {customer_password} – Customer Password
- {vendor_name} – Vendor Name
- {vendor_email} – Vendor Email
- {case_type} – Type of Request
- {budget} – Indicative Budget (Only if first case type is selected)
- {request_date} – Date of the Request
- {request_id} – Request ID
- {page_url} – URL of the page on which the request was submitted
- {request_description} – Description of the Request
- {reply_description} – Description of the Reply
- {activation_link} – Account Activation Link
6. EDD Request Widget
A great feature of this plugin is that you can add this either on any of your chosen page as a Widget. To do this, go to Appearance > Widgets > select EDD Requests to Vendors.
After adding the Request Widget on your Download Sidebar, basically it will appear to all of your Download Page Sidebars.

It allows for a quick and easy way of communications whenever customers have some inquiries, questions or support issues needed to be forwarded to the product vendor.
7. EDD Requests Popup Form
Let’s now discuss the three main popup forms that you can see by using this plugin.
7.1 Login and Registration Popup Form
Here’s the Registration Form Popup before you are able to contact the product vendor. Register with your Email, First and Last Name, or with your Social Login Account. Do not forget to Agree with the Terms of Use and Privacy Policy to complete the registration.

Here’s the Login Form Popup before you are able to contact the product vendor. Login using your Username/email and Password, or with your Social Login previously used to register an account.

Also, you can see the third checkbox which says “Receive regular updates on new model templates”. Upon ticking this box, customers will be opt in to receive email updates via Mailchimp. Take note that we have tested the EDD Requests Plugin and integrated it with the EDD Mailchimp Plugin to make this email workflow process happen.
Take note: In order to facilitate the registration and login as quick and simple as possible, we have tested the EDD Requests Plugin and integrated it with the EDD Social Login plugin. Now, you can use your Social Accounts on this plugin to register/login.
7.2 Vendor Contact Form
After logging in, customers can now fill-in the required fields to submit the request. Such as:
- Choosing the Case Type
- Request Description
- Budget (Only if the First Type is selected)
- Screenshots/Documents to be uploaded
Vendor Contact Form on Author Page – The plugin’s Contact Vendor button can also be added right on the Author/Vendor Page. This is to give a quick and easy way for customers to contact the product vendors on the Author Page itself.

Vendor Contact Form on Product Page – Here’s the Login Form Popup before you are able to contact the product vendor. Login using your Username/email and Password, or with your Social Login previously used to register an account.

8. List of Requests
8.1 Vendor View
Customer Requests at Vendor Dashboard
A great feature of this plugin is not only we give solution for customers to easily contact the vendors, but also for vendors to manage tons of customer’s request systematically and efficiently.
Below you can see the Vendor Dashboard containing a new tab “Customer Requests.”

This list displays all customer requests received in two categories, Request Assistance and Report an Issue/Bug. You can filter this list by clicking any of the filter tabs above.
In the upper right corner, you can also see a quick statistics of all requests received. These statistics give the total number of Request Assistance, Report an Issue/Bug and Reply’s sent.
On the list, you can see important details for each request such as:
- Requests ID
- Customer Name
- Customer Email
- Customer Profile Page
- Date Submitted
- Case Type
- Page URL
- Description
- Budget
- Attachments – the vendors can easily download all attachments here
- Reply Status – here the vendor can directly make a reply to the request. Once replied, the date will be displayed in this column.
Vendor reply form
Clicking on the Reply button will take you to the Customer Reply Form. Here you can once again see the complete details of that specific request. Down below you can see the Reply Field and Attached File if needed. Click on the Submit button and you’re done.

8.2 Admin View
A full list of all Customers’ Request is given available for Site Admins to view as well. The list can be seen by going to Downloads > Customer Requests.

The site admins can simply filter the entries on the list by clicking on either A. Request Assistance, B. Report an Issue/Bug filter at the top, or use the Filter Box and apply criteria needed to easily find an entry you’re looking for.
The Customer Requests List shows you requests details such as:
- Requests ID
- Customer Name
- Request Date
- Vendor Name
- Case Type
- Budget
- Attachments
- Page URL
- Description
9. Vendor Profile Requests Tab
Now, on the Vendor Profile > Requests Tab, the vendors can specify select products or services they want to quickly offer to customers. These offers will be displayed on the Vendor Contact Popup Form.
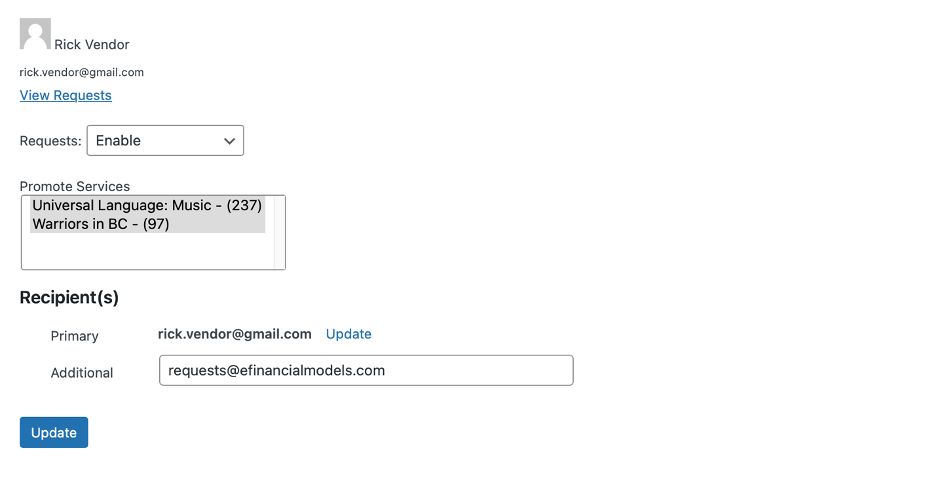
Another feature is the additional second email recipient available for vendors. Now, they can designate an additional email address to receive critical notifications and updates regarding customer inquiries or requests.
While the option for multiple email recipients enhances communication reach, it’s an optional feature rather than a core necessity, offering convenience but not essential functionality for effective request management within the system.
10. Frequently Asked Questions
Can you change the Button Colors?
Button color can be customized and any color can be selected. Other colors are derived from the theme.
Will vendors have access to the customer email addresses?
You can select if vendors will see / or not the email field in the settings.
Can I also upload other file types than listed in the settings?
We can add additional file types to be allowed to upload. Contact us and we are happy to update the plugin.
What if I only need one category of requests?
Please check the options above as you can hide / show the second category of requests as you like. You can also ask for expected budgets or not. The plugin gives you full control how to collect customer requests and allows you to fine-tune and test a new approach as you go.
Can sign-ups be added to Mailchimp?
Yes, you can! The EDD requests plugin is fully integrated with EDD Mailchimp Plugin and allows you to sign-up the customers directly on your mailing list with Mailchimp.
Do I need FES plugin installed to make this plugin work?
No, this plugin can also work for a single vendor store without Frontend Submissions (FES) plugin installed. However, the plugin was designed to make it easily to contact vendors directly. Therefore, with FES the plugin can reach its full potential.
Which social login plugins do work with EDD Requests plugin?
The plugin works with EDD Social Login plugin. Contact us if you need to integrate another Social Login Plugin.
Where can I get support?
You can Contact Us for support or submit your ticket here.